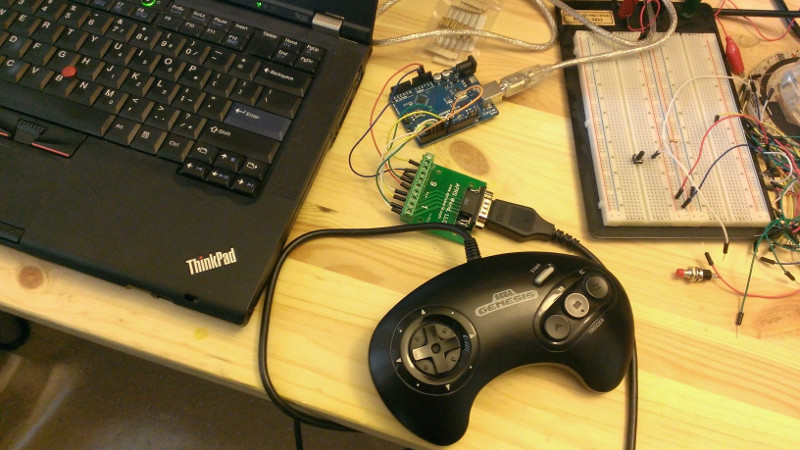
The Sega Genesis, or Mega Drive as it was known outside North America, was a popular console for the simple fact that Sega did what Nintendidn’t. Anachronistic marketing jokes aside, it brought fast scrolling 16-bit games to a home console platform and won many fans over the years. You may find yourself wanting to interface with the old controller hardware, and in that case, [Jon Thysell] is here to help.
[Jon] has done the work required to understand the Sega controller interface, and has shared his work on Github. The interface is an interesting one, and varies depending on the exact console and controller hardware used. The original Master System, with its D-pad and two buttons, simply uses six pins for the six switches on the controller. The 3-button Genesis pad gets a little more advanced, before things get further complicated with the state-machine-esque 6-button pad setup.
[Jon] helpfully breaks down the various interfaces, and makes it possible to interface them with Arduinos relatively easily. Sharing such work allows others to stand on the shoulders of giants and build their own projects. This nets us work such as [Danilo]’s wireless Genesis controller build. By combining the knowledge of the Sega protocol with a few off-the-shelf Arduinos and Bluetooth parts, it makes whipping up a wireless controller easy.
In this day and age, most console controllers can be readily interfaced with a PC with a variety of simple solutions – usually USB. You might feel like trying something harder though, for instance interfacing modern Nintendo controllers to a C64. Video after the break.


6 button pad was an absolute joke.
Now you can get very nice (better than NOS) mega drive and Saturn pads for the original hardware and USB (and wireless) for about £15 which is a god send otherwise we might end up using hacks like this I wonder if it has any input lag? I assume not.
The 6 button pad is a disaster of timing failure.
The Sega controller protocol is actually pretty interesting to look at, because it really shows that they were trying not to reinvent the wheel. The Master System 2-button controller, the Genesis 3-button and 6-button controllers, and the Saturn 6-button controllers use the same method to communicate, with minor extensions to allow the extra features they needed without breaking support for the already existing controllers. The Saturn used a different connector, but I wouldn’t be surprised if you made an adapter that the controllers would be recognized. The Saturn 3D controller is the one that breaks the mold, and only because there was no way to pack the 4-axis 8-bit analog data(One joystick and two shoulder buttons) into the existing structure.
The Saturn actually supports something like four different I/O schemes (including Megadrive pads, if you make an adapter). I believe the original 6-button pad is the only Saturn peripheral one that uses its particular protocol, most other use a scheme with four data lines and two handshake lines (this includes the 3D pad in digital mode, which is why software that control the SMPC I/O lines themselves usually don’t work with it.)
Yeah, I’ve been gathering up controller protocol documentation for a project to make a “Wii Classic Controller”-to-anything-pre-USB-or-bluetooth adapter/converter. The Sega stuff was fun to come across.
The Saturn protocol is a superset of the Genesis protocol. You OR the ID bits together to get the high level type: 3 button MD, 6 button MD, Saturn digital or 3 way handshake. 3 way handshake has detection ability too. IIRC the ‘header’ packet contains a type and the number of analog axes or something like that. You can handle all of it in one driver with an adapter for the Saturn plug. The SMPC document does a pretty good job describing it.
https://i.imgur.com/2XPkRFu.jpg
There was an adapter to use Sega Saturn controllers on the PC, look for Edge 3D (by Diamond and Sega). The small board is just 2 controller ports to pin headers, no active components. It’s rather hard to find nowaday but if you have one, you have an easy to use PCB with no hack or mod needed. I found the small board at a swap meet long ago without the host card, I’d have to figure the pinout and wire it to Arduino
Much easier to spend a couple of bucks on a controller extension cord.
This is spooky….
I have been working on the same project, on and off, for the past few days using a PIC18F4550 (personal preference, aiming to move to the 2550)…
Great to see someone else’s approach!
I remember building a mega drive to midi adapter some years ago. The drivers and design were on some retro gaming/emulator page and it took me months to get it working right. I have a feeling this is a much less troublesome approach and I’m grateful for that, so much so I may give it a go.