If you want to make serious assemblies out of 3D printed parts, you’ll eventually need to deal with threading. The easiest way is to make a nut trap that you can either insert a standard nut into after printing or even during printing. However, there are limitations to this method. If you want a real threaded part you can print the thread, cut the thread with a tap or bolt, or use a threaded insert. [Stefan] ran some tests to see how each of those methods held up to real use. (YouTube, embedded below.) He used fifty test parts to generate data for comparison.
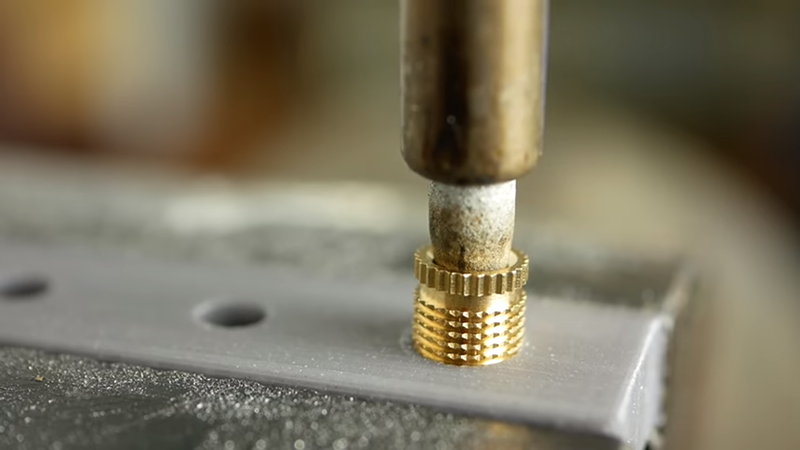
We like the threaded insert method where a brass insert is pushed into the plastic while hot. Special features in the insert cause the brass part to grab the plastic, making it difficult to pull the insert out or twist it within the hole. Another thing we liked was that the tests used holes printed in the horizontal and vertical plane. You can clearly see that the orientation does alter how the holes work and fail to work.
The test holes were M5. [Stephan] noted that you can’t tighten a bolt quite to the recommended torque with these methods, but you can get pretty close. It makes sense that the threads were not usually the part that failed, but surrounding material would crack or delaminate.
Although the printed threads performed somewhat worse than the other methods, they still worked surprisingly well. Of course, you would imagine the threads would wear faster than the brass inserts if you plan on disassembling and reassembling the part multiple times.
As a final trick, [Stephan] shows how he selectively increases the shell thickness around holes to increase the strength. This works differently depending on the slicer you use, but most modern slicers can change parameters within a specified volume of your print.
We’ve seen custom inserts made with nuts that ought to work pretty well even though they don’t have the features to grab the plastic. If you are making a sizable run, you might want to cobble up a thermal press first.


I’ve encountered a number of failed threaded prints, so this is no surprise. The threads don’t line up or are too weak. Not uncommon. It’s good to be reminded sometimes of alternatives though.
I have very good experiences with wood threaded inserts in PETG:
https://www.banggood.com/10Pcs-Hex-Drive-Screw-In-Threaded-Insert-Type-E-Bushings-For-Wood-M4M5M6M8-p-1117728.html?rmmds=myorder&ID=514217520698&cur_warehouse=CN
Hole size is key though – should be pretty high resistance when screwed in.
I use Printed threads for my modular light saber hilts. And designed the coupler to hold the polycarb tube. They hold up to light combat (with kids anyways!) surprising well.
http://widgets3d.com/product/3d-printed-unfinished-mace-windu-light-saber-hilt-cosplay/
Any other functional parts, I either use a nut trap, or threaded inserts, with inserts being my lastest goto.
Another method I’ve used when I don’t need the surface of the nut to be flush is to use the same technique you use for embedding magnets only embed a nut. Basically you make a hex pocket sized for the nut with a hole above which is sized for the bolt. You pause the print just before the hex pocket gets printed over and drop the nut in. If you use 100% infill around the assembly it’s seriously strong. The advantage to this is you don’t have to mess with a soldering iron or worry about embedding the insert perfectly vertical, and the parts will cinch up perfectly with no bumps.
A variant of this approach is what Prusa uses on their printers – square nut with a slot cut into the side so you can slide the nut in after printing. The only downside there is supports/etc. depending on geometry, and you have to have less-than-common square nuts around.
Or just use regular hex-shaped bolts and slide them into a rectangular slot. Not all the sides have to sit flush.
Has no one heard of plastic thread-cutting (Plastite) screws…? That’s what the real world uses.
They tend to delaminate the layers on my prints.
But if I heat the screw to 200C first, then they go in perfect.
I have been wanting to adapt a Philips head screw driver to an old soldering iron…
He mentions them in the video as being better, but doesn’t test them.
I almost always embed nuts into my prints
Sounds painful.
Sounds a little squirrely.
In re heating the insert first: wouldn’t it work better to use an insert slightly smaller than the hole and cool it down (for instance, dipping in liquid nitrogen) to shrink it before insertion? This is the inverse process of the old trick of inserting rivets while hot.
That works for metal in metal, but I don’t think you’ll get enough expansion of the insert to get it to get a solid bite into the plastic. Keep in mind that heating the insert is done to get the plastic around it to melt into/around. All those barbs and knurls get a pretty solid purchase into the plastic once it cools and solidifies.
The advantage of heating it up is that it will melt its way into the plastic, and will be stuck in place once the plastic returns to a solid.
The cold could make the plastic too brittle, and prone to cracking. Alas I don’t have easy access to LN2 any more, so I can’t easily test.
(A quick look suggests that cooling brass down by 200 degrees will result in a change in size of about 0.004, which on the inserts I have here would change the diameter from 7.70mm to 7.67mm. So I doubt it would shrink enough to be useful as that’s roughly the same as the resolution of my printer)
Chemical bonding might be stronger than all this heating and cooling.
I have an unnatural love for heat-set inserts except you can’t use them to lock a set screw to a shaft – they push right out.
If the shaft is large enough (1/4″ or more?) you could use a flanged threaded insert installed from inside the shaft hole into a counter-bored hole for the insert. If the setscrew hole is a through hole: start the insert then use a heated bolt to pull the insert up into the plastic hole. If the setscrew hole is blind, start the insert then push it up with a soldering iron tip inserted into the shaft hole.
I recently used the threaded brass inserts available at my local hardware store. They have a machine screw thread on the inside and more of a lag bolt wood thread on the outside, I think they’re for furniture that needs to be taken apart. I found the outside thread was a little too aggressive for 3d prints, it wanted to separate the layers and the print needed to be printed in that particular orientation due to its design. To get around it I went with an oversized hole that the insert would barely bite into, then added a little jb weld before I threaded the insert in. Worked great and I didn’t have to wait for proper inserts to get shipped to my corner of the world.
Try some hardwood inserts. The threads may cut better into the plastic.
https://www.boltdepot.com/Threaded_inserts.aspx
Did you pay cnc kitchen for his hard work?
I’m currently testing using rivet nuts in a print. So far after 2 weeks or so, it’s still solid and creep doesn’t seem to be an issue, and if it is, epoxy can fix that.
They function by pressure against the walls of a hole, not by flattening onto sheet metal like you’re supposed to use them, but it still seems to work well.
There’s no real objective way to know how far to pull/expand them, aside from making the hole big enough to support expanding as far as it goes, or carefully looking at the depth gauge on more expensive tools, but so far I think this is quite possibly a viable method.
The issue I have with brass inserts is… They’re brass, which isn’t the best for heavy repeated cycling with steel screws exactly, and there might be a bit of lead in the alloy like house keys sometimes have.
There are two types of rivet nuts. One collapses the un-threaded portion next to the flange, folding it outward and over the sheet material.
The other type has a thin section that breaks. The threaded section pushes into the un-threaded section with the flange. That pushes partly out over the sheet material to lock the insert in place. They don’t work so well in soft materials like aluminum or brass but will lock into a hole in thick material. I drilled and threaded a row of 1/4-20 holes into a bar of 6061-T6 then discovered they should have been smaller.
Solution? Do some measuring and testing with this type of insert in the proper internal hole size and thread to figure out the size hole to drill. A quick run through in the mill to drill out the 1/4-20 holes, pop in the rivet nuts then a cleanup pass with the mill to ensure nothing was sticking up. That linear rail bolted down just fine, no problems with anything pulling out.
Dunno if it would’ve worked in steel.
Can you please correct the spelling of his name.
I tend to screw my multi-part prints together, but i don’t use inserts or threads.
If i’m using an M3 screw (3mm), i size the hole at 2.8mm. Tight enough to happily screw straight into securely.
If i’m using an M2 screw, i make the hole 1.8mm. Usually holds up to multiple tighten/un-tightens.
FWIW, if you have the room in your design, a standard wingnut will provide a *LOT* more resistance to torque. That being said, I usually just use a (slightly undersized) threaded hole backed up with an embedded nut. The combination basically makes for a nylon nut that holds *VERY* well and doesn’t tend to loosen.