Reverse Engineering Shimano Bike Electronics

ANT+ is a wireless protocol specifically designed for use with sensors, and has similar functionality in some respects to Bluetooth Low Energy. It’s found a place among various bicycle equipment manufacturers, to connect smartwatches, cycle computers and electronic gear shifters. Of course, as soon as something becomes a defacto standard someone has to start coloring outside the lines. In this case, Shimano went off book with their DI2 groupset, leaving [kwakeham] with a reverse engineering job on his hands.

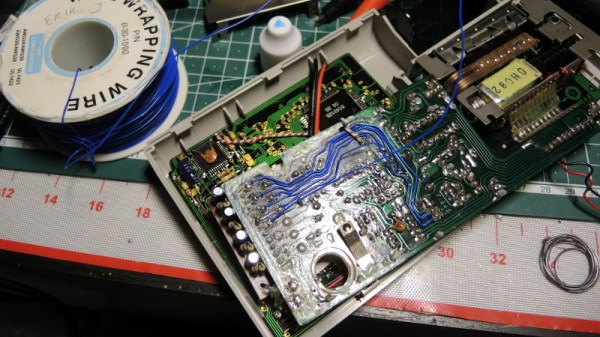
[kwakeham] gives us a great example of how to approach reverse engineering. Researching the Shimano hardware by its FCC ID shows that the device communicates using an NRF24AP2 chip, common in ANT+ devices. The Shimano device is then opened, and a logic analyser attached to various test points until the SPI interface between the transceiver and microcontroller is found. At this point, it’s a simple matter of putting the hardware through its paces and capturing data until the protocol can be pulled apart, piece by piece.

The work is documented on Github for anyone wishing to interface with the Shimano DI2 groupset. Reverse engineering is a powerful skill, that can teach you about everything from Pokemon to botnets. Video after the break.

Continue reading “Reverse Engineering Shimano Bike Electronics”

Sensor-Laden Pigeons Gather Data For Urban Weather Modeling

When it comes to gathering environmental data in real-world settings, urban environments have to be the most challenging. Every city has nooks and crannies that create their own microenvironments, and placing enough sensors to get a decent picture of what’s going on in all of them is a tough job. But if these sensor-laden pigeons have anything to say about it, the job might get a bit easier.

The idea for using pigeons as biotelemetry platforms comes to us from the School of Geography, Earth, and Environmental Sciences at the University of Birmingham in the UK. [Rick Thomas], lead investigator on the “CityFlocks” project, explains that meteorological models are hampered by a lack of data about the air in the urban canyons formed by tall buildings. Placing a lot of fixed sensors has a prohibitive cost, and using drones to do the job would probably cause regulatory problems, especially given recent events. But pigeons are perfect for the job once they’re outfitted with an “Avian-Meteorology Instrumentation Package (AvMIP)”. From the photographs we’re guessing the AvMIP is a pretty simple data logger with GPS and inputs for the usual sensors, all powered by a small LiPo pack. Luckily, the pigeons used are all domesticated racing birds that return to the nest, so no radio transmitter is needed, but if other urban avians such as peregrine falcons and seagulls are used then a future AvMIPS might leverage pervasive WiFi networks to upload data.

It’s not the first time we’ve seen mobile platforms used to fill in gaps in weather data, of course. And if this at all puts you in mind of that time pigeons were used to guide bombs, relax – no pigeons were harmed in the making of this research project.

Thanks to [Itay Ramot] for the tipĀ [via Gizmodo].

A Keyboard For Your Thumb

Here’s an interesting problem that no one has cracked. There are no small keyboards that are completely configurable. Yes, you have some Blackberry keyboards connected to an Arduino, but you’re stuck with the key layout. You could get one of those Xbox controller chat pads, but again, you’re stuck with the keyboard layout they gave you. No, the right solution to building small and cheap keyboards is to make your own, and [David Boucher] has the best one yet.

The Thumb Keyboard uses standard through-hole 4mm tact switches on a 10×4 grid, wired up in a row/column matrix. Yes, this is a mechanical keyboard, which is important: no one wants those terrible rubber dome keyswitches, and you need only look at the RGB gaming keyboard market for evidence of that. These tact switches fit into a standard perfboard, allowing anyone to build this at home with a soldering iron. After wiring up the keyboard and connecting it to an Arduino, [David] had a working keyboard.

There’s a lot going on with this build, not the least of which is the custom, 3D printed bezel for those tiny, tiny tact switches. This is a much simpler solution than building an entirely new PCB, which we’ve seen before. Since this is a 3D printed bezel, it’s easy to put labels or whatnot above the keys, or potentially print buttons. It’s great work, and one of the best small keyboards we could imagine.

How To Build A Mill With Epoxy

The typical machine tool you’ll find in a workshop has a base and frame made of cast iron or steel. These materials are chosen for their strength, robustness and their weight, which helps damp vibrations. However, it’s not the only way to make a machine tool. [John McNamara] has been working on a CNC mill with an epoxy base, with impressive results.

The molds were designed in CAD prior to casting, ensuring there was room for all required components.

The build is one that could be readily achieved in any decently equipped makerspace. [John] used lasercut steel parts to construct the molds for the epoxy base, with some custom turned parts as well. The precision cut parts fit together with great accuracy, and with proper control of the casting process there is minimal post-processing of the final cast piece required. The mold is built with zero draft angle, and is designed to be taken apart to remove the finished pieces. By using steel, the same mold can be used many times, though [John] notes that MDF could be used for a one-off build.

The base is cast in epoxy, mixed with granite aggregate and sand to create a strong, heavy, and vibration damping material. There are also steel reinforcements cast in place consisting of threaded rods, and conduits for various electrical connections. After casting, [John] has spent much time measuring and truing up the mill to ensure the best possible results from the outset.

It’s an impressive build, that shows that building your own accurate machine tools is quite achievable with the right tools and knowledge. We’ve seen similar work before, too – epoxy really does make a great material for casting at home.


Hacker Abroad: Owning A Business In China’s Electronics Markets

I spent a full day on Saturday in the electronics markets of Shenzhen, China. The biggest thing to take away from this is the sheer scale of business that is going on here. It’s a consumer-electronics tourist trap, it’s a manufacturing and wholesaling nexus point, and it’s a community of people working incredibly hard to get ahead in life.

A big thanks to Scotty Allen for introducing me to several store owners in the markets, and to a translator who went around with me. These connections were crucial for an inside look on the lifestyle of Huaqiangbei (HQB).

Continue reading “Hacker Abroad: Owning A Business In China’s Electronics Markets”

Can You Live Without The WS2812?

As near as we can tell, the popular WS2812 individually addressable RGB LED was released to the world sometime around the last half of 2013. This wasn’t long ago, or maybe it was an eternity; the ESP8266, the WiFi microcontroller we all know and love was only released a year or so later. If you call these things “Neopixels”, there’s a good reason: Adafruit introduced the WS28212 to the maker community, with no small effort expended on software support, and branding.

The WS2812 is produced by WorldSemi, who made a name for themselves earlier with LED driver solutions, especially the WS2811, an SOIC chip that would turn a common anode RGB LED into one that’s serially controllable. When they stuffed the brains from the WS2811 into a small package with a few LEDs, they created what is probably the most common programmable LED lighting solution available today.

A lot has changed in the six years that the WS2812 has been on the market. The computer modding scene hasn’t heard the words ‘cold cathode’ in years. Christmas lights are much cooler, and anyone who wants to add blinky to their bling has an easy way to do that.

But in the years since the WS2812 came on the market, there are a lot of follow-up products that do the same thing better. You now have serially addressable LEDs that won’t bring down the rest of the string when they fail. You have RGBW LEDs. There are LEDs with a wider color gamut and more. This is a look at the current state of serially addressable RGB LEDs, and what the future might have in store.

Continue reading “Can You Live Without The WS2812?”

Repairing A Vintage Sharp MemoWriter

As you may know, we’re rather big fans of building things here at Hackaday. But we’re also quite partial to repairing things which might otherwise end up in a landfill. Especially when those things happen to be interesting pieces of vintage hardware. So the work [ekriirke] put in to get this early 1980’s era Sharp MemoWriter EL-7000 back up and running is definitely right up our alley.

There were a number of issues with the MemoWriter that needed addressing before all was said and done, but none more serious than the NiCd batteries popping inside the case. Battery leakage is a failure mode that most of us have probably seen more than a few times, but it never makes it any less painful to see that green corrosion spreading over the internals like a virus. When [ekriirke] cracked open this gadget he was greeted with a particularly bad case, with a large chunk of the PCB traces eaten away.

The corrosion was removed with oxalic acid, which dropped the nastiness factor considerably, but didn’t do much to get the calculator back in working order. For that, [ekriirke] reconnected each damaged trace using a piece of wire; he even followed the original traces as closely as possible so the final result looked a little neater. Once everything was electrically solid again, he covered the whole repair with a layer of nail polish to adhere the wires and add a protective coating. Nail polish might not have been our first choice for a sealer, and likely not that particular shade even if it was, but sometimes you’ve got to use what you have on hand.

After years of disuse the ribbon cartridge was predictably dry, so [ekriirke] rejuvenated it with the fluid from a permanent marker applied to the internal sponge. He also made some modifications to the battery compartment so he could insert rechargeable Ni-MH AA batteries rather than building a dedicated pack. There’s no battery door in the enclosure, so removing the batteries will require opening the calculator up, but at least he has the ability to remove the batteries before putting the device in storage. Should help avoid a repeat of what happened the first time.

If you’re a fan of a good restoration, we’ve got plenty to keep you entertained. From bringing a destroyed Atari back from the dead to giving some cherished children’s toys a new lease on life, fixing old stuff can be just as engrossing as building it from scratch.

Continue reading “Repairing A Vintage Sharp MemoWriter”