A Call For Better Shower Temperature Controls

A good shower is a beautiful, rejuvenating experience. Contrarily, a shower that’s either too hot or too cold becomes a harrowing trial of endurance. [Ben Holmen] has been musing on the way we control temperature in our showers, and he has come to the conclusion that it’s not good enough. He’s done the math, quantified the problem, and is calling for better solutions for all.

[Ben]’s plot of shower temperature vs. mixer tap angle.
[Ben]’s complaint rests with the mixer taps that have become the norm in modern shower installations. These taps have a 180-degree range of motion. On one end, you get maximum cold water output, on the other, maximum hot water output. This is fine for a kitchen sink where we often want one extreme or the other, and exact temperature isn’t important. However, for a shower, it’s terrible.

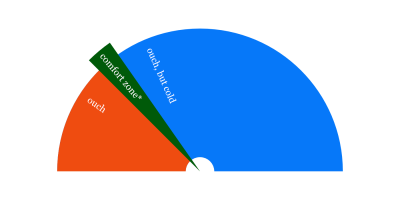
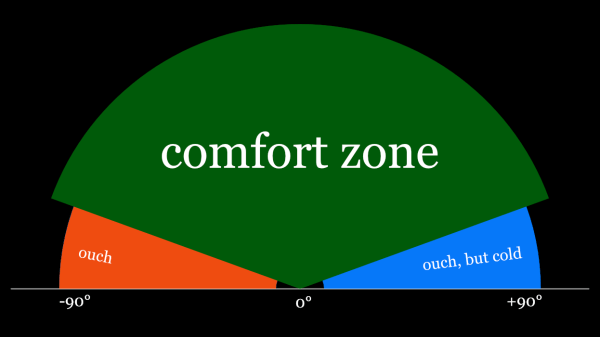
By [Ben]’s measurements, just a 10-degree range on his own shower tap corresponds to comfortable, usable temperatures. That’s means just 5.6% of the control range is devoted to temperatures the user is likely to select. His argument goes that this is the opposite of how it should work, and that most of the tap’s range should be dedicated to comfortable temperatures.

Ideal water temperature curve, compared to standard tap.

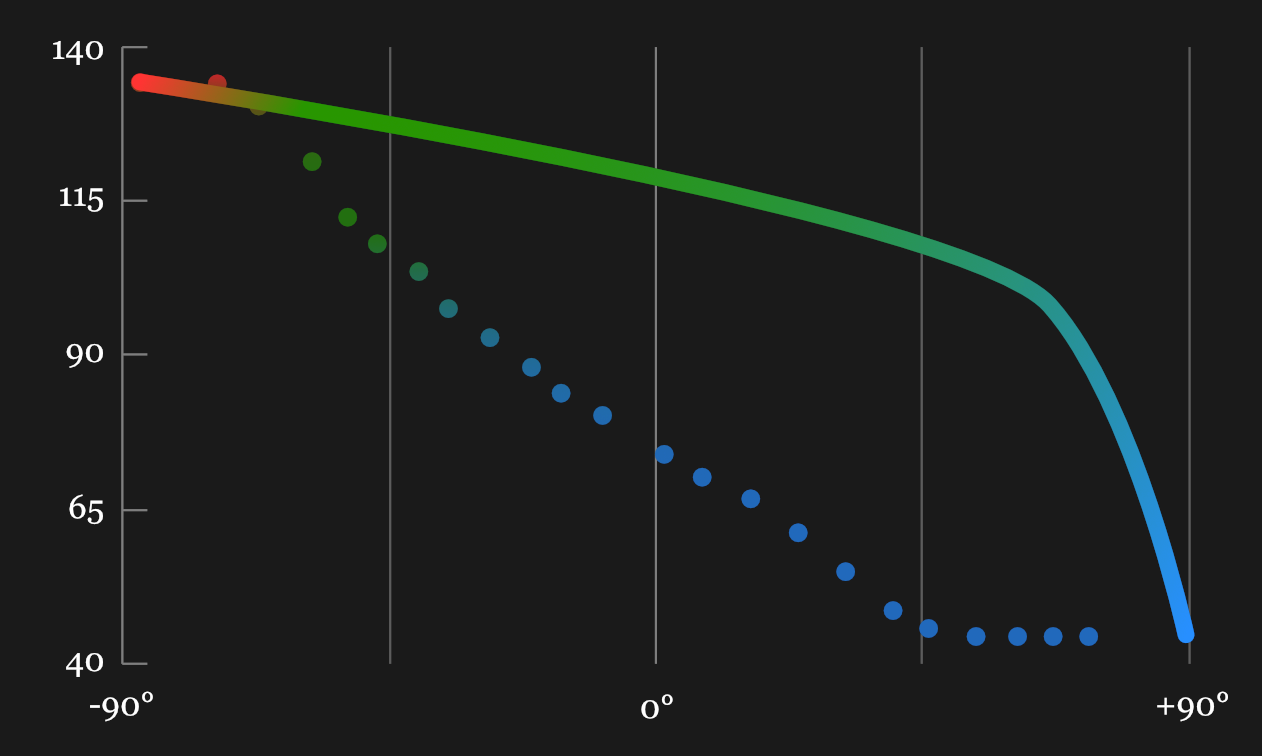
This would allow much finer control of shower temperature in the actual useful range. It would allow us to make tweaks to our shower temperature without having to ever-so-delicately nudge the mixer tap. Extreme hot and extreme cold temperatures should still be available, but left at the utter extremes.

Sadly, [Ben] doesn’t work for Big Tap, so he can’t directly influence the product sold to the public. Instead, he’s calling for manufacturers to develop shower valves that prioritize the temperatures that humans desire most. Unfortunately, it’s not immediately clear how the mechanics of such a valve would work without adding considerable cost and complexity when compared to the traditional model.

What do you think? Are things fine the way they are, or does [Ben] have a point? Perhaps you’re a two-tap evangelist! In any case, we’d love to hear your comments below. Meanwhile, if you’re more worried about the water bill than the temperature, we can help you there as well!

A Bit Of DIY Helps Cut Straight And Happy Threads

A cheap and effective ratcheting tap.

Need to cut threads into a hole? A tool called a tap is what you need, and a hand-operated one like the one shown here to the side is both economical and effective. A tap’s cutting bit works by going into a pre-drilled hole, and it’s important to keep the tool straight as it does so. It’s one thing to tap a few holes with steady hands and a finely calibrated eyeball, but when a large number of holes need to be tapped it can be worth getting a little help.

The usual tool to help keep a tap straight and pressed gently downwards is called a tap follower, but [Tony] had a lot of M4 holes to tap and no time to order one and wait for it to arrive. Instead, he converted a cheap tap into a tool that could be held in the chuck of his mill, with the freedom to slide up and down as needed. The result? A tap that’s hand-operated but certain to be orthogonal to the work piece, making the job of cutting a lot of threads much more pleasant.

Tapping isn’t just for metal, either. Cutting threads into wood is also done, and be sure to check out this simple method for making your own surprisingly effective wood taps in the shop with a threaded rod, or a lag screw. Of course, the need to tap a hole can be sidestepped by using threaded inserts in the right material, instead.

Ham Radio Gets Embedded RTL-SDR

We usually think of the RTL-SDR as a low-cost alternative to a “real” radio, but this incredible project spearheaded by [Rodrigo Freire] shows that the two classes of devices don’t have to be mutually exclusive. After nearly 6 months of work, he’s developed and documented a method to integrate a RTL-SDR Blog V3 receiver directly into the Yaesu FT-991 transceiver.

The professional results of the hack are made possible by the fact that the FT-991 already had USB capability to begin with. More specifically, it had an internal USB hub that allowed multiple internal devices to appear to the computer as a sort of composite device.

Unfortunately, the internal USB hub only supported two devices, so the first order of business for [Rodrigo] was swapping out the original USB2512BI hub IC with a USB2514BI that offered four ports. With the swap complete, he was able to hang the RTL-SDR device right on the new chip’s pins.

Of course, that was only half of the battle. He had a nicely integrated RTL-SDR from an external standpoint, but to actually be useful, the SDR would need to tap into the radio’s signal. To do this, [Rodrigo] designed a custom PCB that pulls the IF signal from the radio, feed it into an amplifier, and ultimately pass it to the SDR. The board uses onboard switches, controlled by the GPIO ports on the RTL-SDR Blog V3, for enabling the tap and preamplifier.

In the video after the break, you can see [Rodrigo] demonstrate his modified FT-991. This actually isn’t the first time somebody has tapped into their Yaesu with a software defined radio, though this is surely the cleanest install we’ve ever seen.

Continue reading “Ham Radio Gets Embedded RTL-SDR”

Threaded 3D Printed Part Comparison

If you want to make serious assemblies out of 3D printed parts, you’ll eventually need to deal with threading. The easiest way is to make a nut trap that you can either insert a standard nut into after printing or even during printing. However, there are limitations to this method. If you want a real threaded part you can print the thread, cut the thread with a tap or bolt, or use a threaded insert. [Stefan] ran some tests to see how each of those methods held up to real use. (YouTube, embedded below.) He used fifty test parts to generate data for comparison.

We like the threaded insert method where a brass insert is pushed into the plastic while hot. Special features in the insert cause the brass part to grab the plastic, making it difficult to pull the insert out or twist it within the hole. Another thing we liked was that the tests used holes printed in the horizontal and vertical plane. You can clearly see that the orientation does alter how the holes work and fail to work.

Continue reading “Threaded 3D Printed Part Comparison”

Simple Shop-made Taps For Threading Wood

Wood can be the material of choice for many kinds of projects, but it often falls out of the running in favor of metal or plastic if it needs to take a threaded fastener. But with a little ingenuity you can make your own wood taps and cut threads that will perform great.

Making wood do things that wood isn’t supposed to do is [Matthias Wandel]’s thing. Hackers the world over know and use his wood gears designer to lay out gears for all kinds of projects from musical marble machines to a wooden Antikythera mechanism. Woodworkers have been threading wood for centuries , so making wood take a decent thread isn’t exactly something new. But doing it on the cheap and making the threads clean and solid has always been tricky. The video after the break shows [Matthias]’ method of cutting a tap out of an ordinary threaded rod or even off-the-shelf lag screws. He uses a simple jig to hold the blank so that flutes can be cut with an angle grinder. The taps work well in the materials he tested, and a little informal stress testing at the end of the video shows promise for long service life of the threads.

Wood threads aren’t suitable for every project, but knowing that you can do it might just open the path to a quick, easy build. This is a great tip to keep in mind.

Continue reading “Simple Shop-made Taps For Threading Wood”

Thar Be Beer In These Walls

When you need a cold one and walking downstairs to your twin-keg refrigerator just won’t do, it’s time to break out the tools to deliver that frothy goodness where it’s needed. And so began [DaveLondres’] inspiring tale of piping beer through the walls of his home.

Now we know what you’re thinking… that beer is going to get mighty warm sitting in long lines from the fridge up to the ground floor. [Dave] thought about that too and designed a double-pipe system to overcome the issue. A run of PVC pipe for each keg connect the in-wall taps to holes drilled in the side of a second-hand fridge. An ingenious branching job yields an extra port for each run which was fitted with computer case fans to keep the cold air circulating. Plastic tubing is snaked inside of the PVC to carry the beer.

Rounding out the craftsmanship on this one is the inclusion of a plumbed drain to whisk away the drippings. If you’re not going to have a beautifully adorned chest-freezer-gone-kegerator in your livingroom this is the best alternative we’ve seen.

[via reddit]

How To Zip, Stick, And Screw Stuff Together

One of the first problems every new hacker/maker must solve is this: What’s the best way to attach part “A” to part “B”. We all have our go-to solutions. Hot glue, duck tape ( “duct tape” if you prefer) or maybe even zip ties. Super glue, epoxy, and if we’re feeling extra MacGyver-ish then it’s time for some bubble gum. For some Hackaday readers, this stuff will seem like old hat, but for a beginner it can be a source of much frustration. Even well versed hackers might pick up a few handy tips and tricks presented in this video after the break.

In part one of this series, [Ben Krasnow] shows us the proper use of just a few of the tools and techniques he uses in his shop. [Ben] starts out with a zip-tie tool which he loves in part because of a tension setting that ensures it’s tight but not overly. He moves on to advice for adhesive-vs-material and some tips on using threaded fasteners in several different circumstances. He also included a list of the parts and tools he uses so you don’t have to go hunting them down.

[Ben] is no stranger to us here at Hackaday. He does some epic science video. You can subscribe to his channel or follow his blog if you enjoy what you see.

Continue reading “How To Zip, Stick, And Screw Stuff Together”