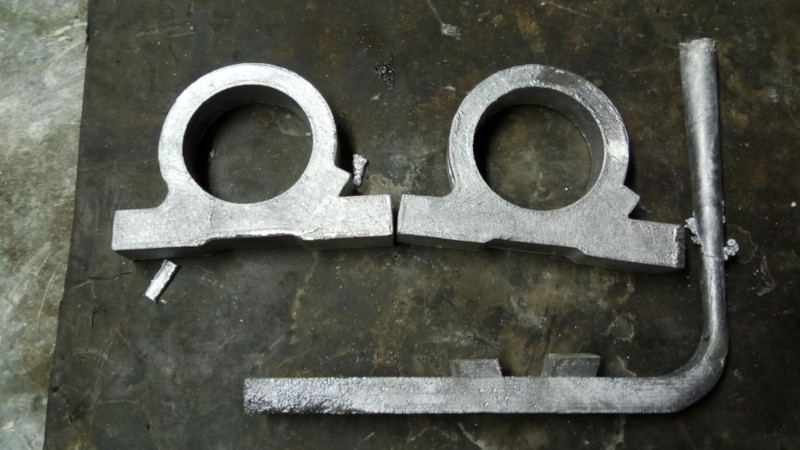
When it comes to machining, particularly in metal, rigidity is everything. [Tailortech] had a homebuilt CNC machine with a spindle held in place by a plastic bracket. This just wasn’t up to the job, so the decision was made to cast a replacement.
[Tailortech] decided to use the lost PLA process – a popular choice amongst the maker crowd. The spindle holder was first sketched out, then modeled in Fusion 3D 360. This was then printed in PLA slightly oversized to account for shrinkage in the casting process.
The PLA part was then used to make a plaster mold. [Tailortech] explains the process, and how to avoid common pitfalls that can lead to problems. It’s important to properly heat the mold once the plaster has set to remove moisture, but care must be taken to avoid cracking or wall calcination. It’s then necessary to slowly heat the mold to even higher temperatures to melt out the PLA prior to casting. With the mold completed, it can be filled with molten aluminium to produce the final part. When it’s cooled off, it’s then machined to final tolerances and installed on the machine.
Lost PLA casting is a versatile process, and goes to show that not everything has to be CNC machined out of billet to do the job. It’s also readily accessible to any maker with a furnace and a 3D printer. If you’ve got a casting project of your own, be sure to let us know. Video after the break.


“Fusion 3D” should probably be “Fusion 360”
I think you’re right. Fixed!
I don’t have access to CNC equipment so please excuse if silly question;
You have modelled the part, printed it in PLA, made a mould, cast he part and then CNCed it. Why not just CNC the part from aluminium?
He is in a catch 22 situation. He needs the part to be able to cnc the part. The current cnc spindle holder is plastic so can’t take the pressure of cutting aluminum.
Or you could get this cut for a couple of bucks, even online if there’s no metalworking shop around.
Sure it can. I’ve cut plenty of aluminum on my ShapeOko2 with the Delrin mounts. You have to go slow but i’m sure it still would have been faster than going through this process.
From the link:
“So just to clarify, I could make the part directly on the CNC (But, where is the fun of it?), so I decided to make it by casting.”
Nice series of vids. Your part came out good.
See also:
https://www.youtube.com/user/myfordboy
Highly recommended: excellent technique and results. Very pleasant watching, too.
Even bigger “But where is the fun in that?”, you can buy these brackets for under $30,- from all the usual suspects. In terms of time and effort, why bother making one yourself?
To learn about lost PLA casting?
In my point of view, if you make a thing and learn something it is not a waste of time. If I not make anything when I need to make something that I cannot acquire easily or it is a not vending part, I don’tb have the skills to make these part.
“why bother making one yourself?”
learning?
I’ve been doing this extensively for parts that aren’t available (old car parts) that would be ruinously expensive to have commercially milled as they’d need a 5 axis machine, or are unable to be machined because they have internal water passages.
Some things I’ve found: people talk about hot burnout of PLA and say if you print with like 5% infill you can just pour the hot aluminum in on top and the PLA will burn off without having to melt it out.
This absolutely does not work for me. The PLA partly burns out and then boils out through the aluminum so I get something like a little molten metal volcano blurping out hot metal. The resultant casting is terrible.
However, having the mold crack doesn’t matter at all. I’ve had molds crack into five pieces during burnout, and I blow them out so there’s no debris inside, carefully fit them back together, and nestle the final result in deep sand, and pour in on top of it. As long as it’s a small casting, there’s not enough hydrostatic pressure to force the mold pieces apart against the surrounding sand, and I get a perfectly acceptable casting with a very thin flashing line where each crack was.
If cracking is unacceptable, some other ways to deal with this are wrap the PLA master in chicken wire fencing before investing it, so you have steel wire holding the investment together, or spend a bit of money and get some R&R Plasticast investment. This is exactly what it was designed to handle, and it’ll handle far higher temperatures. I’ve gotten surface finishes so good they’re oil-tight against a gasket, and I only mill them flat because I like the way it looks.
The writer doesn’t make this explicit but add in some fairly large-section vents on the topmost points of the mold form, both to let the PLA drain out and the air escape during casting, and to provide aluminum to feed the main mold as it cools and shrinks. You want the shrinkage and porosity to stay well away from the part of the mold you value.
I make all my vents and sprues out of wax. When I use vacuum to debubble the investment, I also dip all my forms in molten wax briefly to seal them, so investment doesn’t get sucked into the PLA under vacuum.
I’ve tried printing with wax filament. It burns out beautifully but doesn’t have the dimensional stability that PLA does during printing, so the resulting castings need a lot of machining. With my PLA castings, I’m getting tolerances within 0.5mm on complex parts.
Very interesting read, thanks.
Trying to answer questions above. This method allows for minimal waste. The machining part at the end removes almost no material. I have been using this method myself lost pla casting + cnc but I also cnc parts directly from a billet in order to produce chips to later melt into my forge :)
It also saves a lot of time and heavy lifting by the CNC, and if you do casting, all of the waste is reusable so it is not really waste at all. The two processes compliment each other nicely. The casting gets you close to where you need to be and the CNC machining gets you the rest of the way.
I think it makes more sense for some parts than others. Sometimes you only need to machine a couple of faces to finish the part. If I were him I would have cut the bottom face and the ID at the same time to make sure the height is accurate. Of course the downside is that you would have to use those t-slot clamps instead of a vice to fixture it.
Hey Lewin,
Thanks for sharing this guide. Video is also awesome.
Really loved your post.