The Pocket Emulator That Will Fit In Your Pocket

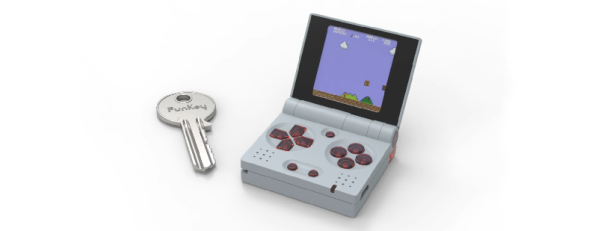
If there’s one thing tiny Linux Systems on a Chip are good for, it’s emulation. There’s nothing like pulling out an emulation console on the bus for a quick game of old-school NES Tetris, or beating the next level in Super Mario World. This is the smallest emulation console ever. It’ll fit in your pocket, and it has a bright, vibrant screen. It doesn’t get better than this.

This project is an improvement on two projects, both of which are some of the top projects on hackaday.io, the best place on the Internet for hacks and builds. The Keymu is (or was, at the time) the smallest emulation console ever, built as a miniaturized version of the Game Boy Advance SP in a 3D printed case and powered by the Intel Edison. The Edison doesn’t exist anymore, so after that development moved over to the Funkey Zero, a tiny console built around the AllWinner V3s chip and a 240×240 display. Both of these are tiny, tiny consoles, but as silicon gets better there’s always better options, so it’s back to the drawing board.

The design of the Funkey Project is again built on the AllWinner V3S SoC with 64MB of DDR2 DRAM. There’s a 1.5″ display with 240×240 resolution, and of course this retro emulation console retains the classic and very useful clamshell form factor of the famous Game Boy Advance SP.

Already, this project is in the works and it’s shaping up to be one of the most popular projects on hackaday.io ever. Everyone wants an emulation console, and this is the smallest and tiniest one yet. Whether or not this project can carry through to production is another matter entirely, but we’re eager to find out.

This Air Compressor Sucks

Vacuum is something most people learn about as children, when they’re first tasked with chores around the home. The humble vacuum cleaner is a useful home appliance and a great way to lose an eye as an inquisitive child. When it comes to common workshop tasks though, they can be a bit of a let down. When you need to pull some serious vacuum, you might wanna turn to something a little more serious – like this converted air compressor.

The build starts with a cheap off-the-shelf tyre inflator. These can be had for under $20 from the right places. They’re prone to overheating if used at too high a duty cycle, but with care they can last just long enough to be useful. The hack consists of fitting a hose barb connection over the intake of the pump, to allow air to be sucked out of whatever you’re trying to pull vacuum on. This is achieved with some hardware store parts and a healthy dose of JB-Weld. It’s then a simple matter of removing the valve adapter on the tyre inflator’s outlet so it can flow freely.

You might also consider adding a check valve, but overall this remains a cheap and easy way to get an electric vacuum pump for your workshop up and running. If that’s not quite your jam, you can always go down the handpump route instead.

Casting CNC Parts In Aluminium

When it comes to machining, particularly in metal, rigidity is everything. [Tailortech] had a homebuilt CNC machine with a spindle held in place by a plastic bracket. This just wasn’t up to the job, so the decision was made to cast a replacement.

[Tailortech] decided to use the lost PLA process – a popular choice amongst the maker crowd. The spindle holder was first sketched out, then modeled in Fusion 3D 360. This was then printed in PLA slightly oversized to account for shrinkage in the casting process.

The PLA part was then used to make a plaster mold. [Tailortech] explains the process, and how to avoid common pitfalls that can lead to problems. It’s important to properly heat the mold once the plaster has set to remove moisture, but care must be taken to avoid cracking or wall calcination. It’s then necessary to slowly heat the mold to even higher temperatures to melt out the PLA prior to casting. With the mold completed, it can be filled with molten aluminium to produce the final part. When it’s cooled off, it’s then machined to final tolerances and installed on the machine.

Lost PLA casting is a versatile process, and goes to show that not everything has to be CNC machined out of billet to do the job. It’s also readily accessible to any maker with a furnace and a 3D printer. If you’ve got a casting project of your own, be sure to let us know. Video after the break.

Continue reading “Casting CNC Parts In Aluminium”

Circular Linear Motor Becomes A Micro Motor Raceway

Over on Hackaday.io we have a lot of people playing around with the possibilities presented by cheap printed circuit boards. Whether that means making a quadcopter from fiberglass or a speaker from etched copper, we’ve seen just about everything. Now, finally, we have a miniature magnetic racetrack. It’s an ant highway, or a linear motor wrapped around into a circle. Or a tiny-scale model railroad. Either way it’s very, very cool.

The ant highway comes from [bobricius], one of the many makers tinkering around with coils and traces. This time he’s built a ten centimeter square board that is, effectively, a linear motor. It’s a three-phase motor made out of PCB coils, with a small magnetic ‘car’ that’s pushed forward. These coils are controlled by an ATtiny10 and a trio of MOSFETs. Wrap that linear motor into a circle and you have a neat little circular track that’s the smallest model car raceway you’ve ever seen.

As with all of [bobricius]’ circuit boards, this one demands a video, and that’s available below. This is an interesting bit of technology, and it’s more than just a raceway for tiny magnetic cars. This could be the beginnings of an analog clock with a digital heart, or the start of the smallest model train layout you’ve ever seen. There’s impressive work being done with PCB motors now that printed circuit boards are so cheap, and we can’t wait to see what’s next.

A quick Hackaday search will reveal [bobricius] as a prolific source of projects whose work we’ve featured multiple times. Favorites include a brushless PCB motor, and an FR4 cell phone.

Continue reading “Circular Linear Motor Becomes A Micro Motor Raceway”

Piezoelectric Antennas For Very, Very Low Frequencies

If you want to talk about antennas, the amateur radio community has you covered, with one glaring exception. Very low frequency and Extremely Low Frequency radio isn’t practiced very much, ultimately because it’s impractical and you simply can’t transmit much information when your carrier frequency is measured in tens of Hertz. There is more information on Extremely Low Frequency radio in Michael Crichton’s Sphere than there is in the normal parts of the Internet. Now there might be an easier way to play with VLF radiation, thanks to developers at the National Accelerator Laboratory. They’ve developed a piezoelectric transmitter for very long wavelengths.

Instead of pushing pixies through an antenna, this antenna uses a rod-shaped crystal of lithium niobate, a piezoelectric material. An AC voltage is applied to the rod makes it vibrate, and this triggers an oscillating electric current flow that’s emitted as VLF radiation. The key is that it’s these soundwaves bouncing around that define the resonant frequency, and the speed of sound in lithium niobate is a lot slower than the speed of light, but they’re translated into electric signals because of its piezoelectricity. For contrast, if this were a wire quarter-wave antenna it would be tens of kilometers long.

The application for this sort of antenna is ideally for where regular radio doesn’t work. Radio doesn’t work underwater, but nuclear subs trail an antenna out of the back to receive messages using Extremely Low Frequency radio. A walkie talkie doesn’t work in a mine, and this could potentially be used there. There is a patent for this piezoelectric antenna, so if anyone knows of a source of lithium niobate, put a link in the comments.

We’ve seen this trick before to make small antennas even smaller, but this is the first time we’ve seen it used in the VLF band, where it’s arguably even more impressive.

Picking The Right Sensors For Home Automation

Imagine that you’re starting a project where you need to measure temperature and humidity. That sounds easy in the abstract, but choosing a real device out of many involves digging into seemingly infinite details and trade-offs that come with them. If it’s a low-stakes monitoring project, picking the first sensor that comes to mind might suffice. But when the project aims to control an AC system in an office of temperature-sensitive coders, it pays to take a hard look at the source of all information: the sensor.

Continuing a previous article I would like to use that same BMaC project from that article as a way to illustrate how even a couple of greenhorns can figure out how to pick everything from environmental sensors to various actuators, integrating it into a coherent system that in the end actually does what it should.

Continue reading “Picking The Right Sensors For Home Automation”

Concrete USB Hub Isn’t Going Anywhere

When starting a new project, the choice of material can have a big effect on the character of the finished product. Wood is stylish and has a certain elegance to it, while polished or brushed aluminium is great for a more futuristic feel. Sometimes though, you just want big, cheap and heavy – in which case, concrete is your friend!

[BALES] was short on USB ports, and needed a hub with plenty of connectivity. Concrete had the benefits of being solid and heavy, and also impervious to beverages. Thus, a melamine form was produced, chosen as its surface doesn’t give the concrete anything to grab on to. A foam skull was cut out and added to create an inlay for decoration, and the 7-port octopus-style hub was placed inside.

With careful attention paid to the mixture consistency, the concrete was poured into the mold and allowed to set. Care was taken to avoid air bubbles and to ensure the mixture flowed completely into the mold, without leaving air pockets behind the inserted components. After allowing it to set for a few days, the part was demolded, with care taken to minimise edge crumbling. The foam skull was removed, and infilled with black epoxy, with a little more used to coat the top and sides of the hub. As a finishing touch, a foam pad was fitted to the base to allow it to sit on a desk without scratching everything up.

In the end, [BALES] has ended up with a hefty hub that won’t skitter around when plugging and unplugging devices. It should also serve admirably as a sturdy drink coaster on those cold winter nights. If you’re trying a similar project yourself, note that sometimes concrete can be surprisingly conductive. Video after the break.

Continue reading “Concrete USB Hub Isn’t Going Anywhere”