Imagine that you’re starting a project where you need to measure temperature and humidity. That sounds easy in the abstract, but choosing a real device out of many involves digging into seemingly infinite details and trade-offs that come with them. If it’s a low-stakes monitoring project, picking the first sensor that comes to mind might suffice. But when the project aims to control an AC system in an office of temperature-sensitive coders, it pays to take a hard look at the source of all information: the sensor.
Continuing a previous article I would like to use that same BMaC project from that article as a way to illustrate how even a couple of greenhorns can figure out how to pick everything from environmental sensors to various actuators, integrating it into a coherent system that in the end actually does what it should.
Popularity Isn’t a Good Indicator
A major issue when it comes to figuring out which components one needs is that there are a lot of (online) articles, forum posts and other commentary out there by people who are using the same sensors and actuators without ever really questioning why they are using those devices and not others. A good example of this are the DHT11, DHT22, and AM2302 temperature and hygrometer sensors. While very popular and used by everyone and their dog, they come with a whole range of potential issues.
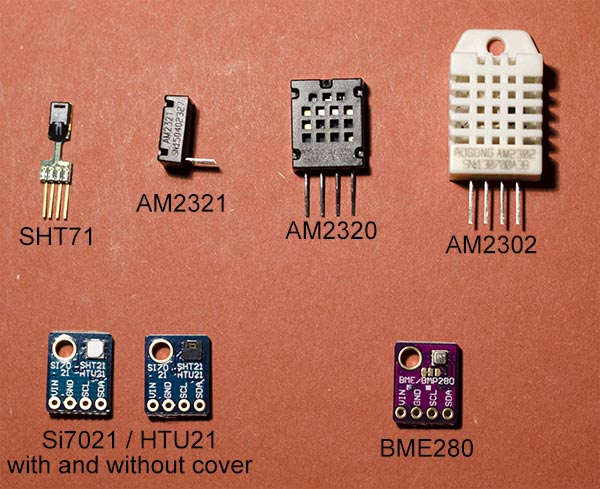
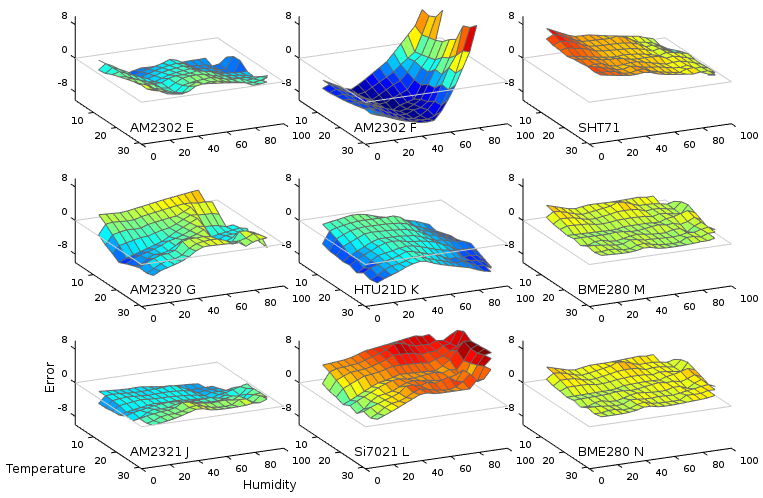
This sensor and a number of others were recently compared in a comprehensive test. The findings of that test showed that across six different sensor devices (specifically the DHT22, BME280, SHT71, AM2320, HTU21D and Si7021), the DHT22 performed the worst, with three out of six sensors outright dying over the course of two years.
They also showed issues with variability between individual sensors and a lack of long-term stability and reliability. Long-term stability cannot be expected, self-heating is an issue, and there’s no reliable way to detect strong heating or cooling as compared to a failing sensor.
Another issue that makes this range of sensors so annoying to work with is that they use their own, proprietary interface and protocol. This protocol is somewhat similar to the 1-wire protocol as invented by Dallas Semiconductor, but uses its own timing system and without the bus-mastering additions. With only its from Chinese translated datasheet to base a library on, one has to raise serious questions about the reliability of any system that includes one of these sensors.
In the BMaC project we initially started out with these DHT22 sensors as well. They were cheap and plentiful, and at first glance they seemed to be just fine. Unfortunately the breakout boards we had did not include the proper resistors on the breakout board, so humidity measurements were off by a few percent RH, as we found out later. These sensors, especially including the breakout boards, are rather bulky as well, making them hard to integrate into projects.
At some point we came across this MEMS sensor from Bosch, the BME280. It was similar to the BMP180, another quite popular MEMS temperature and relative humidity sensor. The BME280 does pretty much the same, only a bit more accurately, and also adds air pressure measurements. Even better, these sensors on a nifty little breakout board cost little more than the DHT22 boards we’d been using until that point.
These Bosch sensors all use either an I2C or SPI bus. This means that one can hook multiple of these sensors to a single I2C bus and communicate with them using an industry-standard protocol. This massively simplifies the sensor code, as it only has to concern itself with reading out the appropriate registers, instead of also the timing and interpretation of the received bits.
So in short, these BME280 sensors turned out to be the superior choice for the project. They are much smaller and more accurate, use a standard interface, and make it easy to chain multiple sensors to a single microcontroller and gaining air pressure readings in the process.
Devil is in the Details
With hygrometers, self-heating can lead to inaccurate results. The act of measuring the temperature simply causes the device itself to heat up. While working on the initial BMaC project, we struggled trying to determine the accuracy of our thermometers, both DHT22s and BME280s, in the absence of some absolute reference sensor.
There are plenty of forum and mailing list threads where people note that their BME280 sensor is measuring two degrees higher than it should, or their DHT22’s measurements are completely out of whack. While the latter we unfortunately found out ourselves to be the case for certain breakout boards, the former issue with the BME280 was harder to pin down as being true.
Since that time, people including the very same who did the aforementioned hygrometer shootout also did an absolute temperature test of the BME280 and DS18B20 sensors, with the conclusion that there’s no sign of self-heating apparent. Possibly one could induce some level of self-heating in the case of rapid and sustained measurements, but then one would have to wonder about what kind of environment would have a temperature that changes so quickly that one-second temperature updates are necessary.
For the BMaC project we used a measuring interval of 30 seconds, which was more than sufficient for general room temperature measurement. Even when we moved to using the BME280 sensors as inputs for the air conditioning control system, we got nice and tight feedback loops between the AC and the temperature response, as can be seen in this image:

The blue graph (MemoryLeak) is the temperature reported from the ceiling-mounted BME280 sensor in a meeting room with two AC units, whereas the other two squiggly lines (Großraum 3) were from the same type of sensor setup in the center of a line of three AC units in an open-plan office. Finally, the sensor readings post-fixed with my name were DHT22-based setups on my desk in that same open-plan office.
The sensor setup in the open plan office was also controlling the AC unit’s fan coil unit (FCU) while measuring the temperature in the same space. The difference between the meeting room and general room readings show how different both systems are configured and measure. The original AC controller with a wall-mounted sensor and aggressive heating pattern ramped up the fan quickly, easing off when the target temperature got reached.
In comparison, my ceiling-mounted sensor and controller took a more gradual approach, preferring to slowly ramp up the fan speeds in small increments and constantly adjust using the temperature readings from the nearby BME280 sensor. Obviously, for critter comfort, it’s important that such systems are non-obtrusive and – above all – accurate.
Time to Actuate Serious Business
While playing around with temperature is fine and everything, the real fun starts when one starts manipulating the water valves and other toys that are hidden in the suspended ceilings of office buildings. Changing the fan speed of the FCUs was easy enough – using a 0-10 V DC signal into a header on the original FCU controller board – the valves controlling the flow of hot and cold water (as described in the aforementioned previous article) required a few bits of custom hardware.

The valves near the FCUs are usually the linear thermoelectric actuator type, whereby a material inside the valve is heated through resistive heating in order to cause a linear motion. This motion in turns either opens or closes the valve. The ones we came across were made by Honeywell, with the 24 VAC version installed. These look similar to these:
This was high stakes hacking. There was every potential that by using the valves in the wrong way, leaving them open for too long, or drawing too much current we could irreparably damage something, or worse: disable the AC system in the entire building. That’s the kind of scenario where you wish that you had paid more attention to a robust system for the actuators.
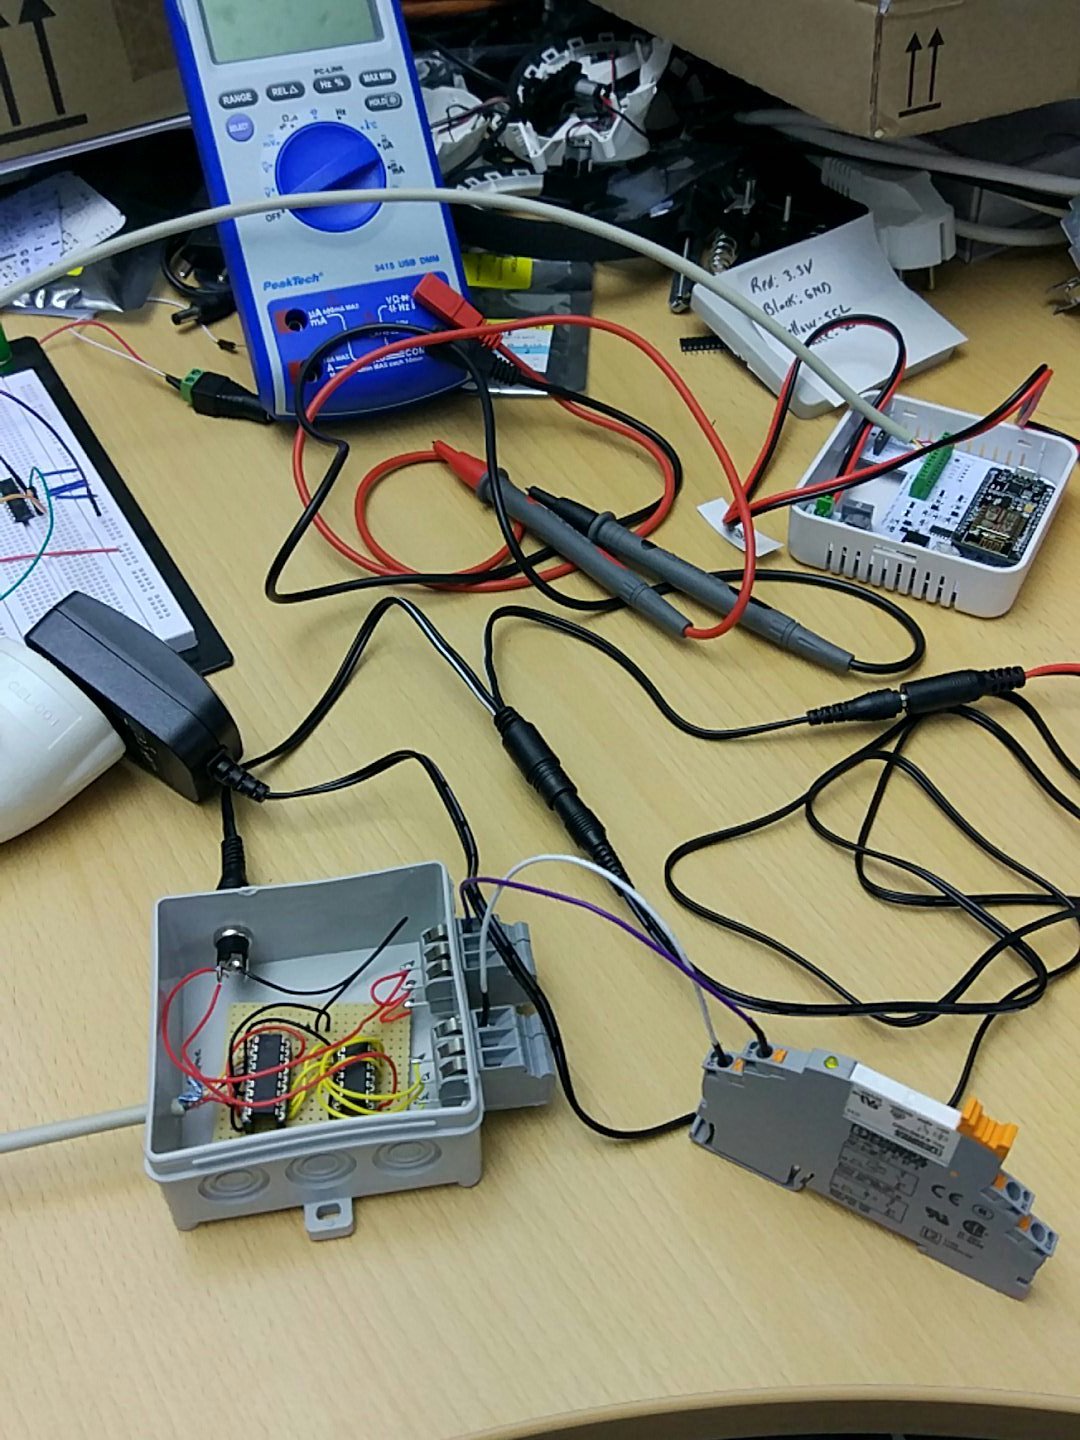 The system that we ended up implementing for the air conditioning valves either used the standard control signal via a relay for whole-floor-section switches, or the 24 VAC supply that was already present on the original valve control line for the FCUs, bypassing the original relay. For the latter we used an industrial Phoenix Contact SPST relay, driven by a Darlington array from an MCP23008 I2C-based GPIO expander.
The advantage of this system is that it uses off-the-shelf components that are meant to be used in an industrial setting. By ensuring that especially the mechanical (relay) parts are rated for the conditions in which they are meant to be used (mounted in a stuffy, hot space above a suspended ceiling), failure over time should be unlikely.
When One Can Afford to Learn Lessons
As the BMaC project (or ‘playing with IoT stuff’ as it was still known back then) kicked off, there was nothing crucial about anything we did. Using DHT22 sensors, only to find out that they weren’t that good was therefore totally okay. As the project escalated from merely making measurements to controlling parts of the building’s systems, it soon became clear that the stakes had risen dramatically.
In any project that uses sensors and/or actuators, the need to validate sensor and actuator accuracy and reliability over time is directly linked with the consequences if any of them were to fail. Having inaccurate room temperature measurements displayed on a Grafana dashboard is embarrassing, having a dodgy coffee machine is annoying, having a non-functioning air conditioning system can cost the company thousands of Euros in lost productivity, or worse.
This leads to the take-away message of this article; the most essential part of any serious project is to know what the cost of failure is, and how to hard to try to avoid this by picking the right system components.


Very nice and detailed analysis. Thanks Maya !
Very cool, particularly the comparison of sensors. Have you seen much issue with inaccurate temperatures as a result of ceiling mounting, as opposed to eye level? Also curious what you’ve found as far as cycle times for best efficiency. How long should the heater or AC run once it turns on?
The ceiling-mounted sensors were off by about 1C compared to people-level temperature, so that’s why the main room has those two squiggles, with one the people-adjusted line. Similarly CO2 levels are affected.
With the AC control I employed a conservative approach, with the system first turning on one out of three AC units, heating or cooling it with the fan on the lowest setting when the deviation was about 0.2C. It’d then ramp up to more aggressive levels as the delta between the target and current temperature increased.
In the system I implemented I had the AC essentially on all the time, though always at this conservative level to prevent overshoot or undershoot.
Your findings on the DHT11/22 BME280 EXACTLY match my own journey over the last couple of years. The BME280 is now my “GO TO”. They’re robust and they work. Haven’t noticed much temperature disparity from other devices, but if it mattered a lot you could always calibrate them and tweak the software :)
You wrote
“With only its from Chinese translated datasheet to base a library on, one has to raise serious questions about the reliability of any system that includes one of these sensors.”
With poor English-language syntax and a somewhat racist dismissal of the world’s most popular first language, one has to raise serious questions about the validity of your analysis.
I think you missed the point, friend. Trying to write code when all the documentation you have is a Google Translate version of a foreign language datasheet is going to be extremely challenging.
I find the occasional lack of support for international customers and poor quality documentation of such products way more offending than complaints about librarys based on Chinese-English translations which are notorious for being inaccurate and misleading if you (and the next guy having to maintain your project) don’t know exactly what you’re looking for.
I’ve suffered through this with the HX711 / HX712 parts of different silicon revisions. You don’t get errata, you get to figure out why the chip doesn’t work from forum posts (HX712 turned out to have a broken gain setting, the documentation for which was silently removed from the pdf and the noise measurments presented earlier were possibly fabricated).
So yes, I subscribe to the assessment that a proper English datasheet is a hallmark of good practice and dedication to service, and this will reflect in the amount of effort you’ll have to put into putting out dumpster fires your products gift you with down the road :)
I’ve had my share of issues as well, but the truth is that my livelihood wouldn’t exist if it weren’t for cost-optimized silicon from China. When I’m really frustrated I try to remember that!
That being said one time there was an undocumented active high enable pin left floating by default which earned a nice facepalm.
You get what you paid for. If you want well documented and well manufacture parts, you don’t go to the lowest bidder.
Otherwise, maybe you should take a Chinese class.
Or HIRE a person fluent in Chinese and a Tech background.
Easier than your flippant suggestion about taking classes to learn Chinese.
Man, it must be pretty hard going through life being so easily offended. Sorry, did starting that sentence with ‘man’ offend you? Crap… How that sentence could be construed as racist is stunning to me. I mean, it isn’t even offensive, and ‘Chinese’ is NOT A RACE.
I second that.
If simply stating in what language something is written is “racist”, I start to wonder who the real racist is
Great article Maya. I’ve worked with some of these sensors on Johnson Controls BMaC system controllers. Yes the good temp and humidity sensors are crazy expensive. What we used to do in areas where accuracy was “kind of” important was to hook up 2 of the cheap sensors in an area and write a program that would average the two :-)
Could also pull an avionics and put up three sensors, using the two that are most in line and discarding the readings from the third :)
I think the bmp 180 is temperature and pressure only. I have one in my bedroom thermal regulating system.
Having messed with temperature a bit over the year I found precision to also be important. I also found I ran the bmp 180 off a microcontroller pin for ground and power. That way I could comply turn of power to all pins when not measuring, reducing self heating (perhaps not necessary).
I wanted 0.1 degrees c temperature stability and was aiming for pid control as with my sous vide. Ended up with .4 degrees temperature stability and almost thermostat control. But that was good enough.
Yes, you’re correct. The BME280 adds the hygrometer functionality, not the air pressure. Still, small detail and doesn’t change the gist. Because the BMP180 and BME280 are similarly priced I never got around to actually using the former.
I did a similar, but less controlled test to check which temperature & humidity sensors to use in my home http://www.electrobob.com/10002-temperature-sensors/ . The sensors used have a similar protocol and identical calculation formula, but slightly different I2C commands and measurement timings and precision.
Following that experiment, I have about 10 sensors spread in the home, some in use for 3-4 years, some newer. I have found that about 1/3 fail after some time by either reporting strange values or getting an offset, no matter the manufacturer. Generally, humidity is way more affected than temperature.
Just a note: by default the BME280 is in continuous mode….which will certainly heat it up. Just taking a reading every 30 secs doesn’t change that as the measuring will just continue in between. Have to set it in FORCED_MODE
Maya, please tell me, are those Honeywell thermo-electric valves only on-off type valves or do they allow for some proportional control? Thanks
DHT11 this DHT22 that and AM the other. Is it possible for someone to use thermocouples and RTD’Ss in projects for higher temperature measurement? The MAX 31865 and MAX31855 are two great boards that no one ever considers
Been using one-wire sensors for years for my home heating control and for projects at work. Inexpensive simple and accurate. There are many places on the web to find support for one-wire temperature sensors. I have them connected to sonoff switches, raspberry pi, commercial hubs available from several vendors, and at work in industrial applications. Give them another look. Two (or Three ) pins and you can connect a small network of one-wire sensors… Lately I use simple RJ45 connections and CAT5 cable to string my one-wire networks.
The lower temperature range of most all sensors is fine but, as my original post, no one ever posts projects using thermocouples with the max31850 and RTD’s with the max31865. So many applications could be served such as kilns, BBQ pits, etc. I’m to much of a newbie but it would be great to see one of the smart posters to publish a project that talks to wifi, and has a display that uses thermocouples or RTD.