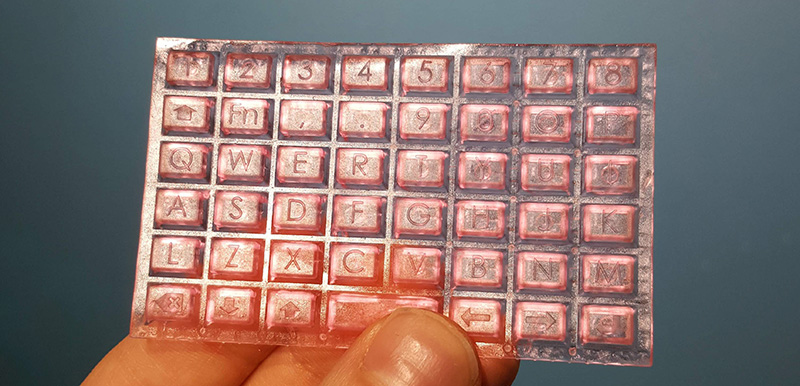
Aside from putting a whole lot of tact switches on a board, no one has quite figured out how to make very small keyboards for wearable projects. [Madaeon] might have the answer, and it’s using a resin-based 3D printer to create a flexible keyboard without silicone.
The world of small keyboards is filled with what are effectively the squishy parts of a remote control. This uses a piece of silicone and tiny carbon ‘dots’ on the underside of each button. Press the button, and these carbon dots bridge two traces on a PCB, closing a switch. No one has yet mastered home-casting silicone, although the people behind the ESP32 WiPhone have been experimenting with aluminum molds.
Instead of going down the path of casting and curing silicone, [Madaeon] decided to use 3D printing, specifically resin 3D printing, using a very flexible resin. The build process is what you would expect — just some button-shaped objects, but this gets clever when it comes to bridging the connections on the keyboard matrix. This is done with conductive paint, carefully applied to the underside of each button.
Right now this is a viable means of getting a tiny keyboard easily. The color is a garish pink, and the labels on each button aren’t quite as visible as anyone would like, but the latter can be fixed with silkscreening, just like how it’s done on the silicone buttons for remote controls.


Home resin printers pretty common?
Since they start under $400, there’s no reason why not. That said, I don’t think *any* 3D printer is all that common.
It’s not the cost but that deadly resin smell, not to mention the often conveniently forgotten need for IPA bath and final cure.
Maybe I should give it a shot, I’ve got plenty of India Pale Ale laying around.
They’re notably less common than FDM printers. I found some 2014-2017 market data that shows about 2:1 FDM/SLA market shares, although that’s not specifically the hobbyist market. I don’t see SLA very often in my own hobbyist circles, it’s largely FDM.
Actually, if the flexible keyboard can be printed, then a pad print can also be printed, along with an alignment jig. Roll the pad print on some conductive ink/paint so the pads are coated but not drippy, align both the pad and the jig so that the inked pads will squish conductive paint onto the center points of the inner backside of each key, and do whatever is needed to get the conductive ink to set (dry out, UV light, heat… whatever).
The first stage of the experiment was done to get a result. The result has been achieved. Good show. Now it just needs to be refined to do it faster easier cheaper. Don’t be so negative.
Remember that the conductively painted portions of the pads just need to be on the inside, and as long as you do not have bridges of conductive ink between adjacent keys then you are good.
Hell, just print a stencil with holes aligned for the inside of each key and then DRIP the conductive ink into each hole with an eyedropper, and let it dry (or bake it in an oven at low heat). That would definitely be faster than the painting, and still would produce a neat-enough result.
Hell the same PCB fab that made the PCB for the keyboard could also be used to make the stencil for applying the conductive ink.
But that’s just buying a tiny keyboard. That’s not making one.
As low quality as the reporting on HaD is by editorial standards (writers for HaD are hackers first and Newsies second, after all) I do have to say that they’ve never written anything as bad as that ironically nonsensical second paragraph of yours.
If you’re gonna critique, don’t feel obligated to get creative with it.
A dime of pot costs $10.
$0.10 of pot costs $0.10
Hope that clears things up for you.
So “a dime for buying pot” is?
$10, from what he implied.
Which by the way is a very expensive dime
I assume the keyboard is meant to be used with etched metallized membranes for the contacts. However, I just bought a remote control repair kit for a few euros, which is just a collection of conductive silicone pucks and a small tube of silicone glue. I bet this would work for this application, and possibly also for something similar printed in TPU on a more common FDM printer
My experience with flexible resins is that they don’t hold up to repeated deformation as would be needed here. In addition, they are typically still somewhat toxic at the surface due to left-over chemicals in the resin that slowly seep out and cause allergies, for example. I’ve thrown the flex resins out.