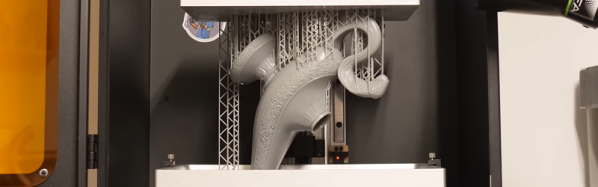
Resin Printer Temperature Mods And Continuous IPA Filtration

Two essential parts to producing successful resin 3D prints: keeping resin at its optimal temperature and lots and lots of IPA to clean the printed parts with after printing. Unfortunately, most consumer MSLA printers do not come with a resin tray heater, and tossing out IPA after every cleaning session because of some resin contamination is both wasteful and somewhat expensive. These are two things that can be fixed in a number of ways, with [Nick Wilson] going for the ‘crank it to 11’ option, using a high-tech, fully integrated solution for both problems.

The vat with IPA is kept clean through the use of a diaphragm pump that circulates the alcohol through two filter stages, one for larger — up to 5 micrometer — particulates and one for smaller 0.5-micrometer junk. A 405 nm LED lighting section before the filters is intended to cure any resin in the IPA, theoretically leaving the IPA squeaky clean by the time it’s returned to the vat.

For the resin tray heater, a more straightforward 12V 150 Watt silicone heater strip is stuck to the outside edge of the metal resin tray, along with a temperature-controlled relay that toggles the heater strip on and off until the resin reaches the desired temperature. None of these are necessarily expensive solutions, but they can be incredibly useful if you do a fair amount of resin printing.

Continue reading “Resin Printer Temperature Mods And Continuous IPA Filtration”

A New Gaming Shell For A Mouse

For some gamers, having a light fast polling mouse is key. [Ali] of [Optimum Tech] loved his 23-gram mouse but disliked the cord. Not seeing any options for a comparable wireless mouse, he decided to make one himself.

Trying to shortcut the process, he started with an existing wireless mouse from Razer weighing in at a hefty 58 grams. The PCB on its own weighed in at 11 grams and after swapping to a smaller battery, [Ali] had a budget of 10 to 15 grams for the shell. Here is where the meat of this project lives. The everyday objects in your life like the poles that hold up traffic signals or the device you’re reading this article on are looked at and used without much thought into why they are what they are. The design of everyday things is a surprisingly deep field and designing a curvy mouse is no exception. With a 3d version of the PCB, he went through several iterations of how to lay out the mouse triggers. The scroll wheel was removed as he didn’t need it for the game he was playing.

The shell was printed in resin and came out great. [Ali] found himself with an ultralight 4000hz wireless mouse that was thoroughly enjoyable. It’s a great example of someone diving in and designing something for their personal use. Whether it’s a mouse or a chair, we love anyone taking on a design challenge. Video after the break.

Continue reading “A New Gaming Shell For A Mouse”

Continuous Printing On LCD Resin Printer: No More Wasted Time On Peeling? Is It Possible?

Anyone who has done any amount of 3D printing with SLA printers is probably well aware of the peeling step with each layer. This involves the newly printed layer being pulled away from the FEP film that is attached to the bottom of the resin vat. Due to the forces involved, the retraction speed of the build plate on the Z-axis has to be carefully tuned to not have something terrible happen, like the object being pulled off the build plate. Ultimately this is what limits SLA print speed, yet [Jan Mrázek] postulates that replacing the FEP with an oxygen-rich layer can help here.

The principle is relatively simple: the presence of oxygen inhibits the curing of resin, which is why for fast curing of resin parts you want to do so in a low oxygen environment, such as when submerged in water. Commercial printers by Carbon use a patented method called “continuous liquid interface production” (CLIP), with resin printers by other companies using a variety of other (also patented) methods that reduce or remove the need for peeling. Theoretically by using an oxygen-permeating layer instead of the FEP film, even a consumer grade SLA printer can skip the peeling step.

The initial attempt by [Jan] to create an oxygen-permeating silicone film to replace the FEP film worked great for about 10 layers, until it seems the oxygen available to the resin ran out and the peeling force became too much. Next attempts involved trying to create an oxygen replenishment mechanism, but unfortunately without much success so far.

Regardless of these setbacks, it’s an interesting research direction that could make cheap consumer-level SLA printers that much more efficient.

(Thumbnail image: the silicone sheet prior to attaching. Heading image: the silicone sheet attached to a resin vat. Both images by [Jan Mrázek])

Ask Hackaday: Resin Printer Build Plates

The early days of FDM 3D printing were wild and wooly. Getting plastic to stick to your build plate was a challenge. Blue tape and hairspray-coated glass were kings for a long time. Over time, better coatings have appeared and many people use spring steel covered in some kind of PEI. There seem to be fewer choices when it comes to resin printers, though. We recently had a chance to try three different build surfaces on two different printers: a Nova3D Bene4 and an Anycubic Photon M3. We learned a lot.

Resin Printing Review

If you haven’t figuratively dipped your toe into resin yet — which would literally be quite messy — the printers are simple enough. There is a tank or vat of liquid resin with a clear film on the bottom. The vat rests on an LCD screen and there is a UV source beneath that.

Continue reading “Ask Hackaday: Resin Printer Build Plates”

Fighting All That Can Go Wrong With Resin

[Jan Mrázek] is on a quest to make your resin 3D prints more accurate, more functional, and less failure prone. Let’s start off with his recent post on combating resin shrinkage.

When you want a part to have a 35 mm inner diameter, you probably have pretty good reasons, and when you draw a circle in your CAD software, you want a circle to come out in the real world. Resin shrinkage can put a kink in both of these plans. [Jan] identifies three culprits: resin squeezing, resin shrinkage, and exposure bleeding. And these three factors can add up in unexpected ways, so that you’ll get a small reference cube when you print it on its own, but large reference cubes when printed as a group. [Jan]’s article comes with a test piece that’ll help you diagnose what’s going on. Continue reading “Fighting All That Can Go Wrong With Resin”

the rotary piston

There’s A Wrinkle In This 3D Printed Wankel

Rotary engines such as the Wankel have strange shapes that can be difficult to machine (as evidenced by the specialized production machines and patents in the 70s), which means it lends itself well to be 3D printed. The downside is that the tolerances, like most engines, are pretty tight, and it is difficult for a printer to match them. Not to be dissuaded, [3DprintedLife] designed and built a 3D printed liquid piston rotary engine. The liquid piston engine is not a Wankel and is more akin to an inside-out Wankel. The seals are on the housing, not the rotor itself, and there are three “chambers” instead of two.

The first of many iterations didn’t run. There was too much friction, but there were some positive signs as pressure was trapped in a chamber and released as it turned. The iterations continued, impressively not using any o-rings to seal, but instead sanding each part down using a 1-2-3 block as a flat reference, within 25 microns of the design. Despite his care and attention to detail, it still couldn’t self-sustain. He theorizes that it could be due to the resin being softer than other materials he has used in the past. Not to be left empty-handed, he built a dynamo to test his new engine out. It was a load cell and an encoder to measure speed and force. His encoder had trouble keeping up, so he ordered some optical limit switches.

This engine is a follow-on to an earlier 3D printed air-powered Wankel rotary engine, and we’re looking forward to part two of the liquid piston series. Video after the break.

Continue reading “There’s A Wrinkle In This 3D Printed Wankel”

3D Printer Showdown: $350 Consumer Vs $73,000 Pro Machine

The quality of consumer-grade 3D printing has gone way up in recent years. Resin printers, in particular, can produce amazing results and they get less expensive every day. [Squidmar] took a miniature design and printed it (or had it printed) on some cheap resin printers and a 65,000 Euro DWS029. How much difference could there be? You can see for yourself in the video below.

We were surprised at the specs for the more expensive machine. It does use a solid-state laser, but for that cost, the build volume is relatively small — around 15 x 15 x 10 cm. There were actually five prints created on four printers. Three were on what we think of as normal printers, one was on the 65,000 Euro machine, and the fifth print was on a 10,000 Euro printer that didn’t look much different from the less expensive ones.

Of course, there is more to the process than just the printer. The resin you use also impacts the final object. The printers tested included a Phrozen 4K Mini, a Phrozen 8K Mini,  a Solos Pro, and the DWS 029D. The exact resins or materials used was hard to tell in each case, so that may have something to do with the comparisons, too.

Do you get what you pay for? Hard to say. The 8K and Solos were neck-and-neck with some features better on one printer and some better on the other. The DWS029D did perform better, but was it really worth the increase in price? Guess it depends on your sensitivity. The 8K printer did a very credible job for a fraction of the cost. Of course, some of that could have been a result of the materials used, too, but it does seem likely that a very expensive dental printer ought to do better than a hobby-grade machine. But it doesn’t seem to do much better.

The DWS printer uses a laser, while most hobby printers use UV light with an LCD mask. We’ve seen low-end resin printers on closeout for around $100 and you can get something pretty nice in the $200 neighborhood. In between these two extremes are printers that use Digital Light Processing (DLP).

Continue reading “3D Printer Showdown: $350 Consumer Vs $73,000 Pro Machine”