One of my favorite ways to think of engineering is that a glass is not half empty or half full, only twice as large as it needs to be. As useful as that idea is, it also means that I rarely put any effort into the aesthetics of my projects – I learn or accomplish what I need, desolder and recycle the components, then move on. Few of my projects are permanent, and custom cases tend to be non-reusable, so I skip the effort and expense.
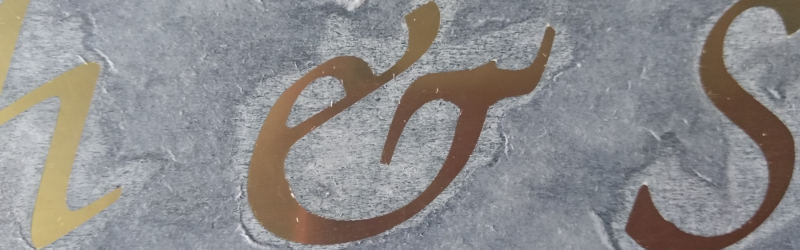
Once in a while though, I need to make a gift. In that case form and function both become priorities. Thankfully, all that glitters is not gold – and over the last year I’ve been learning to etch the copper alloys commonly classified as ‘brass’. We’ve covered some truly excellent etched brass pieces previously, and I was inspired to try and etch larger pieces of metal (A4 and larger) without sacrificing resolution. I thought this would be just like etching circuits. In fact, I went through several months of failed attempts before I produced anything halfway decent!
Although I’m still working on perfecting my techniques, I’ve learned enough in the meantime to give a report. Read on if you’re feeling the need for more fancy brass signs in your life.
 In Asia, brass is a very common decorative material, and I can easily buy it as needed at USD $9 per kilogram in a variety of forms. I started by purchasing about 10 kg of brass sheets, rods, and foils to work out what was practical.
The first lesson learned was that cheap brass flashing, a sort of 0.2 mm thick foil that comes in a roll, just fell apart during etching. The zinc reacted out much faster than the copper, leaving a brittle and ugly mess of copper. This problem disappeared when I used thicker brass, typically 1 mm to 2 mm thick from China or Taiwan, both proved to be good quality.
Not So Hot
The second lesson learned was that even relatively thin brass foil (around 0.2 mm) sinks heat much more than a PCB of equivalent size. I usually etch circuits using the toner transfer method, approximately as detailed here. I found that a clothes iron could not typically heat the brass enough to fuse the toner properly. I attempted two methods to get around this: switching to heat-free processes and using higher-powered heating.
I tried three types of heat-free processes. In the first, I simply bought UV photoresist sheets and tried to adhere them to the brass. I quickly found that my photoresist sheets were terrible, and it was practically impossible to avoid bubbles forming between the photoresist and the brass pretty much everywhere, even when applying the photoresist underwater.
I reasoned that painting on photoresist wouldn’t have that problem, but could not find any local source of photoresist paint. As a result I bought some UV-cure acrylic (the kind used by nail salons). Unfortunately, the curing process did not result in a usable resist: the areas shielded from UV still hardened just enough that I couldn’t clean the brass sheet properly with solvent afterwards. Nonetheless, I suspect a better method of applying photoresist, such as paint or spray, would produce superior results.
I did find that UV-cure acrylic works very well as an etch resist when cured, although it requires some patience and a nasty solvent to remove. One advantage it has is a long working time in a environment with very low UV light. I ended up using it for touch ups when I had an acceptably working process.
As a final attempt to avoid high temperature processes, I tried applying a mixture of about 15% xylene and 85% methanol (xylene and water are not miscible) to the printed paper to render the toner sticky enough to adhere to the brass, press it on, and let it dry before soaking in water and removing. The toner did become sticky and adhere a little, but I found that it did not adhere to the brass as well as it did with applied heat. Applying both organic solvents and heat was not something I had the equipment to try safely, so I gave up on that avenue as well.
Into the Fire
Having given up on low-temperature processes, I focused on heating the brass sheet to a high enough temperature to reliably transfer toner without burning myself terribly. An iron or document laminator were not powerful enough except for very small pieces of brass, and I was interested in etching large panels to paint and use as signage, kitchenware, panel art, or components of furniture.
I knew from previous experience that a heat press for t-shirts would work fairly well — I had tried on steel and large PCB panels — only requiring some touch-up on the edges of the piece. However, a heat press isn’t something I have space for at home right now, and they aren’t that cheap either. Thankfully, with a little bit of preparation and practice, my gas stove worked just fine.
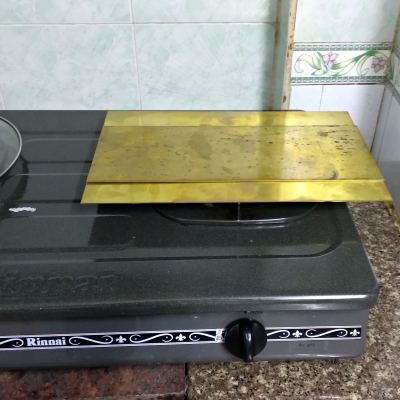
The key turned out to be placing a large 2 mm thick brass sheet across my stove element, and placing the smaller piece on top of it so that pressure could be applied to any point on the piece without risking flipping any hot pieces of metal off the stove and onto myself. It’s worth practicing this a a few times without any heat applied to be sure your setup is as stable and as safe as you think it is!
I heated the brass to a temperature where it would melt toner, but not burn paper, then turned the stove off. With the more massive bottom sheet acting like a heat sink, I placed the paper toner side down on the piece, placed a cotton cloth over it, and used a rolling pin to apply even pressure. I then heated it up again turned off the stove, and repeated the process for a good even bond.
I could have probably used my electric oven to heat the brass instead, but the gas stove proved fast and effective.
Regardless, you’ve got a fair mass of hot metal here – analogous to taking cookies out of the oven on an abnormally heavy baking sheet. It’s not searing hot, but is hot enough and has sufficient thermal mass that it can burn you painfully. You’ll likely want to wear appropriate clothing and shoes. My preference is to also keep a container full of water, oven gloves, and a fire extinguisher at hand.
Touch Up
The result of the above was that I could transfer toner onto much larger and thicker pieces of metal. Probably anything larger than A3 size would require refining the method. Regardless, there were some minor imperfections in the toner coverage. For a circuit this would be OK, but here it affects the looks significantly.
To fix these errors, first I cleaned most of the paper off the piece so that all areas meant to be etched were fully exposed. Then I used UV-cure acrylic nail polish to correct any areas where the toner visibly didn’t bond. I worked in a room lit with non-UV sources so I wouldn’t have to worry about working time. Once the corrections were done to my satisfaction, I left the brass piece out in the sun for two minutes to cure. Next I rubbed black water-based acrylic paint into the piece and then quickly wiped clean and let dry. The idea here was that there were enough paper fibers still adhered to the toner that the acrylic paint would soak in a little, and provide additional protection to the areas covered with toner. Meanwhile, it wiped clean off the exposed brass areas. This noticeably decreased pockmarks caused by small amounts of etchant slipping past the toner.
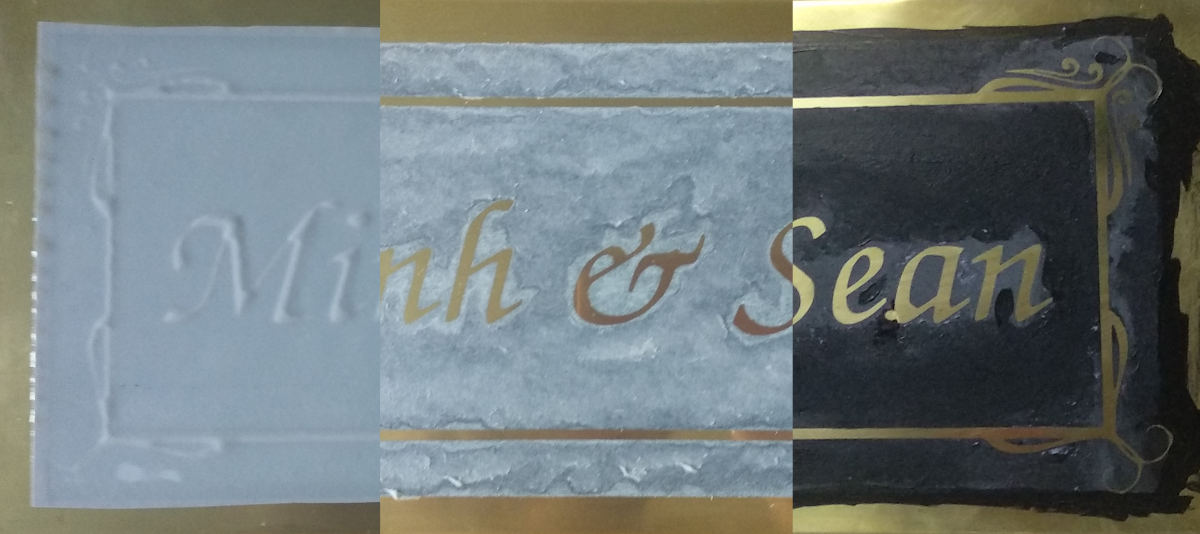
Finally, I taped down the edges, as well as any large uniform areas of toner, to maximize the protection against the etchant. I could see the tape and acrylic both helped keep the etchant contained within useful areas. I carefully sponged on ferric chloride for around 20 minutes. Hydrochloric acid requires police documentation to purchase in my area and earlier experiments using electro-etching produced unsatisfactory results.
After etching, I removed the toner using xylene while outdoors and with a large fan to my back. Safety aside, I have strong opinions about which organic solvents smell the worst and xylene is near the top of the list.
Back In Black
I tried two methods for painting: the first was to use linseed-oil-based lamp black – literally the type of black paint used in fancy oil paintings. This produced the nicest result at first, but took excruciatingly long to do, proved impractical when it came to fine details, and had poor mechanical resistance to abrasive brass polish. It also takes at least a week to dry.
The alternative method is to paint the sign approximately correctly with water based acrylic paint, let it partially dry, then lightly sand the sign down with very fine grit sandpaper. The paint will have a tendency to remain in the grooves that you’ve etched. You keep painting, sanding, and repainting until the pattern you’ve etched is fully painted. Then you repolish the sign and hope it all stays in place.
Sadly, I could not find a store that carried enamel oil paints (the type for painting plastic models came to mind). That would have probably worked far better. I also considered using a black wax crayon or sealing wax, then heating the sign and letting it flow into the etched grooves.
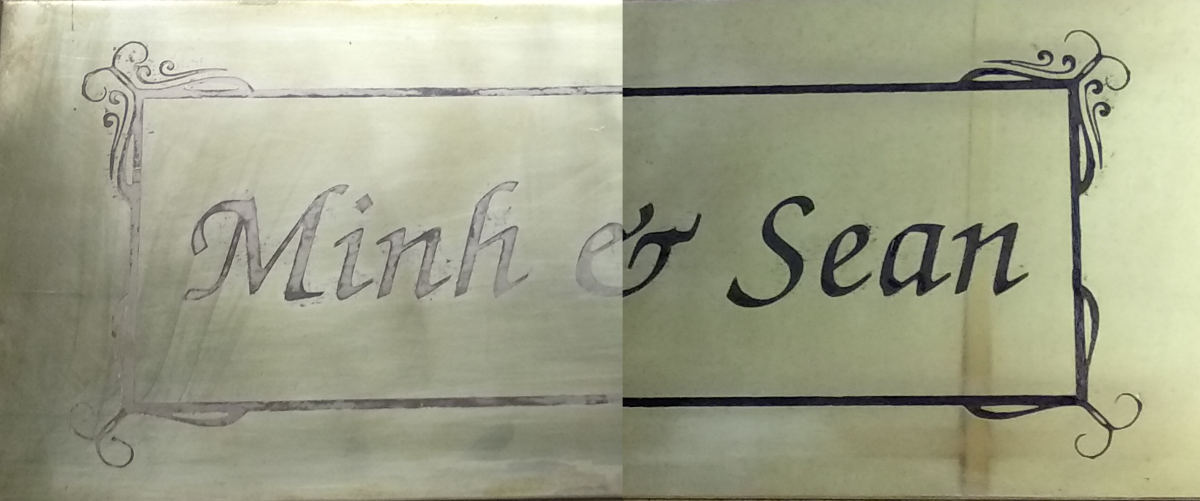
As a final step, you may consider protecting your work with a varnish, although this is not strictly necessary. I’ve found the paint stays well enough to tolerate light polishing with brass cleaner. Now you can frivolously make everything out of brass, just like in Dwarf Fortress.
I think a fair conclusion would be that of all the methods I applied, toner transfer produced the best results, but significant improvements should be possible with UV-cure etch resist. The biggest issue with toner transfer was the etch resist did not completely prevent etchant from reacting with the brass, especially near the edges of the piece. I think this could be resolved with spray or paint on UV-cure etch resist, or perhaps even film of less suspect quality.
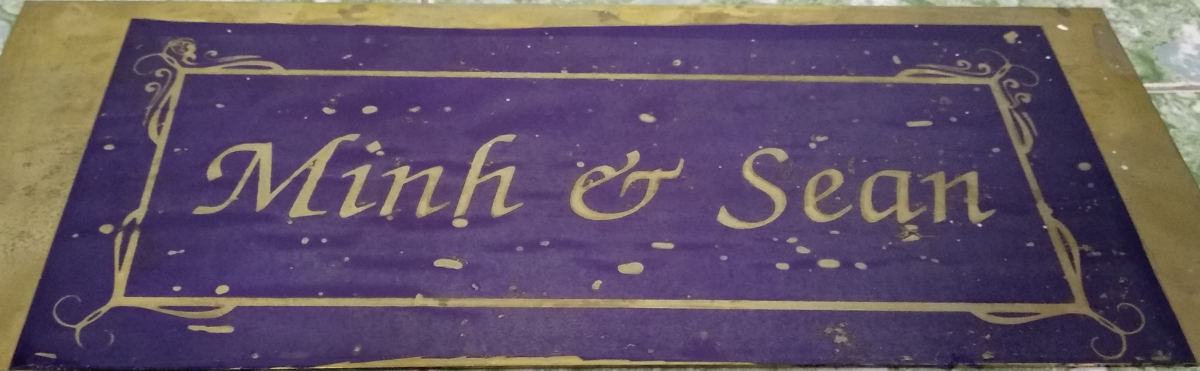
Incidentally, the gift I later made with this process was for a friend’s wedding, and it turned out quite well the day before the ceremony. A fortunate result to a few months of tinkering, but progress continues.


Why not layer a brass sheet with a thick ABS sheet and use a CNC router to cut away the brass to expose the ABS. Different bits and depths should achieve what you want.
It’d be hard to get a really fine point like the scroll work on the edges of the box. You could get close with a conical bit but you’ll have a slight slope in the brass where the point happens.
I had good results with vinyl sticker cutting. For etching, try “edinburgh etch”.
I’ve seen some vendors use the vinyl sticker method locally, and I’ve also seen beautiful brass-coated steel sheets with vinyl pre-attached. Sadly I lack access to a machine to cut the vinyl in precise patterns, and for some of the detailed designs I’ve drawn up it’s not suitable. It can be a really good method though.
I had considered coating the brass sheets in wax and manually cutting the pattern out as a somewhat older version of this method.
Wax flakes unless it’s really soft, especially along edges or in corners. I spent a lot of time trying to use it as resist. Jewelers use stuff more like pitch. (In general, if you want to find a metalworking technique tested heavily, go look at jewelers, because they have like three thousand years of testing stuff out.) Even when I submerged metal in molten wax until it was all the same temperature, so it was stuck the best it was going to, and I’d cut the wax 50% with motor oil, it still flaked when cool. It was disastrous with electrolytic etching. Water would get under the edge and bubbles would form. But the same thing happened to a lesser extent with every liquid etch I tried. FeCl3 with a sponge might not be quite as bad?
The Clickspring YouTube channel has one public and one Patreon video outlining his brass etching regimen. He uses photo resist film, and has several tips to get the best out of it, including thoroughly cleaning the surface, and using a direct heat source to bond the film. He also talks about how best to fix small errors in the resist after UV exposure, and how to clean up the brass afterwards. Worth a watch.
https://www.youtube.com/watch?v=qpy5O0b7cL8
Clickspring is amazing, and their results speak for themselves! I plan to try some of their methods after I buy some less bad photoresist. The stuff I purchased this time was unusable. I paid 3$ for a large roll and got what I paid for.
“I reasoned that painting on photoresist wouldn’t have that problem, but could not find any local source of photoresist paint. ”
Special photoresist paint?
I’m pretty sure that plain old spray paint would do!
Shallow etching…
Mask your design with thing waterproof.
Put in some thick rubber gloves… Get a sponge dip it in your electrolyte. Attatch it to an arc welder and ground the sheet of metal. Give your metal a wipe with the sponge. Don’t let electrolyte get inside the gloves.
For deeper etching you want to leave for a day or two.
Two sheets of acrylic. Drill loads of small holes in one and put a bead of silicone around the edge of the other, lay on a few long wires on the sheet so the ends stick out one side a little and stick the sheet with the holes to make a sandwich with a wire filled air gap. Cover your brass in melted wax. Etch on your design or put on a mask prior to waxing then peal it off. Stick the wax side of the metal sheet to the hole covered side of the acrylic sandwich. Make a couple of holes in the other side of the acrylic at opposing corners add some tubing and use a fishtank filter pump or similar in a small container to circulate the electrolyte and let it precipitate out in the bottom of the container.
Multiple layers of spray paint worked much, much better for me than wax ever did. I tried several wax formulations and every one of them chipped and separated during etching.
I like the idea of silicone caulk or adhesive. That stuff sticks really well. It’s a pain to remove, though.
If you have access to a laser cutter, you can do what we do at my university to make PCB’s.
a) We take our unetched copper PCB, and we spray paint it black with at least 2 coats of black spray paint. The spraypaint serves as a resist for the etchant
b) We then use the laser cutter in our design department to blast away the black spray paint and leave the rest of the paint undisturbed (the board now has the mask). The board is copper which sucks away heat, so there is no real chance of harming it with the laser cutter, but the paint burns off nicely. You might want to make 2 passes to make sure.
c) We now put the PCB into the etchant solution and warm it a bit to make it work faster
d) We come back in the morning and collect our PCB, followed by cleaning and drilling.
You probably do not have a laser cutter, but there are many places that offer laser cutting services that might be able to help you cheap.
Was going to say this. I’ve done this with large format pieces too and it’s the best bang for your buck even if you have to rent cutter time.
Just to add, the laser method has a tendency to leave behind a layer of burnt organics that will mask the “exposed” areas (why people end up doing multiple passes). A reliable fix is to *very softly* clean the masked board with a toothbrush and diluted isopropanol before etching.
The more robust paint you use, the better. The laser has no problem ablating the paint, however it helps fine features to tolerate the toothbrush. I got ~0.2 mm features no problem when I added the brush step.
Spend some time focusing on surface prep. Oils and oxides on the surface of metal have a lot of influence on processes like etching and plating. Pros say that 95% of the job is preparing the surface, and the actual etch or plate is the easy part.
Cleaning and activating a surface is like any other skill: you spend some time tinkering with it to find a combination of materials and technqiues that produce goodo results, then they become part of your process. I personally use a lab detergent called Alconox for the first pass, a warm lye bath (sodium hydroxide) to strip organics as a second pass, and a goood rinse.
Some (all?) photoresist uses a base to develop it. So you don’t want a base (some soaps) left over on your cleaned brass before sticking the photoresist film to it. Include a rinse of vinegar (a mild acid) and then a rinse of water.
Rather than using normal (and harsh) etchent, try electroplating (with is also electroetching, depending on the current direction). 5 to 12v DC is all the voltage you need. Copper sulfate is a lot easier and cleaner to work with. You can get it at the hardward store as Root Kill – its used to kill roots that invade sewers. I’ve had good control and good detail etching brass sheets this way.
As it turns out, this was the first thing I tried in an effort to get away from ferric chloride. I tried voltages from around 2v to 19v and a variety of solutions. The results on brass were very poor — the zinc etched out of the brass much faster than the copper, leaving behind a brittle mess of not-brass.
If you’ve had more success than me, please share, I’d love to hear it!
I stopped persuing etching a while ago due to lack of facilities, but I have one HUGE piece of advice I wish was more readily passed around on the internet when it comes to photolithography.
Some background: I tried toner transfer first, and tl;dr it never worked consistently, but on average it worked better than my first photoresist attempts.
The majority of the time, poor results using dry film photoresist are caused by the printer. You cannot readily tell this by eye. I think it’s critical to buy a step sensitivity guide (google “Stouffer 21 Step Sensitivity Guide.” This is basically an industry standard transparency strip with a gradient of rectangles with different darknesses. Any decent photoresist datasheet (for example, try “Dupont FX900”) gives you an idea of the required opacity to prevent exposing masked regions given process parameters. For example, FX900 will hold resist anywhere from 6-9 on the SST-21 in the recommended exposure range. I think this is actually much better than other resists, IIRC.
I tried MANY different printers. When it came to inkjets, only some printers, at very specific settings (not necessarily “higher quality”!) would print *barely* dark enough (maybe 7-8). If your alignment isn’t critical and your printer happens to be really good at feeding consistently, the best results I got came from printing a transparency twice (got step ~12-13 iirc). Darkness was not correlated with printer price, though I only got to try maybe 4-5 and it wasn’t a good sample. Laser printers are MUCH more difficult. Because of how they work (electrostatically attract toner particles on a drum) large dark areas tend to be problematic. If you compare with a step wedge, they usually are much darker on the outside and have pinholes in large dark areas. The only printer that ended up working was a large, extremely expensive Xerox commercial grade printer I used in a library, which got me consistently to the edge of the required step range (~step 9-10 IIRC) even for large toner areas.
After having a decent mask, everything works MUCH better than toner transfer. The really random behavior of printers also explains why there are so many “tutorials” on the internet that swears by inkjet or toner and insists the other type doesn’t work.
Anyway, tl;dr buy a stouffer 21 step wedge to diagnose problems with photolithography. It’s probably your printer.
I didn’t get as far as actually exposing the photoresist much, but thanks for the advice! This will be useful to know later on.
I have a low-end Brother printer, unfortunately one of the models that’s notoriously picky about what medium it prints on and does leave some pinholes in the toner fill. The whole point of this process was to be able to run the full etch at home without having to buy yet more equipment. There are plenty of reasonably priced print shops in Vietnam, and I may give them a try as per your suggestion!
The UV index is pretty high here so I just use normal paper soaked in water when exposing the boards, this part seems to work fairly well. I have a UV meter with digital output so may develop an automated exposure process using sunlight instead of UV lights. The sensitivity guide you mentioned would be perfect for honing it!
Roughly 20 years ago, when i did my apprenticeship as electronics technician, we had a special machine to darken the laser printed transparency films. It was applying a very thin and consistent layer of “white spirit”? (Terpentin-Ersatz in german) that dissolved the toner slightly, so you would get a much better, consistent dark black. The solvent would then be evaporated and the film was ready to be used for UV exposure on the PCB. Etching results were extremely improved with that little machine…
“White spirit” is commonly known as “mineral spirits” in the US.
“Terpentin-Ersatz” (turpentine substitute) is normally a quite generic paint thinner.. I had sometimes sticking toner from copies to clear PVC document envelopes (made sticky by the “softeners” (Weichmacher) of the soft PVC. That was not soluble with ethanol (denatured) but quite good with a gasoline like cleaning solvent (“Fleckbenzin”) which my mother had to remove grease stains from fabric. Butz probably paint thinner would also have worked.
>Fleckbenzin
I know this stuff as “Waschbenzin”. waschen = to wash
But maybe it is called Fleckbenzin in some parts of german speaking Europe? Fleck = spot/stain
As some others stated, dryfilm resist is the easiest to use but surface prep is the most critical factor. A good scrub with an abrasive (Comet) is critical to prevent resist-lift.
Source: I own a photoetch company.
Did something similar when I was younger. Viscosity and heat are the key to pulling good resolution, but not on the metal. If you have access to a silkscreen t-shirt printing company, generate a screen of the pattern you want to etch on a silk. Expose and cure the silkscreen silk, wash out the uncured. Very lightly clean the bare (coating free) brass using a non-abrasive cleaner and some alcohol. You want a break-free finish – similar to an alodine or mtm epoxy bonding prep surface. Screen the brass/copper in two “half weight pulls” of silkscreening ink instead of one “pull.” Bake as if though the metal is a t-shirt. Two passes through a screen-printers oven worked for me.. If you can get diluted muratic acid (swimming pool chlorinator) without a license, I found that a 3:1 mix of muratic and hydrogen peroxide in a spray bottle and sweeping it with a soft synthetic brush gave me enough control to pull halftone dots with striations and sharp edges. I actually got pretty good results with lemon juice as well. Coca-Cola works (phosphoric acid) but it takes while.
muriatic acid is HCl, what is normally not used or suitable as a chlorinator. It is often used to remove calcium carbonate deposits and to lower a too high pH value.
But I often used a similar (more diluted) mixture to etch may PCBs because we had this chemicals at home for the pool. I think the recipe was 200ml of HCl (37%), 30ml of H2O2 (30%) and 770ml H2O (tap water is sufficient).
Stop thinking like a circuit board maker and start thinking like a 18th century artist instead. Photoresist and toner transfer don’t appear to be necessary for what you are making in the volumes you are making them. Try a paper stencil and spraypaint, touched up with a hand brush and a graver, or even freehand paint what in resist what you need.
Totally off topic here, but I am often fascinated by what items are available for purchase in various parts of the world, and what isn’t. I do think it’s a bit odd that one needs police documentation there to purchase a chemical that our bodies produce in relatively large quantities every day, though I don’t recommend using one’s stomach as a source of chemicals for etching brass. Here in the US one can purchase hydrochloric sold under its synonym “muriatic acid” in many hardware stores, though it’s usually diluted in water to roughly 30% in my experience.
Personally I would consider xylene to be more dangerous than hydrochloric acid (for different reasons, obviously), but that’s just based on my own experiences with those chemicals. My first impression with xylene: Many years ago as a young guy just starting his career I was working in a plating shop (it was a small factory that produced flexible printed circuits). I had a pair of boots I bought for that job that were tolerant to every chemical I ever stepped in at that shop, and there were a lot of them, and none were pleasant – Until I accidentally spilled a bit of xylene on the floor and walked through it (didn’t have the option of avoiding it). That stuff started dissolving the soles of my boots almost instantly! Nasty stuff.
There is a spray-on product called Toner Aide (made by Sprayway) that also does that now. No machine, just spray it on and let it evaporate / dry. Also helps getting rid of the tiny toner holes.
BTW, I also use that Stouffer 21-step wedge to get an appropriate exposure time. Very useful.
I’ve used vinyl for an etch mask with great results.
Used a Cricut to cut single sided sticky vinyl, then carefully stick the mask to the brass surface, and press it down hard with the little rubber tipped squeegee, like you do with large decals.
Vinyl peals right off after the etching process and the thing is a snap to clean up. Worked perfectly on copper and brass. I use this for etching PCBs and decorative etching, both with consistent success.
https://www.facebook.com/photo.php?fbid=1991015607588356&set=pb.100000398091676.-2207520000.1561215680.&type=3&theater
I just noticed how you were trying to heat the brass sheet evenly in the oven and thought if anyone needs to do this and needs it to be very evenly heated, a trick I learned in watchmaking school is to heat items on a bed of even quartz sand, perfectly clean.
We did this for heat bluing polished handmade steel parts, but it works for even heating of any metal. And its a low tech solution. It must be perfectly clean and even size grain, ideally white quartz sand, as experimentation found that that works best.
Not sure if this will help anyone, just thought id mention it. If you ever want to try heat bluing polished steel, this is how a watchmaker blues clock hands, screws, etc, over an alcohol lamp.