Plenty of hackers and makers are passionate about content creation. In the dog-eat-ice-bucket-challenge world of online video, production value is everything. If you want to improve your audio quality then cutting down on echoes is a must, and these acoustic panels will help you to do just that.
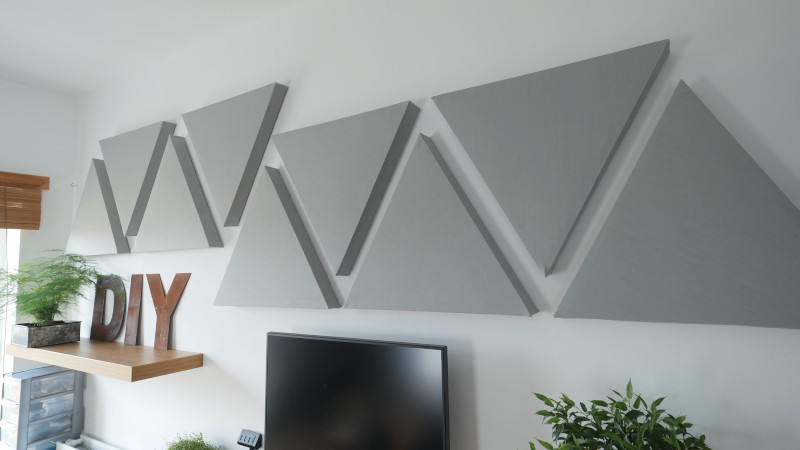
The build starts with aluminium L-channel, affixed together into an equilateral triangle with the help of some 3D printed brackets. Two of the triangular frames are then fitted together via a series of hexagonal standoffs. Foam or housing insulation is then added to act as the primary sound absorbing material. To give an attractive finish, the panels are covered in fabric. The panels are then placed on to drywall using nails glued into the standoffs.
While the panels are likely more expensive to build than off-the-shelf foam alternatives, they have an attractive look which is key in video studio environments. If you’re wondering where to position them for the best results, there’s a simple and easy approach to figure it out. Video after the break.


I thought DIY acoustic panels were just egg crates stuck to the wall?
There’s a youtube video of a guy experimenting with common materials, and ended up using a few layers of towels mounted on a wooden frame.
That test showed that a heavier barrier is better at stopping sound propagation – the driver and microphone were on opposite sides of the materials.
A church bell would have worked even better in the test as they’re great at blocking sound – being very heavy – but won’t absorb any…
A fairer test for reducing echos requires reflecting the sound off the surface. The closer the impedance of the material is to air, the easier it is to couple into it without reflection. Then, the more restive the material is to movement, the more it will absorb.
Obviously towels won’t act as excellent sound reflectors and will be restive (can’t make a bell out of a towel) – so will work. But a fairer test may not have pushed their merit as much. Using towels is similar to heavy curtains. Perhaps that’s more of a granny look these days.
The chap did get a little excited about how well they perform with bass – again that was simply due to being more mass in the way. For bass reduction the thicker the better. The wall has the node of the reflection – all pressure without movement. To absorb well, a material needs as much of the sound’s incident waveform within it as possible. Ideally more than 1/4 wavelength to allow a peak of the wave to be within the materials.
Done by the same person from this one as well, so you can find it in his channel!
Why does foam or domestic insulation need an aluminium frame? Adding more rigidity won’t make the acoustic performance better.
Why do walls need paint? It wont make them hold up the ceiling any better.
Yoa mean the paint on my walls isn’t holding up my ceiling? I don’t think I’ll be sleeping well before I can resolve this unknown new issue. ;)
For better acoustic properties, use Owens Corning 703 fiberglass. It’s not all that expensive honestly (24 sqft of 2 inch thick 2 x 4 foot panels for about $100 shipped – go in with a friend or makes some presents with the extra) and if you make smaller sized panels (like in this video), since this particular fiberglass is rigid, just cut out the shape you want and wrap in your selected cover material using spray glue – no brackets needed although you could pop in some grommets for easy hanging from screws or standoffs.
I’ve even just wrapped the 2 x 4 ft panels without cutting and they hold up great on their own.
Then there’s placement… which is a whole other story. REW is a nice free software for measuring the problem frequencies in your space https://www.roomeqwizard.com/ If you need more deadening but don’t want them to be visible, consider mounting on the undersides of desks, tables, countertops and chairs; higher end bars and restaurants will do this to make the space more acoustically pleasant.
The best measure of reverb for the layman though is to clap your hands and listen for the echos – after installing panels, they should be less “smeared” and decay much quicker.
If you have a super “live” (lots of reverb), You’ll notice plenty of benefits to cutting down the reverb in a room, not just when recording – positional audio from movies and video games will be much more directional and immersive and conversations will become more clear.
The strawboard ceiling and carpet in my lounge and dining areas absorb sound very well. The contrast with sharp extended reverberation due to the pine lining and cork floor in the kitchen area is dramatic. I have the strawboard pencilled in for an off-grid rural build currently under way. Even external sounds are less intrusive.
In the studios I once worked for, most of our wall surfaces were covered with these rigid fiberglass panels, framed in 2x2s, with fireproof architectural cloth wrapped and stapled on. Elegant and effective.
Why use an aluminum frame that can absorb, ring and propegate sound.
Aluminium is pretty dead – especially so if L channel and thin.
Now I’m wanting a frame made of tuning forks for comparison.
By how much did the panels reduce the echo?
He does a test in the video around the 8 minute mark. The difference is noticeable.
Link at time: https://youtu.be/qczNxoG8s6o?t=478
Thanks very much. I’ll go ahead and watch the video.
Please don’t use foam. It doesn’t work well the cheap stick is a fire hazard. Rock wool, Owens Corning 703, or safe and sound are the recommended materials with a low density cover fabric that lets air flow. Plus they have fire retardants so it doesn’t turn the room into a tinder box.
Good conversation on room acoustics.
https://youtu.be/1d9WmjTJniI
Why not foam? There’s plenty of fire resistant foams out there that work really well.
I’ve literally bought several truck loads of it from here:
https://www.efoam.co.uk/acoustic-soundproofing-foam.php
It’s great and better for sound absorption than rock-wool. No nasty fibres either.
So why do I know it works better? Pilfered data from Queens University Belfast (as well as lots of other sources, but too many years ago to recall) and built huge sound attenuating chambers for Cobham, Cardiff University and UKAEA.
At Cardiff, the one chamber was made by Hodgson and Hodgson (https://www.acoustictechnologies.co.uk/) and that used rock-wool. The only reason for the choice was to keep costs low enough to fit under purchase tender limits – otherwise they’d have chosen foam too. Comparing it to another that was designed and built in house with the foam, there was noticeably less reflection in the foam chamber.
Obviously rock-wool can work and is often used (and is less expensive). But for good performance, using something that’s been designed from the ground up for the purpose is well worth it.
At home though, I prefer heavily laden bookshelves to scatter sound – and being in a different room to my daughter when she’s been eating sugar.
Yea but now you are comparing foam for this specific application vs found some shot laying around
It really shouldnt be thay hard
I’ve used efoam for years. Goldilocks zone, quick, good and cheap.
There are also these.
https://www.polybags.co.uk
1) Pretty much any foam you can buy today (other than FireFoam, of course) is fire retardant.
2) There is no such thing as FireFoam.
As LightningPhil said there are plenty of suitable foams available.
I just bought some from https://www.gbfoamdirect.co.uk/foam-cut-to-size/acoustic-foam-sound-proofing/
It meets all of the relevant fire safety requirements.
A while back I wrote this guide on how to make your own acoustic panels wrapped with custom digital prints: https://www.avsforum.com/forum/19-dedicated-theater-design-construction/1316623-diy-custom-printed-movie-poster-acoustic-panels-cheap.html
The target audience here is for home theater, so the prints in use are movie posters but the digital fabric printing services will print whatever you have on acoustically-transparent fabric. The cost is very reasonable, the 4 panels built in this guide were done for a total of $80 all-in. Nothing more than basic hand tools required!
This is spectacular, thank you! I might suggest something like this for my workplace, where we’ve occupied a warehouse-like space with considerably more office-like jobs, and the reverb is brutal. Boring panels on the wall are boring, but everybody likes posters!
I used to print large-format TV studio backgrounds on paper, but these were easily kinked and otherwise damaged, and couldn’t be cleaned. I switched to fabric about three years ago, and never looked back. I use the “performance pique” fabric at https://www.spoonflower.com/, which is stretchy so minor wrinkles disappear. Comes in 56″ width and they can print up to 5 yard strips. Many other fabrics available.
If you want to listen to clear music then I would suggest you reduce the echo in the room. It can be done easily by following this technique to install it in your own house.
I think the best acoustic panels are acoustic foam panels https://acousticpanels.co.uk/product-category/acoustic-foam-panels/
I have a good experience to setup my home soundproofing.
When soundproof my home, My friends and users suggest me the best can be https://acousticpanels.co.uk/