Having a motorized gate on your driveway is great, but only if there’s an easy way to trigger it. [Andrew] says the gate at his parent’s place could only be controlled by manually pushing a button on the panel or with a dinky remote that didn’t have nearly the range they wanted. So he decided to build his own magnetometer allowing the gate to automatically open when a car was trying to leave.
Naturally, there are commercial offerings that would solve this problem. But with a sticker price of more than $150 USD, [Andrew] was more than happy to spend a bit of time tinkering to get the job done for less than 1/10th the cost with an ESP8266 and a QMC5883X series magneto-resistive sensor. Of course, this is one of those projects that seems simple enough in your head, but ends up taking a bit of finesse to pull off in the real-world.
 For one, [Andrew] had to figure out how to prevent false positives. Pretty much any object brought close enough to the sensor, including his hand, would cause it to react. He ended up coming up with a way to use a rolling average to prevent the gate from firing off just because a squirrel ran past. The built-in safeties are designed to ensure that the gate only opens when an actual car is sitting in the appropriate spot for long enough.
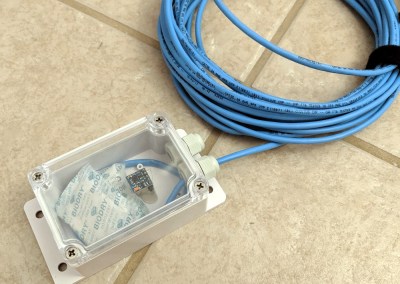
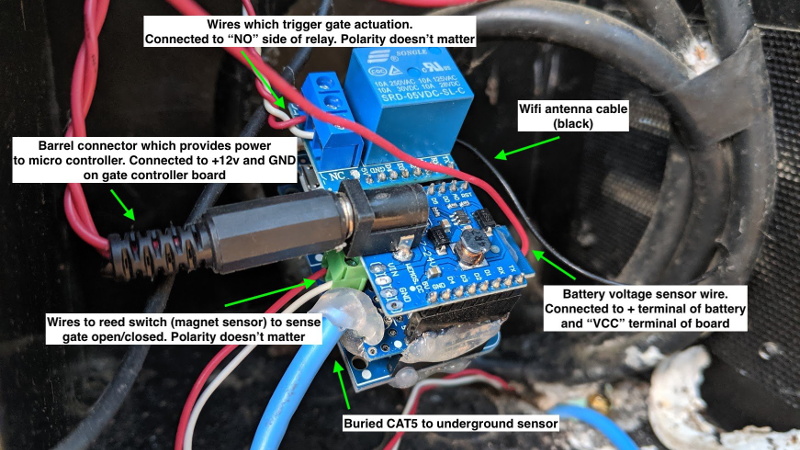
Speaking of, we love how [Andrew] deployed the QMC5883X sensor for this project. The small sensor board and a few moisture-absorbing packets were placed in a Sonoff IP66 waterproof enclosure, and buried under the rocks of the driveway. A standard CAT5 cable is used to tether it to the ESP8266, relay, and assorted other goodies that now live in the gate’s control box. In the future he says the cable will likely have to go into a conduit, but for now the system is working more or less how he expected.
If your estate isn’t quite palatial enough to have a motorized gate out front, we’ve seen plenty of projects that add some much-needed intelligence to the humble garage door opener which might be more your speed.


It seems like the website: https://www.appmarsh.com is copying your content (https://www.appmarsh.com/hackaday-detecting-cars-with-an-esp8266-magnetometer/ )
Thanks! We’ll send them a scary e-mail.
BTW: feel free to reach out to us directly at editor@hackaday.com instead of posting in the comments.
There editing gave me a few laughs thou.
“however finally ends up taking a bit of of finesse to tug off within the real-world.”
https://www.urbandictionary.com/define.php?term=tug%20off
I already know how to hack it haha. He should never have made it offcial. Now everybody can open his gate….security mistake nr. #1 – Give the attacker the intelligence he needs to get in.
Yes, but he didn’t post information about the second signal.
The one that cancels the explosion, if only the first signal is received.
Haha! Luckily the gate isn’t so much to keep people out as dogs in. No need to hop the fence to hack the sensor, you can just use the “push to open” button on the side of the gate controller’s housing. Here’s to hoping the dogs don’t read my entry and figure out they can lay on top of the sensor!
How do these like strong magnetic fields?
My experience with the Banner M-Gage units taught me that absolutely nothing beats an old fashioned inductive loop.
Btw, indoor cat5 is absolutely terrible for this application.
I’ll have to explore that eventually. As far as I’m concerned and induction loop would be great but involves pickaxing a larger trench in the driveway. Maybe when it gets cooler..
In your mind what’s the biggest concern with the cable? I assume it will degrade and ingest water over time, possibly very soon. We’ll see how long it lasts before I need to rip it up and replace/conduit the cable.
I’d say not suited for location.
I was a contractor in the parking controls and gate operator business for 25+ years and specialized in cleaning up other people’s shit jobs. Use of cat5 wire in outdoor applications, especially where constant DC is present will lead to a wonderful turquoise slurry.
Better to pot your electronics in epoxy and use a cable that is rated for direct burial.
I have installed or been responsible for several hundred loop installations.
A good resource is renoae.com
The AX series detectors operating instructions give guidelines on loop sizing and layout.
They offer many detector flavors and have been my go-to for years.
As an aside, enabling the close timer without entrapment detection is not advisable.
Your well documented homebrew device does expose you to a level of liability you may not be aware of.
The lawyers love this stuff!
After your comment I may just dig it up and do it the right way before this turns into a headache. Interesting thought about entrapment that I’ve never considered. The good news is that the auto-close comes from the gate controller board itself and has a detector, independent from my build.
It’ll work. Hope he doesn’t own a bicycle, motorcycle, moped, skateboard…
What happens when the silica gel is saturated in a few days?
It’s a sealed box, so hopefully they never get used. They are there as a contingency.
Where is this? Arizona? I think osmosis will draw every scintilla of moisture down into that box to condense.
Best to not create a cavity where moisture can accumulate.
Very cool and nice work! I’m a gate and controls automation professional technician, and I love to see innovation like this. Now on a professional note, I’m required to mention that there are existing Magnetoresistive Sensors available (https://www.emxaccesscontrolsensors.com/product/cs303/) as well as a variety of other vehicle detection systems (induction loops, ultrasonic detectors, vibration probes, infra red sensors, microwave motion detectors, etc…), but none are low priced. I also have to mention that your sensor likely won’t last long due to being outdoors. And that the device isn’t UL certified and you assume liability should something go wrong. Other than that, I really like it! Maybe add a zener diode to the relay output so if your circuit fails you don’t back feed voltage to the control board of the gate operator and damage it.
What? It’s a dry-contact on a relay… galvanically isolated. There would have to be arcing or some other breakdown, which will be unmitigated by the addition of another component. Furthermore… a zener makes absolutely no sense across a relay output at all. Please explain your reasoning. As a machine-tool/automation tech who does machine-level and component-level repair, it makes no sense to me.
He mentions that he knows of more expensive alternatives.
Even if it were UL listed, he assumes responsibility. He built it. If I take a UL listed powersupply and douse it with gasoline, I’m still responsible for the fire. I like pointing out liability, but mentioning UL certification on hackaday?
Going out the gate is one thing, but coming in is another application. I currently have a Mighty Mule driveway alarm, which is basically a magnetomiter as well. It runs sends a 433 Mhz signal to a little receiver in the house when someone drives in. It is a very wife pleasing addition to the gate. However it lacks a few things. One is reliability. It does not feature a moving average to prevent false positives, it is battery operated, and doesn’t have any way of triggering an output to allow connection to a Raspberry Pi, or Arduino input. I think this project might be the solution I have been looking for as an upgrade to my system. The QMC5883X being the key ingrediant. There is hope for my little project yet. Thanks
Glenn.
One addtional comment. I did a search for the QMC5883X but could not find it. All I found was the QMC5883L. Where can one buy the QMC5883X?
Thanks.
Glenn.
That’s a typo. QMC5883L is what I’ve used
Thanks. Where did you get it? I like your project. Well done.
Please ignore question regarding location of part. Found it in your parts list…Dooh!!
Great project. I have a project that lives in a similar environment – measuring sidewalk surface temperature. I’ve been having a hard time keeping the wet out using the same enclosure you have. Let me know if you come up with the fix! Desiccant packs didn’t do the trick for me. :)
So far so good here but I’m still expecting it will fail at some point. When that happens (or when I’m sufficiently motivated) I’ll pot the sensor inside a few inches of PVC.
I did something similar only on lsm9ds1 sensor. I am currently planning to switch to GY-271 because it is cheaper. With lsm9ds1 I have problems with the temperature change, the built-in algortym to correct the readings when the temperature changes is not quite good. And the second problem was the growing readings after several hours of work. Do you have similar problems with your sensor? How does it deal with temperature? Cyclic reset helps with lsm9. How long is the wire between the sensor and wemos d1? I flooded my sensor epoxy resin.
I’ve occasionally had to soft reset the D1, hard rest a few times as well. I haven’t had issue with temperature changes. I’m not sure if my readings are affected by temperature, but since I’m using a running average of readings that wouldn’t be an issue anyways. For V2 I would definitely pot the sensor and use burial/waterproof CAT5. The run is about 25′ from D1 to sensor.
I did stress tests on my sensor, cooled it to 2-3C or warmed it to 40C and brought it to room temperature. His disturbances may have been due to moisture but in fact readings on this lm9 were raging. I have no problems with Wemos so far – lsm9 is reseting in intervals so working stable for now. I was surprised by the 25′ cable length? If I counted correctly, it will be about 7.5 meters – I2C?
nuce sensor. As a bonus, a pocket full of change will get you in when the remote dies
*nice…. bah