[Eric Weinhoffer] and his colleagues did a great comparative tear down of the MX Master 3 and the MX Master 2S mice from Logitech. Tear down’s are great fun and often end up teaching us a lot. Looking at the insides of a product can tell us a great deal about how to solve certain problems, or avoid pitfalls. Opening up two versions of the same product provides an even greater wealth of useful information on how product design evolves based on lessons learned from the earlier versions. Logitech is no greenhorn when it comes to Mice design, so the MX Master 2S was already almost perfect. But looking at the Master MX 3 shows where the earlier version fell short of expectations and how it could be improved upon.
These mice have intelligent scroll wheels, which can rotate in either “detente” or “freewheel” modes. Detente allows slower, precise scrolling, while freewheeling allows rapid scrolling. The two mice models have completely different, and interesting, methods of achieving these actions. The older version has a rubber-coated wheel and uses a motor, which turns a cam. This forces a detent ball onto the inside of the wheel for detent mode and releases it for free mode. Once the rubber wears off, the mouse is pretty much headed for the dumpster. The new metal wheel does away with the rubber coating as well as the noisy, slow, and prone to wear-and-tear motor assembly. The actuation is now done using a bi-stable electromagnet. A 25 V pulse magnetizes the coil which sits inside the wheel and it pulls on little metal teeth on the inside rim of the wheel. This gives a noiseless detente feel, without any physical contact. A second 25 V spike de-magnetizes the coil, allowing the scroll wheel to spin freely.
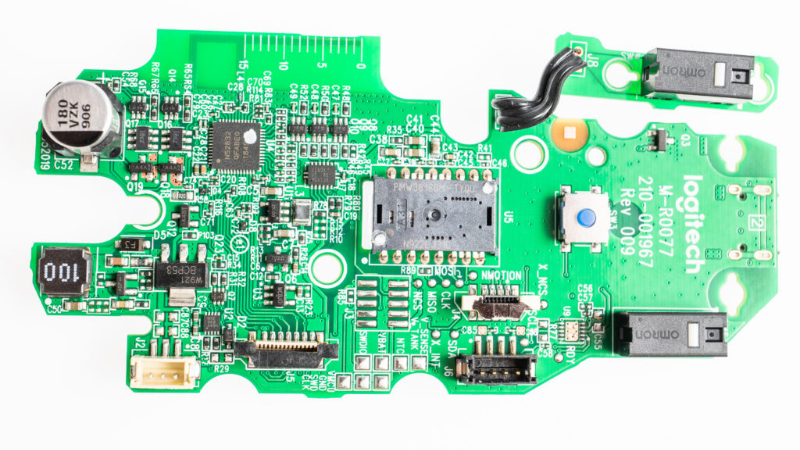
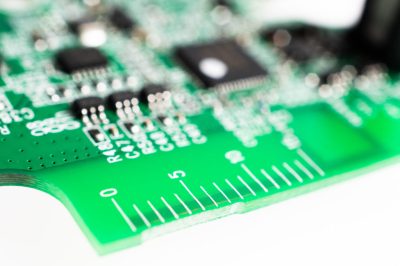 [Eric] points out several incremental changes in design which have resulted in improved ergonomics. He also uncovers a few nuggets of useful information. The use of interchangeable mold inserts help make molds last longer while still offering the flexibility to make changes in the molded part. It’s interesting to see special components being used for withstanding vibration and high-G forces. Some of these insights can be useful for those moving from prototyping to production. There’s one puzzling feature on the new PCB that [Eric] cannot figure out. There is a 15 mm scale screen-printed over the blue tooth antenna. If you have an answer on its purpose, let us know in the comments below.
If you are left-handed (which makes 10% of us), you’re out of luck with these right-handed mice and might like to sign one of the several online petitions demanding lefty versions.


seems like a simple mechanical slide would be much more effective over time and cheaper to produce
Maybe the scale has something to do with computer vision guided quality control?
That was my thought as well
Maybe a leftover as reference for tuning the antenna.
this is the most plausible answer.
I wouldn’t think so. Vision systems I’ve worked with use a precision calibration fixture or target and would have no use for printed numbers or scale. (also, what if the silkscreen scaling or placement is wrong? There would be no way to inspect that)
I think that numbered scale is human readable for some reason.
I find the shaved edge of the PCB starting at 0mm and continuing to about 8mm interesting though.
This is where the pcb is milled free from the panel!
The scale is there for antenna tuning, specifically for measuring how much is trimmed off of the antenna. Sometimes antenna designers will make the antenna a bit longer than needed for the first prototype allowing for easy tuning. Since it’s at 0mm, it looks like they nailed it first try.
Seems weird they would leave the screen print on every single PCB after the the first proto. Then again I guess they already have the screen prepared.
Leaving it on the board gives them an instant answer as to whether the antenna is the correct length or not.
Think about it if they had to manually measure each and every board’s antenna (and how much time that would consume).
It also gives some legitimacy to what Matthew Trey stated above about it being for CV guided quality control.
The antenna will not be tuned for each mass produced piece. It will be tuned at the prototype and then the PCB design data will be adapted. But perhaps it was like that: They got the length correct in the prototype, so they could use the PCB design files as they were. No change to the length an dno change to the silkscreen.
Yep, I agree on that.
I’ve done this for a design where I also used an Inverted F 2.4GHz PCB antenna for BLE. I have found during this project that these types of antennas are not very sensitive for plastic and human interaction /dielectric properties.
If you have ever have the room for it the inverted F antenna is a great design with good directional and range performance.
And as ‘qwert’ mentioned it is weird that they still have the silkscreen printed on this, however proto runs for these kind of consumer electronics usually are at high quantities (e.g. 5000 pcs).
If it is meant for tuning/length measurement of the antenna, then it seems odd to have the origin “0” at the far end of the antenna stub, instead of at the base.
Maybe it’s an inside joke, after all. Just to get all of us scratching our heads.
The designer probably left it in there on the production run as an accomplishment to say “I got it right on the first try.” With the added “benefit” of not needing to modify the silkscreen.
$100 tear-down. Hopefully they improved the longevity of the buttons. That’s what happened to my last MX.
Yeah. Bad microswitches are infuriating. If you or somebody you know can solder then it is fairly easy to replace the microswitches. If you only have solder braid or a solder sucker then break open the faulty microswitch so you can pull out each terminal individually.
I repaired many tact switches in mice back when they were not cheap. The little snap domes inside the switches would crack. So I’d take apart another junk mouse, carefully cut off the melted tops of the nubs holding the metal top to the right switch body, then take out the button and the dome.
Transplant the dome to the broken left switch on the good mouse then put in the button and put the top cover back on. Some careful application of *very tiny* drops of super glue would hold the top on the switch.
The hardest part was finding a bad mouse with the same switches, or close enough for the domes to interchange.
The other big problem with mice was one or more wires breaking just outside or just inside the mouse body. I did a lot of cable shortening and even some re-routing for less stress on the wires. I noted that the cheaper mice tended to have molded flexible strain reliefs on their cords while the expensive mice ran their cords through a high stress convoluted path to the exit, without a molded on strain relief.
I used to work with a guy who would try and fix mice. He would proclaim them fixed at any rate. This was an actual business and soon people realized if they came to me I would just trade them for a new mouse. The other guy discovered I was trashing “perfectly good mice” and pitch a fit and fish them out of the trash. It got so I would have to stomp them. He would also retrieve deal ethernet cables out of the trash to “re-crimp” the ends but they would get folded back in with the good ones. I got to snipping one end off of the suckers before trashing them. One day I needed a long cable and he had a tangle of “good” ones. I must have spent half an hour getting to the far end of a cable only to discover it had the other end chopped off. I was livid. From then on I chopped BOTH ends off.
I mean was anything done to prevent it from being put back together?
Those omrons look like they’re as easy to change as the ones on my G3, which I’ve changed 2 times now, if the switches are the only thing that break, I’ll have my mouse forever ^_^
Same here! (but with a Performance MX) This mouse seriously feels like they used my hand for the mold. I mentioned in another comment that if you look, you can usually find 2 versions of Omron switches, one from China and one from Japan. The Japanese ones are a little more expensive, but that hardly matters when you are buying a couple, and they last way longer. I’ve had this mouse for dang near a decade, and swapped out the original switches 2-3 years after I got it. Still going strong on these Japanese switches.
You know you can put stuff back together, right? Top Gear Top Tip: Logitech uses Omron switches, but most are from China. You can hop on Digikey and usually find the same part, but from Japan. Those will last much longer.
My MX right button begin to badly behave, a good and firm infuriated thump on the mice didn’t kill it and resurect the faulty microswitch (for now).
The software controlled dual-mode scroll wheel is much older than 2015 MX Master. It appeared ~13 years ago on the MX Revolution with a similar motor based mechanism.
The MX Revolution was one of the best mice i ever had. Used it daily for many years, until the microswiches failed. The software controlled free spinning wheel was, well, revolutionary. it would switch the mode depending on the scroll speed and automatically re-engage if it slowed down. It is also a relatively heavy wheel, which has a very nice feeling to it. Unfortunately i could not get a replacement back then, since it was EOL. Then i had the MX1100 for a short time, which also had a free spinning wheel, but with a mechanical switch.
i soon switched to the Performance Mouse MX. Same mechanical switch for the wheel. It also failed at the microswitches, but i got it replaced on warranty after 5 years, still using the replacement today. I do have the MX Master at work. It is very nice too. Skipped the Master 2S. Since my current Performance mouse is coming up on it’s fith year and will soon probably fail too, i will get the MX Master 3 then.
Hop on DigiKey and get replacement switches that are made in Japan. Should only take a couple minutes to swap them out. Logitech also sells replacement bottom slides for most their mice, if you bugger them up trying to get to the screws.
MX Revolution FTW. I’ve replaced the battery twice and the switches once. Also grabbed a spare on eBay at one point just in case.
That sexy looking soft plastic inlay that turns to goo right under your fingers in months, yuck.
The inlay isn’t soft plastic and (n=1, on my Master 2S) is perfectly normal after a 6 months of use.
Best sealed away from air.
The scale may be for assembly for measuring the harness length and bend placement.
Bluetooth is one word. Not ‘blue tooth’
I’m wondering if the scale is used for testing the movement of the mouse. A 15mm movement should result in a specific change in the mouse position.
Logitech M-BA47 user here. Never had to replace the Omron switches. Has been in use daily since I bought it.
the scale is for antenna tuning