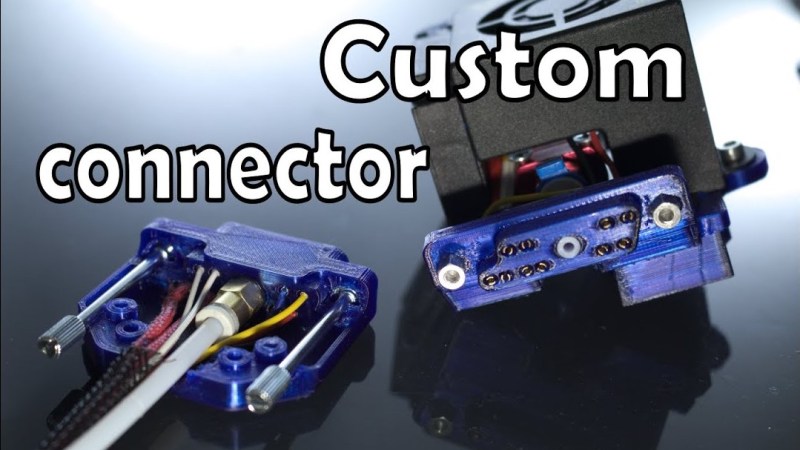
We sometimes forget that 3D printers are just CNC platforms with a hotend attached, and there a whole range of alternative tool heads to use. [Jón Schone] has been doing exactly that, and needed a way to quickly disconnect his hotend completely from his printer, so he 3D printed his own custom D-sub connector for both filament and wires. (Video, embedded below.)
[Jon] has added a number of upgrades for his Creality CR10 3D printer, including a quick change tool mount to allow him to also use a laser engraver and even a small spindle. When the hotend is removed there’s no way to quickly disconnect the wiring , so the print head is usually left connected and placed to one side of the printer. For a quick detach solution for both wiring and the Bowden tube, he first modified an off-the-shelf D-sub connector. The connector was relatively expensive, and the tube had a tendency to pop out, which led to some failed prints.
[Jon] wanted to use proper Bowden tube fittings inside the connector, so he designed and printed his own D-sub connector and bought loose contacts. Pushing the contacts into the housing turned out to be quite difficult to do without breaking them, so he’s working on making that process simpler. This is just one of many examples of 3D printing 3D printer upgrades, which has been a core feature of the RepRap project right from the beginning. Check out the video after the break
We have no shortage of 3D printer hacks and there will be many more to come. Some cool recent ones includes the Jubilee CNC that was built from the start with automatic tool changing in mind, and a printer that fits in your backpack.


Reminds me of a 11W1 connector…
https://sc02.alicdn.com/kf/HTB1uRGCLyrpK1RjSZFhq6xSdXXaF/229641202/HTB1uRGCLyrpK1RjSZFhq6xSdXXaF.jpg
Yeah, but that’s “relatively expensive, and the tube [has] a tendency to pop out, which [could lead] to some failed prints.”
Nah. I would rather use “mig welder euro connector”, it already got bowden tube :-) Also gas line in case you need it for laser cutting head :-)
OK, then you could use a 2kW hotend :-) but how to connect the temperature sensor?
I was amused the first time I took a good look at the innards of a MIG welder because it looked so much like the familiar Bowden type 3D printer extruder. I have heard tell of experiments using the business end of a MIG welder as a low resolution 3D printer that lays down steel rather than plastic though I gather the output is a bit rough and I imagine that unless your welder’s duty cycle is upwards of 50% it’s going to be dog slow too.
Still, the mechanical similarly is interesting… I suppose there are only so many ways to push a continuous thin flexible strand of rigid material through a tube. Does anyone know of a mechanism _other than_ a driven pinch roller for this? (I’m content with the performance of the pinch roller in my MIG and my 3D printer, I’m mostly just curious…)
My thought exactly. There used to be a whole family of (Amphenol?) configureable connectors like that, where you could select insulator blocks with coax, HV, high current, etc contacts and sandwich them together in a shell. I think they were aimed at military and aircraft rack mounts.
They still use them heavily.
https://www.amphenol-aerospace.com/pdf/catalogs/LRM_Catalog.pdf
Yeah! We need an rgb multi-material version that mimics a DB13W3 connector.
There are companies that make fluid and gas line fittings that fit in place of the typical coaxial cable connectors for the W holes. SUN used the 13W3 on their workstation monitors.
Sun, SGI, NeXT… a few companies used DB13W3.
Of course Sun uses composite sync, SGI uses sync-on-green… so plug a Sun GDM5410 monitor into a SGI Indy and it’ll just sit there and look stupid. I have to use a home-made DB13W3→DB15HD adaptor so that I can plug said Indy into the “VGA” input (which *does* understand Sync-on-green).
This kind of contacts is enough for 40W Hotend ? seems limit
Normal sub D poins are good for 3 or 5A. with 24V that’s 72W or 120W
The current rating is probably for a specific voltage and must be derated at higher voltages/temps. There are no free lunches and I very highly doubt dsub contacts would survive in a system handling anywhere near 72W much less 120W loading.
really wish there was a way to edit comments, forgot to say that of course you could parallel multiple contacts to increase current capacity though
And those are all completely overkill since the heater cartridge on Creality’s default hot-end is only 40W maximum, that’s the most common type of generic heater cartridge that you’ll find in 3D printer hot-ends.
Voltage is only a concern for isolation and contact arcing. Current rating is based on heat/power dissipation. 3A at 12V or 3A at 24V makes no difference to the contacts, it’s the current that heats them up.
I think I’d be looking into getting rid of some of those pins. Pretty sure everything could be done with a power pair and a data pair, of just a single LIN bus wire.
There’s so many wires of noisy analog data in use that seem like they really should be digital.
The Duet3D people are working on a smart extruder board that will use CAN bus to control the extruder, fans, thermistor, and heater. The wiring will consist of serial data and power.
Now that’s my idea of how you do electronics! It would be awesome if that catches on!
I’ve had similar thoughts although it hadn’t occurred to me to actually run the filament through the DIN connector. How awesome!
Anyway.. to me it seems like getting firmware which supports a bus would be the hardest part. I’ve been looking at Klipper. It already supports putting different parts of the printer on separate micros. What’s missing, as I understand it is the bus. I think it only allows a star topology with the Pi, Beagleboard or whatever runs the “main” part of Klipper requiring a separate serial port for each dangling micro.
I’ve been daydreaming about adding a Juice4Halt to my Octoprint Pi, the version with the RS-485 interface. Then I would mount it permanently to the printer, switch from Marlin to Klipper and try to hack Modbus support into Klipper so that I could simplify all my wiring much as you suggest.
I’m not sure just how difficult or easy this would be to do but I have several other projects to finish before I get to trying.
@mrehorst says CAN bus. Would CAN bus be better than Modbus? I don’t know much about it except that it sounds complicated and I mostly hear about it being used in cars along with proprietary codes that are undocumented in order to make 3rd party accessories harder to design and market. The easier to hack the better I think when it comes to building an open source 3d printer.
I dunno that CAN is the right choice. You have to use dedicated CAN transceivers at all the nodes, and there’s some weirdness in that a CAN packet isn’t a fixed length, as they insert bits in the middle of runs of same-parity bits to assure clock timing. Obviously it can be highly reliable, as they wouldn’t use it in cars otherwise, but you probably need a lot of experience and design time to get something that’s accurate in real time applications. The protocol is documented, but I believe that both the original and the newer negotiated data rate CAN require paying licensing fees to Bosch or purchasing the documentation from ISO.
@kc8rwr CAN bus unlike Modbus is multimaster and has arbitration built into itself. The lower the Id of transmitting node the higher priority it gets. Using this mechanism wisely you can design system which is very simple to configure – i.e. set addres of a extruder (from extruder range x to y) with two dip switches, plug 4 wires (power, gnd, CANH, CANL) and of you go printing.
The proprietaryness of CAN sucks, but it’s hard realtime guarantees are how people put the stereo system controls and the safety critical stuff on the same bus in a car without killing everyone. Probably not a good idea, but it shows how cool the bitwise arbitration can be.
An open source software defined version would be awesome, if it were possible without unreasonable CPU load.
I’d much rather have two separate connectors for filament and power/control.
reminds me of 13w3 Sub-D connectors -> https://www.digikey.com/products/en/connectors-interconnects/d-sub-connectors/439?k=13w3
The modular ones without power or HF plugs look like they could easily be equipped with a filament feed line tube.
Wouldn’t it be far far easier to take a normal cheap connector and just drill out a hole in the middle for the bowden connector?
When you’ve got a 3D printer, you try to solve all your problems with 3D printing.
What about the 3dps that are using an HDMI plug for the connector? I think it’s the new BIQU one…