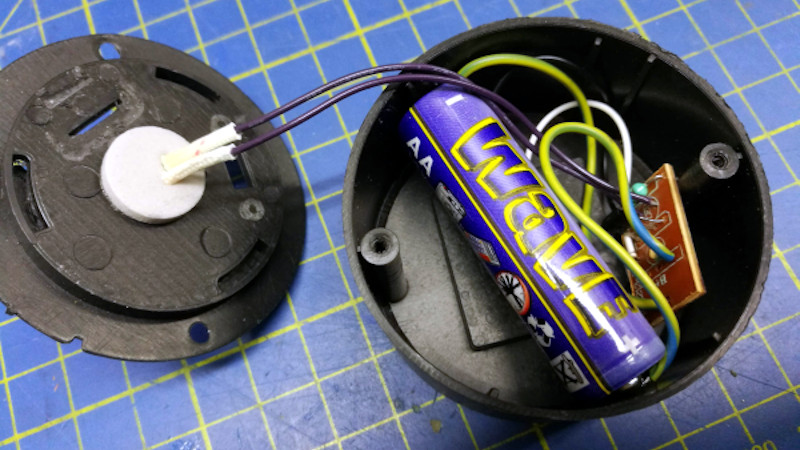
If you walk the aisles of a dollar store one constant that you will see worldwide is the Chinese solar lamp. Your dollar gets you a white LED behind plastic, mounted on a spike to stick into the ground, and with a solar cell on top. It charges in the sunlight during the day and then lights the LED for a few hours at nightfall. They are in gardens everywhere, and no doubt landfill sites are full of them because they do not last very long. [Giovanni Bernardo] had one that stopped working, so he subjected it to a teardown to find out what was up, and what made it tick (Italian, Google Translate link).
As expected, the culprit proved to be a leaking and corroded 1.2 volt NiMh cell, and its replacement with an AA cell brought the lamp back to life. But the interesting part of this tale comes from his teardown and analysis of the lamp’s components. It’s centered around a YX8016 battery charger and power management chip. The device has an amazing economy of design with only four components including the solar cell and the LED. The final component is a small inductor that forms part of the boost converter to keep the LED lit as the battery voltage falls. The chip switches at 580kHz, and produces a 3.2 volt supply.
If this is a subject that interests you, don’t forget to take a look at the power harvesting challenge we ran a while back.


It’s going back over a decade but I recall we used to call those lamps 4 leg component a “quadistor” !
In my experience with inexpensive solar lights, they almost always get destroyed by water ingress. I might have to try potting the PCB or use a conformal coating. Anyone know of any cheap options for going that route. Drilling a few small holes in the bottom of the housing that contains the PCB.
I’ve always found a different failure mode – over charged batteries. And I’ve gone through at least 4 sets of LED lights so far. The charge circuit keeps on charging and eventually cooks the battery. I’ve even disassembled one and set out the parts with the solar cell in bright sunlight and measured to see if I was right. But these weren’t the cheap sets from the dollar store, these were all the better sets from LOWES or Home Depot. So, neither one has cornered the market on crappy solar lights!
The next ones I put in will be LED, but they will be powered with an outdoor 12V power supply.
If it over charges can you just put a bigger battery in? Three ones I’ve seen have 300mah or smaller batteries so a decent as might solve the issue.
There was only room for the one battery in the lights I bought. But I sure would have put a larger battery in them if I could. The battery in these lights are only good for about 3 – 4 hours of light and a larger battery would have extended the on time.
And BTW, light on duration is how I figured out they were over charging. After a couple of months the lights exposed to full son would start going out sooner than the lights in partial shade. But they would all eventually fail.
Actually it depends on the current output from the solar cell. If you put a larger battery in and the cell can’t charge it fast enough, the voltage curve of the battery might keep it below the turn on voltage of the boost circuit. These are garbage lights and they DO overcharge the smaller batteries. I have a habit of hot glueing the screws and seams to keep water out. They lasted marginally longer. These lights are designed at a low cost and with planned obsolescence in mind. You can’t make much off a dollar, so it’s easier to pump out cheap lights to save a few dimes a piece and force consumers to toss them after 1.5 years in the elements.
No problem with a turn on voltage, this is very low. I often test these lights with my LED torch to check if they just did not charge due to bad weather or have a dead battery: light the solar cell for 10-20s with a 3W torch and when you switch it off and the battery is OK, then the LED will light for a few seconds.
But often they have batteries with extremely low capacitance for their size from the begin on. A good NiMH AA has 2000 to 2500mAh, but there are crappy ones with only 300mAh in some of them. There are even cheaper ones with a tiny 40mAh niMH button cell.
Try shooting it with a bunch of Rustoleum Leak Seal. It’s a spray-on waterproof coating, very flexible after it dries. To protect the battery terminals, I’m not sure. Lots of spray silicone, I guess?
I’ve got a box full, I was hoping to repurpose the solar cells, but they are bonded into the clear plastic that has gone cloudy. The only way to reuse them seems to be to individually grind the dead stuff off and repolish, blah.
You might tr “unfrosting” them with some sort of clear overcoat — spar varnish, perhaps?
Or melt the plastic away with chemicals and use it bare.
I might eventually try that, leave them soaking in acetone or brake fluid or something.
there are various commercial cleaners for this, I use one on my car headlights, but the orange based cleaner seems to work well.
The plastic is often epoxy resin. Very difficult to impossible to dissolve with solvents.
They are past that, too deep into the plastic, also top surface is very rough and deteriorated. Spar varnish is kinda temporary also, it also clouds up if left in full sun over 2 or 3 years.
It depends on the light. I’ve found a complete range from really nice cells to nearly potted in resin that has turned yellow.
I use a BBQ starter flame thing to gently heat the outside of the Cell to soften the hotmelt underneath then pry of the cell. A hot air gun would work too.
There are a lot of different designs of these things. Some use amorphous cells, some use polycrystalline. Some use a CdS cell to detect when it’s dark enough to turn on the LED, some use a more clever scheme requiring no CdS cell. Some batteries are AA, some are 2/3 AA, I wouldn’t be surprised if some are AAA but I haven’t seen any. The amorphous cells seem to stand up to the weather better. Some of the ones I bought 6 years ago are still working, most of the dollar store devices I bought in 2019 have failed in 6 months.
Yes, there are some with AAA, I can confirm this, because I have some. And some crappy ones with tiny 40mAh cells.
I found this list of ASIC chips for solar garden lights: https://dzrmo.files.wordpress.com/2017/01/garden-light-asic-list.pdf . I’d sure like to see a timer integrated to turn the light off 4 hours after dusk and leave energy in the battery for the next evening. This would be easier on the battery and would leave some energy through an overcast day. Some battery operated XMAS lights at the dollar store come with the timer chip, but not the solar cell. Seems China builds one or the other. Not combined.
In some variants the charger/pwr management chip has built in flicker PWM to make the LED look like a candle.
So he replaced the battery and now it works again. What an awesome hack!
Ya, and the new battery only cost 2.00 to replace a battery in a 1.00 light. We will show those chinamin how its done.
Atleast one could rip out the booster pcb to use in your own 3.3v projects.
Normally not. The booster circuit often uses the LED itself as a rectifier and delivers pulsed current to it. Crudely controlled only by the inductor size.
I had one last several years, outliving several others, including a more expensive one. It’d be interesting to have a contest to create the longest lasting solar light. EG put money in a savings bond, and when there’s only one light left, give it to the winner. Maybe a decade or more later.
I tore down a bunch of these that had failed, I was hopping to repurpose them as solar driven sensor, as I should be able to get something useful into the available power envelope. Anyone have any links to similar projects? It would be nice to use the exsisting charge controller to keep the cost down…
Normally the “charge controller” is a diode. Not more.
The tropical country that I live in has too many mosquitos and spiders with large webs all over the place. I’m thinking of repurposing such circuits by reducing the whole lamp’s footprint, so that it can be hung near spider webs. Equipped with a green filter this should make for a pretty good and environmentally friendly mosquito trap.
Meh, put on an super cap for a few-minutes-backup and few more years of life! anybody tried with a supercap?
I like this idea. Find the peak cell voltage and get a cap that can’t overcharge. It can’t be damaged by charge depletion, and should run an LED quite a while if sized correctly. Haven’t done the math…. don’t care so much.
I spent a lot of time testing and tweaking these Dollar-Tree garden lights:
The electronics in these Garden-Lights do have logic to prevent total discharge but have NO protection for over-charging nor does it limit the charging duration, voltage or current. The solar cell on the light produces over 2V in bright sun. In other words, the Garden-Light is rather battery unfriendly when it comes to charging. I can certainly see the opportunity for overcharging on bright sunny days. Do this over and over during the summer and venting would likely escalate until “POOF” – dead light!
NiMH have a similar venting issue with improper charging so switching from NiCd to NiMH won’t help. Without proper charging control it would seem that a one dollar Solar Garden light is worth only what you paid for it. Consider it mild entertainment for a few months to a year, at most.
Above from my blog:
https://dzrmo.wordpress.com/2018/01/29/solar-garden-light-failure-autopsy/
Nicads are a lot more tolerant of overcharging than Nimh cells. Most sealed nicads can tolerate 10% overcharging for several years (i.e. 50ma for a 500mah cell). Nimh cells would be ruined in a matter of months at this charge level.
But a second problem is that the cell is deep-cycled every day. It’s charged until full each day, then run at night until it’s dead. Even without the charging problem, the cell will reach its cycle life within a year. For long life, don’t overcharge, and don’t deep-cycle it.
Many years ago, there was a solar-powered flashlight / night light project in one of the hobby magazines. It used nicads, a little PV panel from Radio Shack, and an LP339 quad comparator circuit to sense voltage to stop charging when the cells were full, and stop discharge when they were empty. I built one, and it worked well. By adjusting the pots to not overcharge or deeply discharge the cells, the originally batteries lasted for about 10 years. It eventually wore out when the plastic over the PV panel turned dark and cloudy from exposure to the sun.
So, it’s possible to make this idea work; the cheap ones just aren’t doing it right.
I wonder if a supercapacitor might work better than a battery? Though you’d need a DC/DC converter to charge/discharge it, due to the widely changing voltage.
You nailed it.
The four legged chip has been around from the days of NiCd.
They are marketed as 1.2 volt charges without any specification of cell chemistry.
I had some of these and they failed pretty early. As an experiment I opened one up and found as you did, cheap AA cells that had gone toes up. I replaced them with a couple of the Energizer rechargeable NiMH I was using every day in my portable audio, and brightness and runtime both went way, way up. Clearly the limiting factor on these things was the batts, not the solar cell. They went from going uselessly dim around 2:00a to still being usefully bright at 6:00a. Never found out what the nameplate capacity was of the factory cells – virtually no labeling – but the Energizers were stated as 2500mA-h.
I’ve measured the cell capacity in some of mine. It was only 100-200maH — a far cry from the capacity you should get from an AA or AAA cell.
At least it’s a NiMh cell now. The last ones I bought had NiCd, long after everything else had switched to NiMh or Lithium. I guess they were trying to dump all the NiCd cells after ROHS prevented their use in most products.
They also stopped using CdS photocells, but that’s one less part anyhow if they use the solar cell voltage to detect darkness.
“At least”? A NiCd cell much more tolerant to this kind of abuse – no charge control and regular deep discharge. Most people think, RoHS would be a good thing, but basically it is the real reason for “planned obsolescence” (low product lifetime). E.g. leadless solder is more brittle than good SnPb, so with thermal cycling solder joints fail much more early.
While we’re on the subject, does anyone know how the LED in the color changing one works?
It seems to have its circuit right inside the LED, I was curious because, I wonder if the timing circuit uses a capacitor in there.
And as battery voltage drops, red is the “last color standing”.
I expect red is “last color standing” because it hos the lowest forward voltage of the LED colors.
Oddly, price seems to have little to do with durability. We’ve had the some of the cheapest last 2 years and some of the color change crackle glass ones die in 4 months. The solar motion lights OTOH, seem to have the epoxy over the solar cell as the weak point. I’ve been thinking about possibly using glass covers to see if that will block enough UV.
I once used these cheap lamps for kids projects to great effect ( see => https://www.instructables.com/id/Solar-Easter-Egg/ ) , but NiMH /NiCd based types have now had their “run in the sun”. Far superior 3.2V LiFePO4 based designs increasingly abound for not much more. These newer types are much brighter & often have inbuilt PIR motion sensors too. You can usually tell the battery type by counting the PV elements. At .5V each a NiMH/NiCd type will have only 4 ( thus 2V), while LiFePO4 models usually have 8. Lithium iron phosphate based designs are very durable – I’ve had a bunch of them up for 5 years with no issues !
The UK has dollar stores? Not pound stores?
Who mentioned the UK? I don’t think they speak Italian in the UK
Typical of the superior LiFePO4 powered solar lamps now on sale here in NZ => https://m.alibaba.com/amp/product/62113236790.html
Lots of awesome info.
Like many, I find solar LED projects fascinating, and want to build ones that last years for a reasonable cost (<$5 in parts, <$2 if possible).
After all this discussion:
What’s the best method in 2020?
LiFePO4 (3.2V) powered ones now beat out NiMH !
You can beat those overcharged NiMH throwaways in reliability, but surely not in price.
Hi everyone, has anyone ever bought a solar lamp with this circuit?
https://imgur.com/VCYZtnw
https://imgur.com/y2v0cFB
I’m trying to find out what kind of controller (U1) was installed. Anyone have any information? Thank you in advance
That’s an oddball circuit. All the cheap ones have a blob-passivated chip, not an 8 pin package. And no external transistors or switch. Is the big round thing an inductor? No marking on the chip? how old is this thing anyhow?
There are only two external transistors marked J3Y.
The switch selects 3 operating modes of the solar lamp.
Is the big round thing an inductor? No, it’s the motion sensor (I removed the half sphere that covered it)
No mark on the chip? No sign. :(
How old is this thing anyway? 1 year and a half.
You have the deluxe model. I doubt you got it at a dollar store.
Maybe it’s something like this: https://circuits-diy.com/wp-content/uploads/2020/06/Motion-Sensor-Solar-Outdoor-Light-Circuit.png but I don’t know what you’d need a controller chip for.
Every time I have to figure out a mystery circuit, it becomes obvious when I draw out the circuit with operating voltages marked. So find the PIR sensor pinout and measure the operating voltages.
Thanks for the reply. In fact the lamp costs very little, but I would like to repair it: it seems a waste to throw it in the trash when with a few cents you could replace the controller. This is the lamp
http://www.zj-leds.net/product/ZJSL100_Solar_Wall_Light_276.html
Unfortunately, finding the pinout of the PIN sensor and measuring the operating voltages is not possible as the Chip controller no longer works.
It’s highly unlikely you could get a replacement controller. Also highly unlikely tat the controller is dead, because it’s a nicely passivated package. Almost all those solar lamps have dead batteries after being overcharged and deep-cycled every night. Pull out the battery and measure the solar cell voltage, draw the circuit, look for numbers on the PIR sensor. Figure out how it works. If something died, re-engineer it and put it back to work.
Thanks. You were very kind in answering me.
I have a set we got 1 year go. They use the 4-legged YX805 (or something similar, as the marking on the chip is just X805, I think, but I replaced a bad one with a YX805 and it works.). The failure of one was due to water getting inside. Interestingly, it did not corrode the battery or terminals. It caused leads on the board components, including the 4-legged chip, to rust right off! I replaced the chip, and a 10 uF cap that looked like somebody crushed it with pliers, and it works again. (I suspect the cap was like that when it was installed). I swapped out the 300 mAh NiMH battery for an 800 mAh one. The jury is still out as to whether that helps. If you don’t get enough sun during the day, or if the solar cell can’t produce enough current to fully charge the battery, a higher-capacity battery isn’t going to help. I put a bead of liquid contact cement around the border of the solar cell on top, as that joint is the only place I can see that could possibly let water through. My next tweak (when some inductors arrive) will be to put a lower-value inductor in place of the 120uH one that’s on the board to boost the current and light output from the LED. I am hoping that with the 800 mAh battery, I can get more hours AND brighter light.