When doing surface-mount assembly you can certainly use a soldering iron in the traditional way, but it’s far more convenient to cover the pads with solder paste, place the components, and bake the board in a reflow oven. If you’re lucky enough to have a precut stencil this can be done in one go, otherwise a tiny blob of paste must be laboriously placed on each pad by hand. [Kevarek] has made this a bit easier by designing a low-cost handheld solder paste dispenser.
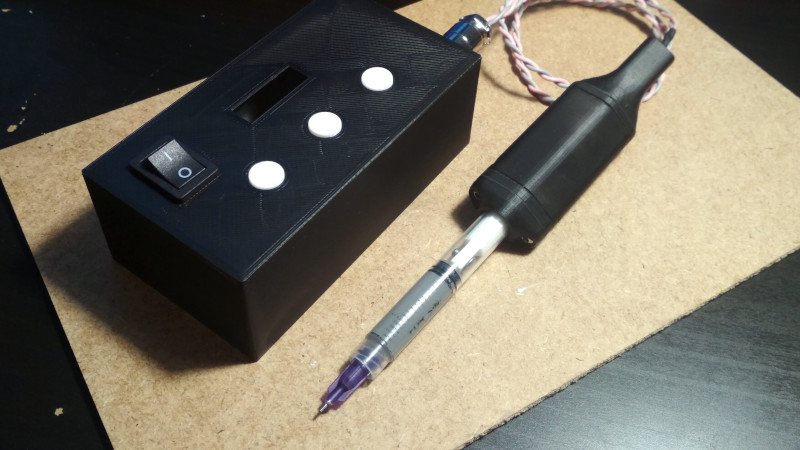
The unit takes the form of a handheld 3D printed wand containing a geared motor and a threaded shaft, that engages with a syringe full of paste clamped onto its end. There’s a control box powered by an STM32 microcontroller that not only allows adjustment of flow rate, but provides advanced features such as performing a slight retraction at the end of dispensing to avoid excess paste. There’s a push-button on the wand for control, as well as a set on the control box to adjust its parameters.
If you’ve ever handled solder paste, you’ll know it can be a uniquely annoying and finicky substance. Either it’s too stiff and clumps together, or too runny and spreads out. No doubt some readers are lucky enough to always have fresh paste of the highest quality to hand, but too often a hackerspace will have a tub of grey goop with uncertain provenance. We like this tool, and while it won’t make up for poor quality or badly stored paste, at least it’ll make applying paste a breeze.
We’ve covered paste dispensers quite a few times in the past, but you might also wish to read our in-depth guide to the subject.


But I’m worried that my grey goo hand wrangling skillz will get rusty and I’ll be out of shape for the nanopocalypse.
Yeah. How else am I going to workout my zombiedroid murdering thumbs?
OK, so how do you fill a syringe with paste without making a mess or taking forever?
I know the short answer is “buy prefilled syringes”, but I have empty syringes and a full tub of paste, and would like to figure out how to fill said syringes with said paste without ending up with burpy air bubbles in the syringe and a mess on my bench.
Anybody know the secret how to cleanly refill syringes? Best I can come up with is a little piping bag & nozzle (you know, for applying cake frosting & decoration), but it’s still a chore and a lot gets wasted in the nozzle.
Disclosure: I never used solder paste.
One way of filling a syringe is to first put as much solder paste in a big syringe as you can get in, without being too carefull, which will have air bubbles.
Then add a tube and squeeze it from the big syringe into a smaller syringe. The air bubbles should escape during this process.
Another way worth a try will be to use some kind of centrifugal method to compact the paste in the syringe. Do this with the tip of the cyringe to the center of the centrifuge, so the air bubbles rise to the exit point.
Howabout getting a baggie, turning it inside out, stuffing your hand in it, grabbing up a glob, turning it back inside the bag, cutting the corner off, and squeezing it into the syringe that way.
Oh if you do get the piping bag kit (they have them in dollar stores here) you could put a piece of polythene over one nozzle and use it as a conical plunger to get the remaining paste out of the nozzle you were using.
I can recommend female-to-female luer lock couplers. You connect two syringes together and transfer contents as one continuous steam, so there are no problems with air bubbles or excessive waste
Use a freezer bag. Cut a corner and squeeze it to fill the syringe. That minimize the mess but you lost some material on the bag.
Thanks all. I’ll give the baggie trick another try. Good idea on the female-female Luer. I’ll try that to transfer from the big syringes.
Great project.
Since there is so much empty space in the hand piece, I would have placed all the electronics inside of it too. If it fits maybe a small 10280 or a 10180 battery too.
With current design the handpiece is lightweight and easy to handle. First iteration was sporting the electronics on the handpiece but it was too bulky. Now imagining the 18650 lipo battery with a boost circuit it would get even more bulky, expensive, hard to print, assemble and operate. Just my opinion :). Thanks for the comment though.
Why would you need a dcdc converter? And why would you put a 18650 in it? That is huge.
I don’t think the battery + electronics would be more than 10 gram.
A SO8 or QFN10 packaged H-bridge IC, a sot23-6 or SO8/QFN10 MCU (eg a atiny10/pic10f), another sot23-6 for the lipoly charge controller and a single button. The PCB would not be larger than ~15*15mm or 2*1cm. With a 0.6mm thick PCB some height can be saved too. The 10180 battery is 1cm * 1.8cm, holds 80-120mAh.
IMHO this is lighter than dragging the cord around. And more convenient too.
The hand piece isn’t empty, it has moving parts in it.
I see plenty of space around the plunger and the threaded rod and no moving parts besides those.
If the Silder paste starts to dry out/get clumpy what is an easy solution to add to remix & reconstitute it to be usable again?
The applicator is nice. I’ve seen BGA resets that use a stainless steel stencil and a plastic card applicator trick. But how long is the paste viable?
Is it the same as thermal compounds for heatsinks? Aka should I use Electronics Isopropyl? A fine oil (Silicon based? Ir hydrocarbon? WD40) it’s not distilled water as it wouldn’t keep it a homogeneous suspension.
Anyone?
You can thin solder paste with tiny quantities of isopropyl alcohol, but it’s not very good: it starts to separate easily, and also evaporates quickly. Propylene glycol works well. Liquid rosin flux works well too. I have not tried tacky flux but I imagine if you could mix it properly it would work well.
Keep the stuff in the fridge and stir it from time to time, add diluent as required, and a tub is easily good for a couple of years.
It’s tough to get the lumps out – mortar and pestle kind of grinding is needed. If it’s that far gone you may as well chuck it and buy new stuff – the effort to make it work smoothly in a stencil application isn’t worth it, and I assume a syringe applicator isn’t much more forgiving.
I’ve had vendors re-ball BGAs, but I’m sure they would not recommend using paste for that purpose. I wouldn’t try it.
Personally, I’d approach manual SMT a bit like manufacturers deal with mixed technology assembly: dispense glue in the component centre (multiple dots for bigger devices), cure the glue then hand (or wave) solder.