Amp Volt Ohm Meter Model 8 Mark III From The 1960s

There’s hardly any piece of test equipment more fundamental than a volt ohm meter. Today you’re likely to have a digital one, but for most of history, these devices had real needle meters. The AVOmeter Model 8 Mark III that [Jeff Tranter] shows off had an odd banana-shaped meter. Maybe that goes with the banana plugs. You can get a closer view of this vintage piece of equipment in the video after the break.

Even the outside description of the meter is interesting. There were several unique features. For example, if the meter goes full scale a little button pops out and disconnects the probes to protect the meter. Another unusual control reversed the polarity of the leads so you didn’t have to swap them manually.

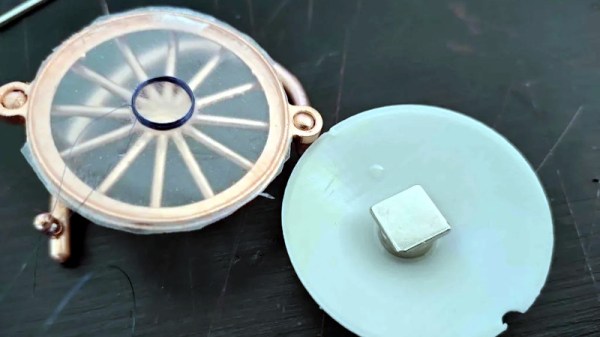
Some of the other features will be familiar to anyone who has used a good analog meter. For example, the meter movement has a mirror under the needle. This is used to make sure you are looking straight down on the needle when making readings. If you can see the reflection of the needle, then you are off to one side and will not read the precise value you are interested in.

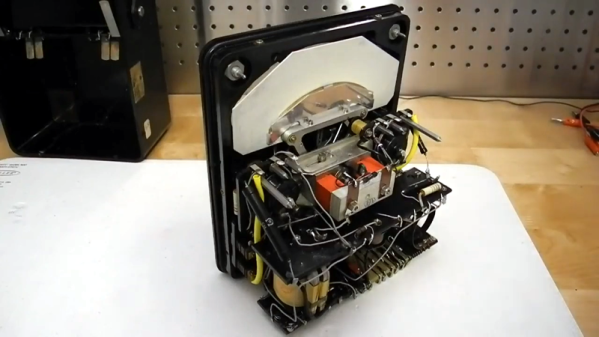
If you only want to see the insides, [Jeff] teases you until around the six minute mark. There are no active devices and this meter is old enough to not use a printed circuit board. The AC ranges work with a transformer and germanium diodes. The rest of the circuit is mostly a bunch of resistors.

The point to point wiring always makes us wonder who built this thing sixty years ago. You can only wonder what they would think if they knew we were looking at their handiwork in the year 2020.

We see a lot of meter clocks, but it would be a shame to tear this unique meter apart for its movement. Perhaps someone should make a clock that outputs a voltage to a terminal so you could read it with your favorite meter. This instrument was probably pretty precise for its day, but we doubt it can match a modern 6.5 digit digital instrument.

Continue reading “Amp Volt Ohm Meter Model 8 Mark III From The 1960s”

Closed Ham Radio Peripheral Reveals Its Windows Secrets

The student radio society in Trondhjem owns a Flex 6500-radio, with its associated Maestro panel peripheral. This is a software defined radio, and the Maestro is a computer containing just enough of an embedded version of Windows to run its front-end software. Unfortunately for our Norwegian radio amateur friends it runs very little else, even to the extent of being unable to connect to public WiFi that requires a web log-in. This was particularly annoying as the student network does this and they’d had to create their own hotspot, so they’ve provided some details on how they were able to open it up a little to do a bit more.

At first they were cagey about the exact nature of the exploit they used to penetrate the device’s defenses, but since then they’ve published a second installment with full details. It involved gaining access to the filesystem and a terminal through a right-click menu from a web browser screen within the Maestro software, then using that access to change configuration such that it could be exposed across the network. From there they were able to treat it much as they would a normal Windows installation, including putting other software such as SmartSDR onto it.

This piece of work provides a fascinating insight into an embedded Windows device, and leaves us as usual surprised by the ease of the exploit. We’d say it’s something of a brave move for a company to ship a feature-limited product to radio amateurs of all people, a community that has been experimenting and finding whatever means  to extend the capabilities of their equipment for over a hundred years. Perhaps Flexradio’s eyes are on greater things.

Hackaday Links Column Banner

Hackaday Links: February 16, 2020

Have you heard the exciting news about Betelgeuse? It’s been hard to miss these days, with reports of the red supergiant star suddenly dimming, and speculation growing that the star will go supernova sometime in the next 10,000 years. But the exciting part is that astronomers have gotten together and scheduled the Betelgeuse supernova for February 21, 2020. Or at least that’s how at least a half-dozen poorly written articles make it sound. We thought that seemed odd, so we dug a bit and the real story is more complicated and more interesting. Betelgeuse is normally a variable star that goes through complex cycles of brightening and dimming. Its current dimming is unprecedented in magnitude, but the timing coincides with its normal cycle. If this dimming is just a deepening of its normal cycle, the star should start brightening again on February 21. If it doesn’t, it could mean the star is entering the next phase in its evolution. We’d love to see a star so bright it’s visible in daylight and casts shadows at night, but we’ll just have to see what happens on Friday.

One of the last two factories in the world that makes the lacquer master discs needed to make vinyl records burned to the ground last week. Luckily nobody was hurt, but it took 82 firefighters hours to get the blaze under control. It remains to be seen how this loss will impact the vinyl record market, but since the appearance of a new star in the sky has long been seen as a bad omen and a portent of doom, if Betelgeuse does go boom next week, expect to hear the hipsters gnash their teeth and rend their man-buns. In the meantime, enjoy perhaps your last look at the fascinating vinyl manufacturing process.

Rent it once, rent it for life? Apparently, at least if you rent a Ford vehicle from Enterprise and install the FordPass app on your phone. That was the experience of one Masamba Sinclair when he rented a Ford Expedition in October and found that even five months later, the app – which he never unpaired from the rental vehicle – allowed him to start and stop the car’s engine, unlock the doors, and even track its location. The same thing even happened again this month when he rented a Mustang. Ford and Enterprise might both want to rethink the security model here; leaving it up to the customer to unlink the car from the app is a recipe for disaster.

Don’t forget that we have a really interesting contest going on right now: the Train All The Things machine learning contest. With so many different machine learning platforms and frameworks available today, you can surely find a way to build something that really shines. The early entries are interesting, with everything from an intelligent bat detector to sunglasses that give you control of the world. The contest is sponsored by Digi-Key and runs through April 7, so get started on your AI masterpiece and send it in.

Speaking of Digi-Key, they’ve put together a handy list of vendors from their line card who are reporting impacts from the Covid-19 outbreak in China. We wondered about supply chain effects from the outbreak recently, and this is confirmation that we’re starting to see a pinch. As of this writing, there are 62 vendors listed, with the majority reporting impacts from the extension of the Chinese New Year holiday. We’ll stay on top of this story, and of course we continue to wish our friends in China well.

DIY Dispenser Places Solder Paste Without The Mess

When doing surface-mount assembly you can certainly use a soldering iron in the traditional way, but it’s far more convenient to cover the pads with solder paste, place the components, and bake the board in a reflow oven. If you’re lucky enough to have a precut stencil this can be done in one go, otherwise a tiny blob of paste must be laboriously placed on each pad by hand. [Kevarek] has made this a bit easier by designing a low-cost handheld solder paste dispenser.

The unit takes the form of a handheld 3D printed wand containing a geared motor and a threaded shaft, that engages with a syringe full of paste clamped onto its end. There’s a control box powered by an STM32 microcontroller that not only allows adjustment of flow rate, but provides advanced features such as performing a slight retraction at the end of dispensing to avoid excess paste. There’s a push-button on the wand for control, as well as a set on the control box to adjust its parameters.

If you’ve ever handled solder paste, you’ll know it can be a uniquely annoying and finicky substance. Either it’s too stiff and clumps together, or too runny and spreads out. No doubt some readers are lucky enough to always have fresh paste of the highest quality to hand, but too often a hackerspace will have a tub of grey goop with uncertain provenance. We like this tool, and while it won’t make up for poor quality or badly stored paste, at least it’ll make applying paste a breeze.

We’ve covered paste dispensers quite a few times in the past, but you might also wish to read our in-depth guide to the subject.

A Cheap And Easy GoPro Mount For Model Rocketry

Launching model rockets is fun, but the real meat of the hobby lies in what you do next. Some choose to instrument their rockets or carry other advanced payloads. [seamster] likes to film his flights, and built a nosecone camera package to do so. 

A GoPro is the camera of choice for [seamster]’s missions, with its action cam design making it easy to fire off with a single press of a button. To mount it on the rocket, the nosecone was designed in several sections. The top and bottom pieces are 3D printed, which are matched with a clear plastic cylinder cut from a soda bottle. Inside the cylinder, the GoPro and altimeter hardware are held in place with foam blocks, cut to shape from old floor mats. The rocket’s parachute is attached to the top of the nose cone, which allows the camera to hang in the correct orientation on both the ascent and descent phases of the flight. Check out the high-flying videos created with this setup after the break.

It’s a simple design that [seamster] was able to whip up in Tinkercad in just a few hours, and one that’s easily replicable by the average maker at home. Getting your feet wet with filming your flights has never been easier – we’ve certainly come a long way from shooting on film in the 1970s.

Continue reading “A Cheap And Easy GoPro Mount For Model Rocketry”

Have LED Bulbs Reached Their Final (and Cheapest) Form?

[electronupdate] has done a lot of LED light bulb teardowns over the years, witnessing a drive towards ever-cheaper and ever-simpler implementations, and suspects that LED light bulb design has finally reached its ultimate goal. This teardown of a recent dollar store example shows that cost-cutting has managed to shave even more off what was already looking like a market saturated with bottom-dollar design.

The electrical components inside this glowing model of cost-cutting consists of one PCB (previously-seen dollar store LED bulb examples had two), eleven LEDs, one bridge rectifier, two resistors, and a controller IC. A wirewound resistor apparently also serves as a fuse, just in case.

Inside the unmarked controller IC. The design is as cheap as it is clever in its cost-cutting.

That’s not all. [electronupdate] goes beyond a simple teardown and has decapped the controller IC to see what lurks inside, and the result is shown here. This controller is responsible for driving the LEDs from the ~100 Volts DC that the bridge rectifier and large electrolytic cap present to it, and it’s both cheap and clever in its own way.

The top half is a big transistor for chopping the voltage and the bottom half is the simple control logic; operation is fast enough that no flicker is perceived in the LEDs, and no output smoothing cap is needed. The result, of course, is fewer components and lower cost.

Some of you may recall that back in the early days of LED lighting, bulbs that could last 100,000 hours were a hot promise. That didn’t happen for a variety of reasons and the march towards being an everyday consumable where cost was paramount continued. [electronupdate] feels they have probably reached that ultimate goal, at least until something else changes. They work, they’re cheap, and just about everything else has been successfully pried up and tossed out the door.

Make A Set Of Headphones From Scratch

There are a variety of ways to enjoy your audio, of which headphones are one. Making a set of headphones is a straightforward enough project, but [madaeon] has taken the art to a new level by building the headphone drivers from scratch rather than using an off-the-shelf pair.

The result is a set of moving coil drivers with a construction technique involving using the semi-opaque thin window from an envelope as a diaphragm and as a former for the coil. Cyanoacrylate adhesive holds everything in place. The diaphragm is suspended across the mouth of a cardboard tube with the coil positioned above a magnet, resulting in the minimum moving mass necessary for as good a sound reproduction as possible. Judge for yourself, there’s a video that we’ve placed below the break.

The drivers are placed in a set of 3D-printed on-ear holders, and while they probably won’t match an expensive set of commercial headphones, we’d hazard a guess that they won’t have too bad quality. At the very least, it’s an interesting design to base further experimentation on.

Surprisingly few home made speaker or headphone drivers have made it onto these pages, probably because of the ubiquity of the ready-made article. An exception is this flexible PCB speaker, and of course we’ve also talked about home made electrostatic speakers. Continue reading “Make A Set Of Headphones From Scratch”