Every well-equipped wood shop has a dust collection system, with blast gates at every tool to direct the suction power where you need it. If these gates are hard to reach they can be real pain to operate. [Cosmas Bauer] had this problem with his table saw, and created a convenient cable-operated mechanism.
 The dust chute on table saw is on the back end, meaning he needs to walk around it to open it, and then walk back to the front to operate the machine. As we all know,
 laziness increased efficiency can be an excellent reason for projects. Electronics or pneumatics might get the job done, but [Cosmas] realised that a mechanical system might be simpler and more reliable. Being a woodworker, he built most of the system out of wood.
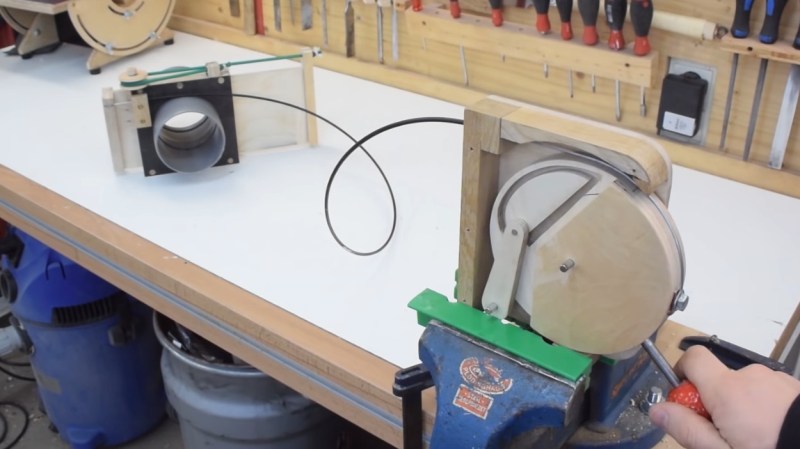
The blast door itself is held in the closed position by a piece of elastic tubing. To pull it open, he attached a bicycle cable to the blast door, with the other side attached to a latching mechanism that is the star of the show. It’s a rotating disc, with the end of the cable and operating handle attached on the outer edge. A slot track is cut in the disc, in which a pin on the end of a short arm slides. It has a few sharp corners in the track, which forces the pin to only go around in one direction, and to latch in two possible positions when released. Check out the video after the break to see it in action.
With electronics and actuators so cheap, we sometimes forget that a lot of problems can be solved in ways that don’t involve flowing electrons. This mechanism is a perfect example of that, and a 3D printed version would be handy for a number of applications.
For a fully automated, Arduino controlled dust collection system, check out [I like to make stuff]’s fully automated version.


when I saw blast door I was expecting something more star wars and less norm abrams.
Norm Abrams is The Man.
More JJ Abrams less Norm Abrams? ;)
Norm would probably make better movies.
at the very least he would help make the sets
Very first thing I thought, too.
Sorry but amount of work is enormous here. As much as I hate 3D printing this is where a a 3D print would be far better that cocking about with saws, glues and screws.
You can get it done in an hour, whereas a 3D printer would take the best part of a day or two to print all that.
As much as an hour?? Nah, I could do it in 30 minutes, with one hand behind my back and wearing a blindfold!
And the HUGE problem with 3d printers is that you have to sit there and watch them the WHOLE time, otherwise they don’t print. I think they are powered by impatience or something.
Well, yes – unless you just assume the thing is going to print right the first time around, no failed prints, all the right settings, and everything fits so you don’t need to revise the plans or make any adaptations and modifications. Building something like this is always an iterative process.
Also, don’t leave a 3D printer unattended lest you burn down your house with it, or again waste a print because of some minor issue and return 24 hours later to find out the fact that you just wasted 24 hours for nothing. 3D printers aren’t yet good enough that you can just fire and forget and go have a beer in the mean time so yes, you kinda do have to be there and watch them go.
You could always send the parts out to be printed.
Yeah, and then you wait a week for the parcel to turn around, only to discover that the part you designed isn’t quite right and you need to do it again.
Lots of my prints come out fine the first time around because I’ve already taken the time to do test prints and find optimal settings for different types of geometry. Fire and forget is how I do the vast majority of my prints, since I can’t exactly take a day off from work just to babysit the machine.
Lol
Are there really this many “HaDers” that have never heard of Octoprint?
I just go about my day with the printer running. I have a smoke alarm, a spray-can fire extinguisher (both of which have thankfully never been used) and my OctoPi sitting next to the printer.
I like to stick around for the first layer or two but after that I can just check it periodically with a phone app. (I use Printoid). With the camera on the Pi I don’t just see what the printer “thinks” it’s doing. I can watch it and see if there are any problems.
Do you ever watch movies or tv shows?I don’t think Printoid will do this but the video stream can be accessed by itself from any video app. Why not use one that is capable of running as a floating window. Run Netflix or whatever your favorite video service is in the background and cast your screen to the livingroom TV?
It can be done less complicated (and less elegant) just by switching the latch-mechanic from inside the wooden wheel to the pull-handle outside. Add a latch that keeps the handle’s rod down unless you press the release manually.
Or use two cables instead of one, get rid of the rubber mechanism and just pull the blast door in both directions.
this gets rid of a possible failure mode where the rubber doesn’t work anymore and the door stays (partly) open.
Because the last thing woodworkers want to do when improving their woodworking shop is to cock about with woodworking tools…
Presuming they have a 3D printer. Personally I’m not big on dumping $200 tools on limited-use (for me) needs. My personal time is cheaper than that.
Bait ‘n switched. I was thinking the same – an impressively small throw for a door movement… and this thing sucks, not blasts.
True, but “suck door” is … well … let’s just go with ‘that’s a different website’
Incognito mode here we… ooooh…. maybe not.
That’s very elegant – kudos!
I imagine everything in my house turned on or off with face cam lever switches now. Like mad scientist satisfying.
I would love to see more projects using mechanical cables like this instead of electronics. This is just mechanically beautiful. The cam is much like a chronograph heart cam, modified by cutting in half at an angle. Works the same way.
Brilliant. Now where the hell do you buy this cable in hundred foot lengths?
https://www.amazon.com/feet-Conduit-Bowden-Liner-Cover/dp/B00WL5MXYS
That bit where he said he could have used a wood screw rather than an insert though, don’t. New Bowden cables stretch with use, might take quite a while to settle if used seldom, but anyway you’ll want to adjust it a few times, the wood screw will possibly strip out.
If you’re not committed to this exact cable, you can buy bicycle brake cable and cable housing in bulk. You can clamp the helical steel housing with a bent over nail or a fancy two screw pinch or anything in between. Don’t get shifter cable: it has a different housing that’s intended to minimize length distortion during use at the cost of being much less easy to clamp without crumpling it.
Very neat design and execution. It was a little scary to watch the demo cut at the end crossing his arm right over the blade… yikes! Use a push stick bro.
And a saw guard…
This was really cool. Nice workmanship too. Thanks for sharing!
Very clever, and he has the same Japanese saw as Adam Savage!
I built one! The designer doesn’t seem to have supplied the plans, but I took a screenshot of the disc with the funky cutout from the video and scaled it to a circle of diameter 150mm. I made a sandwich of three layers of scrap plywood as shown in the video and made a follower with a 4mm peg cut from a nail. All the other pivot points are 4mm in diameter too.
Check his other videos for a cool (but slightly less cool) alternative blast door actuator.
I would duplicate this but I would put an arduino on it and some blue LED’s. You could use a microswitch to turn on the arduino when the cable is pulled and the arduino could be programmed to randomly flash the LED. If you give me a few minutes I can probably figure out how to work some nixie tubes in it as well.
I’m sure you could. It wasn’t that hard. However, you didn’t.
I should have posted a comment on YouTube. Most of the comments there are asking for the drawings. I could charge a dollar for a copy of my sketch.
Thanks for this video. Little things like this make woodworking more insanely cool! awesome mechanism, and solving a common problem! will copy this :)