Anyone with a few cordless tools has probably amassed quite a collection of batteries for them. If you’re a professional contractor, having a fleet of batteries you can swap out during the day’s work is a necessity. But if you’re just doing the occasional DIY project, those batteries are probably going to sit unused more often than not.
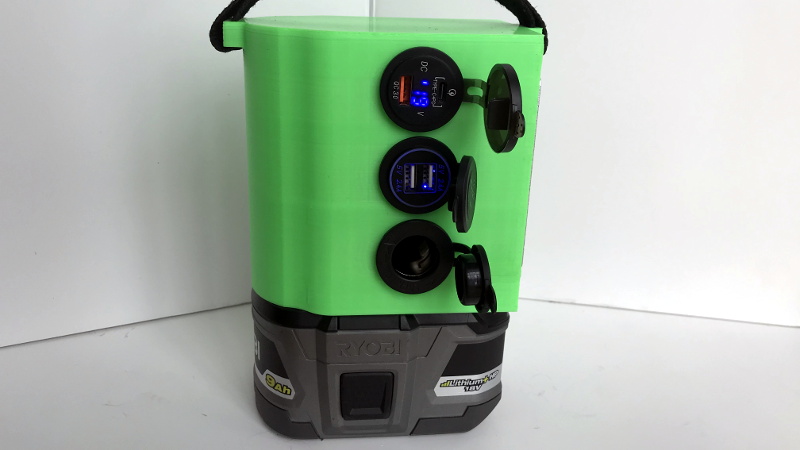
Looking to find alternative uses for his growing collection of Ryobi batteries, [Chris Nafis] has come up with a portable power station design that lets him put all that stored energy to use. With support for multiple charging standards and even an integrated work light, this device would be perfect to have around for power outages or to take with you on a camping trip.
 Ryobi standardized on an 18 V battery a while back, so [Chris] is using a 10 A DC-DC buck converter to step that down to a more generally useful 12 V. From there he’s got a standard “cigarette lighter” automotive power connector which offers compatibility with a wide range of mobile devices such as small inverters or mobile radios. There’s also dual 2.4 USB “A” ports and a Quick Charge 3.0 compatible USB-C port for charging your mobile gadgets.
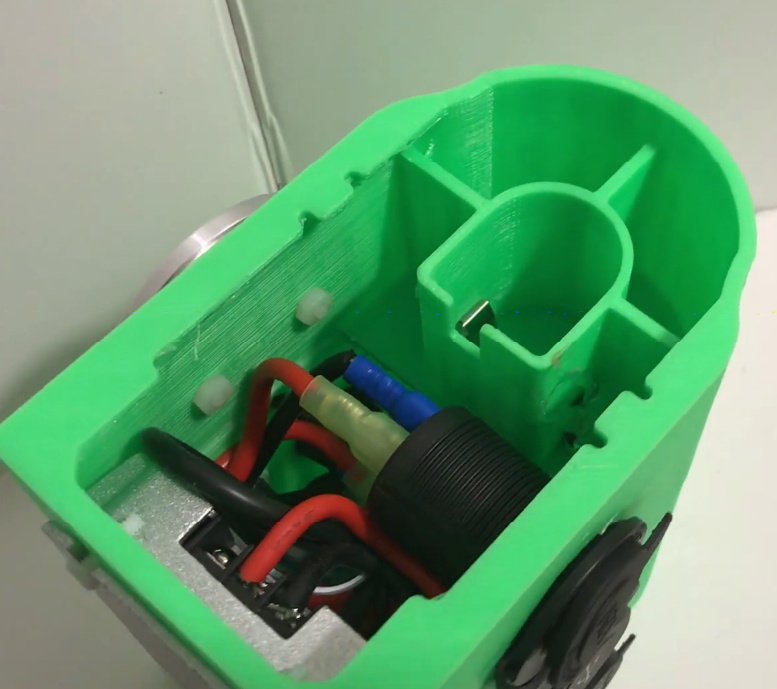
As an aside, this project is an excellent example of how powerful 3D printing can be when building your own hardware. Trying to make an interface for a Ryobi battery, without sacrificing a tool as a donor anyway, would be maddeningly difficult with traditional at-home manufacturing methods. But with a pair of calipers and a bit of time in your CAD package of choice, it’s possible to design and build an exact match that works like the real thing.
Which incidentally should make adapting the design to other battery types relatively easy, though editing STLs does pose its own set of unique challenges. A future improvement to this project could be making the battery interface a separate piece that can be swapped out instead of having to reprint the entire thing.


>Trying to make an interface for a Ryobi battery, without sacrificing a tool as a donor anyway, would be maddeningly difficult with traditional at-home manufacturing methods.
You take a piece of thick wood, drill a few holes with different sizes to roughly match the outline of the batteries connection pillar, file away until it fits as snugly as you want and add a few bend (spring-steel) metal flaps to make electrical connections -> done.
how is that “maddeningly difficult”?
Granted, it would be maddeningly difficult to recreate this great project as a whole without a 3D-printer.
On that note: I’d ad a switch to change the output voltage of the cig-lighter outlet between 12V and native 18V (with a warning light or sth.).
Many cig-lighter accessories work with voltages between 12V and 24V (trucks) and you’d waste less energy by bypassing the unnecessary internal to-12V conversion with those.
Aye, many cigar lighter things have a built-in buck / step-down converter anyway, and those are usually designed so they work in all sockets, no matter if they’re nominal 12v or nominal 24v.
Usually written on the fine print on the device somewhere.
Little Pure Sine wave inverters like the Bestek 300 ( https://amzn.to/2SLqwQr ) have an input of 11-15V DC… A fully charged Ryobi battery can be over 20VDC. Many CPAP machine only take 12VDC as input. A switch to turn on/off the regulated supply is an interesting idea. Since you can mix/match what sockets you put into the three holes, you could easily add a second cigaretty socket and wire it for unregulated voltage. The model is on thingiverse ( https://www.thingiverse.com/thing:4168822 ) so you could also add another switch.
As an Amazon Associate I earn from qualifying purchases.
3 layers of the white plastic chopping boards work well.
You want the tabs which the battery’s mounting clips snap into to be quite strong so that they won’t break and drop the $$$ battery onto the ground.
Then you sometimes also could want something around 14V (voltage with engine running, battery charging)
Needs more blue status LEDs!
Very useful and clean looking project though.
I need to make something similar for my EgO lawn mower 56V battery packs, especially my 7Ah ones. Big suckers that I hate to see just sit for 6 months waiting for the grass to grow again.
Check the voltage of a fully charged 56V battery. I see they have 36-56V input, 12V 30Amp output converters ( https://amzn.to/2SWQq2s ;-)
Since most cig lighters are in a car, and alternators charge at ~14v, don’t forget to look for the 13.8v to keep your “12v” gadgets happy/happier
Most of them are most efficient at about 30V.
No joke.
Of course just the ones with a 12 to 32V input range.
I have an USB-C-charger for the cig lighter outlet and it’s about 80 Percent efficient @14V and over 90% efficient at 30V.
Neat project. It would also be neat to make one of these that has a little 120V inverter in it as well. I could see that being handy say in a power failure being able to keep a household 9W LED lamp going for quite a while, or being able to power up your cable modem and router for a while..
I would NOT put a cig connector on it with other than 12V out. Too easy to cook something by accident. For me at any rate. YMMV.
On my original prototype I thought about adding an MPPT solar charger and a small pure sine wave inverter. But it started getting too big. That and I haven’t figured out the protocol for charging the Ryobi One+ batteries yet ;-)
The Bestek 300 Pure Sine inverter ( https://amzn.to/37Is0za ) can light a 100W light bulb off the 12V/10A socket
3.3v on the middle pin will put it into charge mode
Kizz, do you have more info on charging these batteries? I have been looking for a datasheet or something to modify my 6-battery charger to charge all the batteries at the same time, (And preferably faster too), but i have not been able to find anything about their 18V batteries, like if they need CC/CV (And what the values should be, and how it distinguishes between a 2Ah and 9Ah battery) or just a specific voltage where the battery takes care of it itself, or even a whole other solution? And stuff like 3.3v on the middlepin. I have not had the patience to take my charger apart to try and figure it out myself as i’m a bit scared to kill a battery’s circuit by just applying voltages to it, so i would prefer someone else to have made those mistakes ;)
6x? Do you mean 6S battery charger (6 in series) or charger for 6 individual cells.(not the same)
You might start with a BMS board/module look for the kind that has overvoltage and undervoltage protection.
Regarding CC/CV with lithium is first one then the other. Going to high on any of it can result RUD and/or fire.
So read up more regarding lithium charging.
If you want to play with charging the batteries you might do better with Ridgid, They have lifetime warranties inducing the battery packs.
AFAIK Ryobi does make a cute 120V inverter for their batteries.
Techmoan did a review of it I believe.
The 150W Ryobi inverter ( https://amzn.to/2T0WLtM ) is a modified sine wave inverter. Not all electronics like that. If you are trying to run a CPAP machine overnight, it’s best to stay DC to maximize the battery life.
In trucks the cig lighter sockets have “24V” anyway (up to 30 with engine running). So of course you need to know what you do, but it can be practical.
But why would you want to power a 230V LED lamp from a battery? Use one for 12V systems, which replace halogen lamps.
One thing where I regularly have to use 12V to 230V inverters is “the opposite from the described unit”: Charging tool batteries from a 12V solar system.
I just found out that Thingiverse supports two CAD formats. Never heard of them before… *.csg and *.scad. I learned that there are two free software packages freeCAD ( https://www.freecadweb.org/downloads.php ) and openSCAD ( https://www.openscad.org/ ).
I was able to use freeCAD to import a *.STEP file and export *.csg and *.scad.
I was able to read the *.scad file into openSCAD. Although I don’t know how to use either program. At least you don’t have to worry about editing an STL file to make changes
I uploaded these files to thingiverse: https://www.thingiverse.com/thing:4168822/files
I’ve worked for a while on a project like this for Milwaukee batteries, and also have had a good number of Ryobi bricks to experiment with and disassemble to harvest the cells from. From what I know, those powertool bricks do NOT have any kind built in deep-discharge protection! Some manufacturers will give you extra terminals on the battery pack to monitor the voltage of the parallel blocks of 18650s and a thermistor output, some will not even do that, but use a proprietary communication protocol to talk with the tool or charger you plug it in. The positive and negative terminals on the battery are directly connected to the cells inside, and without a bit of voltage monitoring your DIY devices *WILL* deep-discharge the battery! I’ve whipped up a cheap and dirty LM10-based battery monitor for my own projects to circumvent the issue, and if you’re misappropriating tool battery bricks for your projects, do keep in mind that you’ll want to monitor the battery voltage if you don’t want to end up with deep-discharged and dead battery bricks!
Clyde, would you mind sharing some more information on your LM10 battery monitor? I have been wanting to utilize Milwaukee tool batteries in projects but have been hesitant to for the reasons you cite and my inability to find a suitable solution.
Posted my solution at https://i.imgur.com/dG0UW9Q.png for you. It’s not by any means perfect, the resistors around the gate of T1 are kinda high so the mosfet switches slowly. Since we’re not running a PWM signal, this should be fine. With the values in the example, it turns off at 13V and back on at ca. 16V, so there’s no oscillation when it hits the cutoff voltage. The whole thing uses through-hole parts and can be whipped up in the home-lab without ordering PCBs online first.
Thank you so much!
ryobi batteries have a bms integrated
Isn’t the LM10 a stone-age-old and really expensive part? But there are dirt cheap protection boards on AliExpress, probably also for 5S packs.
The LM10 is stone age old, yes. You still can get it for about $1.50 a piece on ebay. As usual with chinese parts, caution is adviced. Socket your ICs, so you can easily exchange it if you get a fake.
DeWalt packs have the deep-discharge protection in the tool, not the pack.
All documentation I’ve seen says that Ridgid and Ryobi batteries do have deep-discharge protection in the pack. This is confirmed by the fact that some of their cheaper tools, when disassembled, obviously don’t have any such protection.
Nice when is it for sale 👍🏿👍🏿👍🏿👍🏿👍🏿👍🏿
” though editing STLs does pose its own set of unique challenges”
Why would you ever want to do that when he included the OpenSCAD files?!?
When I first put the part on Thingiverse, I only put the STL. I didn’t see a way to upload a STEP file. After seeing the author’s article, I googled around and found that they support the *.csg and *.scad formats. I didn’t know what they were, but found that freeCAD program could input STEP files and export those formats. So I then added those files to thingiverse.
Nevermind, just opened the “scad” file.
This should win the Prusa Contest https://www.prusaprinters.org/prints/22019-diy-ryobi-18v-one-powerstation !