Irrigation Controller Uses Google Calendar To Make Things Easy

Irrigation controllers have been around for a long time, often using similar hardware inside that would be familiar to the average maker. However, many of the products on the shelf at your local hardware store can be quite expensive for what amounts to a microcontroller, display, and relay board. [oscillatory] had such a rig, but wanted to bring it into the 21st century, IOT style.

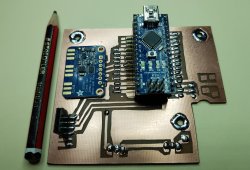
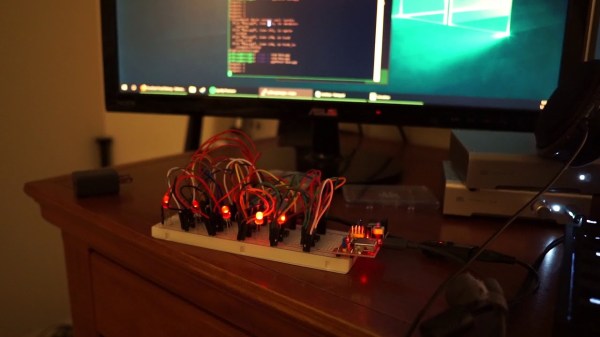
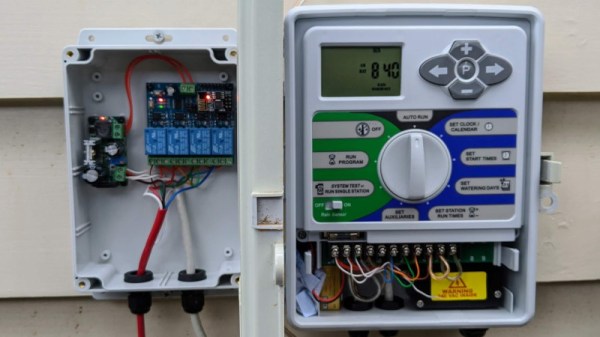
The existing Holman irrigation system consisted of a control box, hooked up to four solenoid valves controlled by relays. [oscillatory] decided that replacing this with something fancier would thus be straightforward. A relay board packing an ESP8266 was sourced, and flashed with the Tasmota firmware. This was then hooked up to run off the Holman’s 24 VAC supply via a CCTV power supply, allowing the new controller to be run in parallel with the existing hardware, just in case. Scheduling is then controlled by Google Calendar, in concert with Home Assistant.

[oscillatory] now has a watering system that can be controlled over the web, and without the need to install any custom apps. Simply creating a calendar entry is enough for the system to spring into action. We’ve seen others use a similar approach, too.  It’s a great example of using off-the-shelf parts to whip up a useful custom home automation setup!

Stout Homebrew Radio Pumps Out 200W Of AM Goodness

In this day and age, with cheap online shopping, software defined radio and bargain-basement Baofengs from China, the upstart radio ham is spoilt for choice. Of course, there’s nothing quite like the charm of keying up your own homebrewed rig, cooked up in the garage from scratch. [Paul], aka [VK3HN], knows just how it feels, and put together an epic 200 watt Class D AM rig to blast his signal on the airwaves.

An example of an Arduino used in one of [Paul]’s builds.
It’s a build following on from the work of another radio ham, [Laurie], aka [VK3SJ]. Younger hackers will note the Arduino Nano at the heart of the project, running the VFO and handling all the relevant transmit/receive switching. We can only imagine how welcome modern microcontrollers must have been to old hands at amateur radio, making synthesizing all manner of wild frequencies a cinch.

The amount of effort that has gone into the build is huge. There are handwound coils for the PWM low-pass filter, and the PCB is home-etched in ferric chloride, doing things the old-school way. There’s also a healthy pile of dead components that sacrificed their lives in the development of this build. Perhaps our favorite part is the general aesthetic – we can’t get over the combination of hand-drawn copper traces and off-the-shelf Arduinos.

Many components perished in the development of this powerful rig.

It’s a build that far exceeds the Australian legal limits, so it only gets keyed up to 120W in real use. This has the benefit of keeping the radio operating far in the safety zone for its components, helping keep things cool and stable. We’re sure [Paul] will be getting some great contacts on this rig. If you’re suffering from low power yourself, consider an amplifer build. Video after the break.

Continue reading “Stout Homebrew Radio Pumps Out 200W Of AM Goodness”

DARPA Subterranean Challenge Urban Circuit Now Livestreaming

Currently underway is the DARPA Subterranean Challenge (SubT) systems competition for urban circuits streamed live on YouTube now through Wednesday, February 26th.

The DARPA Grand Challenge of 2004 kicked research and development of autonomous vehicles into high gear. Many components on today’s self-driving vehicles can be traced back to systems developed for that competition. Hoping to spur further development, DARPA has since held several more challenges focused moving the state of the art in autonomous robotics ahead.

To succeed in this challenge, robots must handle terrain that would confuse today’s self-driving cars. Cluttered environments, uneven surfaces of different materials, even the occasional flooded section are fair game. These robots also lose access to some of the tools previously available, such as GPS. The “systems track” denotes teams building physical robot systems versus a separate “virtual track” for simulation robots. “Urban circuit” is the second of four phases in this competition, environments of this phase are focused on man-made underground structures. (Think subway station.) For more details on this competition as well as description of various phases, see our introductory post or the competition site.

Those who rather not watch robots tentatively exploring unknown territory (and occasionally failing) may choose to wait for summaries published after competition rounds are complete. The first phase (tunnel circuit) from August-October 2019 was summarized by IEEE Spectrum here. Or you can go straight to DARPA for details on the systems track and virtual track with overall results posted on the competition site.

Continue reading “DARPA Subterranean Challenge Urban Circuit Now Livestreaming”

A Turing-Complete CPU From RAM

Building a general-purpose computer means that you’ll have to take a lot of use cases into consideration, and while the end product might be useful for a lot of situations, it will inherently contain a lot of inefficiencies. On the other hand, if you want your computer to do one thing and do it very well, you can optimize to extremes and still get results. This computer, built from RAM, is just such an example.

The single task in this case was to build a computer that can compute the Fibonacci sequence.  Since it only does one thing, another part of the computer that can be simplified (besides the parts list) is the instruction set. In this case, the computer uses a single instruction: byte-byte-jump. Essentially all this computer does is copy one byte to another, and then perform an unconditional jump. Doing this single task properly is enough to build every other operation from, so this was chosen for simplicity even though the science behind why this works is a little less intuitive.

Of course, a single instruction set requires a lot of clock cycles to work (around 200 for a single operation). The hardware used in this build is also interesting and although it uses a Raspberry Pi to handle some of the minutiae, it’s still mostly done entirely in RAM chips, only cost around $15, and is a fascinating illustration of some of the more interesting fundamentals of computer science. If you’re interested, you can build similar computers out of 74-series chips as well.

DIY Power Station Puts Ryobi Batteries To Work

Anyone with a few cordless tools has probably amassed quite a collection of batteries for them. If you’re a professional contractor, having a fleet of batteries you can swap out during the day’s work is a necessity. But if you’re just doing the occasional DIY project, those batteries are probably going to sit unused more often than not.

Looking to find alternative uses for his growing collection of Ryobi batteries, [Chris Nafis] has come up with a portable power station design that lets him put all that stored energy to use. With support for multiple charging standards and even an integrated work light, this device would be perfect to have around for power outages or to take with you on a camping trip.

Ryobi standardized on an 18 V battery a while back, so [Chris] is using a 10 A DC-DC buck converter to step that down to a more generally useful 12 V. From there he’s got a standard “cigarette lighter” automotive power connector which offers compatibility with a wide range of mobile devices such as small inverters or mobile radios. There’s also dual 2.4 USB “A” ports and a Quick Charge 3.0 compatible USB-C port for charging your mobile gadgets.

As an aside, this project is an excellent example of how powerful 3D printing can be when building your own hardware. Trying to make an interface for a Ryobi battery, without sacrificing a tool as a donor anyway, would be maddeningly difficult with traditional at-home manufacturing methods. But with a pair of calipers and a bit of time in your CAD package of choice, it’s possible to design and build an exact match that works like the real thing.

Which incidentally should make adapting the design to other battery types relatively easy, though editing STLs does pose its own set of unique challenges. A future improvement to this project could be making the battery interface a separate piece that can be swapped out instead of having to reprint the entire thing.

Continue reading “DIY Power Station Puts Ryobi Batteries To Work”

We Ruined Status LEDs; Here’s Why That Needs To Change

Ah, the humble status LED. Just about every piece of home electronics, every circuit module, and anything else that draws current seems to have one. In the days of yore, a humble indicator gave a subtle glow from behind a panel, and this was fine. Then the 1990s happened, and everything got much much worse.

It’s Not The Technology, It’s How You Use It

With great brightness, comes great responsibility.

The 1990s brought us much good: Nirvana, Linux, and of course the blue LED. Much like “Teen Spirit”, the latter quickly fell into overuse: the technology rapidly became the sigil of all that was new and great, much to the ocular pain of the buying public.

This decision ranks up there for stupidity with other such questionable choices as hiring a rental car at the airport, or invading Russia in the winter. A status LED, most would agree, is there to indicate status. It need only deliver enough light to be seen when observed by a querying eye. What it need not do is glow with the intensity of a dying star, or illuminate an entire room for that matter. But, in the desperate attempts of product designers to appear on the cutting edge, the new, brighter LED triumphed over all in these applications. Continue reading “We Ruined Status LEDs; Here’s Why That Needs To Change”

LEGO Microtonal Guitar: Building Blocks Of Music Theory

Is there anything LEGO can’t do, aside from turning to a soft gelatin when a human steps on one? The incredible range of piece sizes that make them such versatile building blocks extends their utility far beyond the playroom floor, as [Tolgahan Çoĝulu] demonstrates with his LEGO microtonal guitar.

His LEGO what now? If you’re in the western world, microtones simply refer to those that fall between the 12 semitones-per-octave shackles of the western scale. Microtones are smaller than semitones, so they can bring a richer flavor to music, as evidenced in eastern cultures. In the past, [Tolgahan] has made microtonal guitars with fixed and adjustable frets using standard fret wire. After his young son copied his design in LEGO, he decided to bring it to life.

[Tolgahan] and a friend designed and printed a compatible base plate fingerboard and glued it in place on an old classical guitar. Then he and his son spent hours digging through their hoard to look for 1x1s and other 1x pieces to build up the fingerboard.

Here’s where it gets really interesting — they printed a ton of special 1×1 pieces to build up the moveable frets. Since they’re 1x1s, they can also be used to teach music simply by moving them around to the notes of the scale or song being taught, no matter the hemisphere it comes from. Pluck your way past the break to watch the story play out and hear this LEGO guitar for yourself.

If [Tolgahan] and his son had used machine learning to sort their LEGO, it probably wouldn’t have taken so long to find all those 1x1s.

Continue reading “LEGO Microtonal Guitar: Building Blocks Of Music Theory”