Heavy Metal Power Bank Uses Tool Batteries

At one time or another, most of us have seen a gadget for sale and thought we could build something similar for cheaper. Of course, we’re almost always wrong. Not about being able to build it, mind you. But when you add up the cost of the materials, the tool or two you almost inevitably end up buying, and the time spent chasing perfection, you’re lucky if you haven’t doubled the original price.

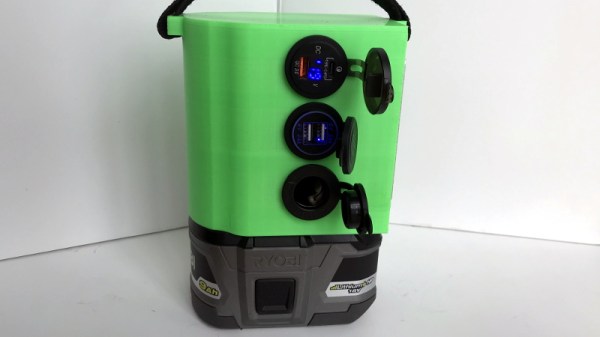
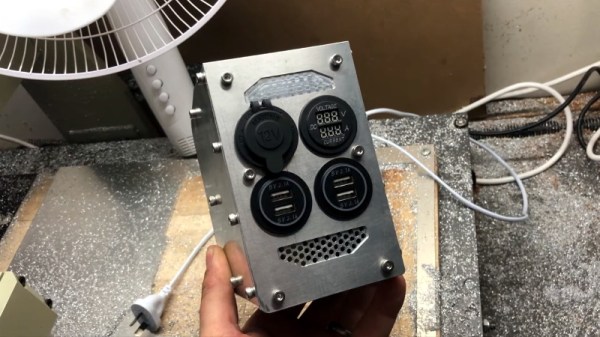
We’re not sure how much money [Taylor Hay] ended up saving by building his own portable power bank. But we do know it’s a gorgeous piece of hardware that’s certainly built far better than the average consumer gadget. The CNC-cut aluminum side panels look like something pulled out of a tank, and while we know some might balk at the 3D printed internal frame, we’re confident you could use this thing as an impromptu step stool without a problem.

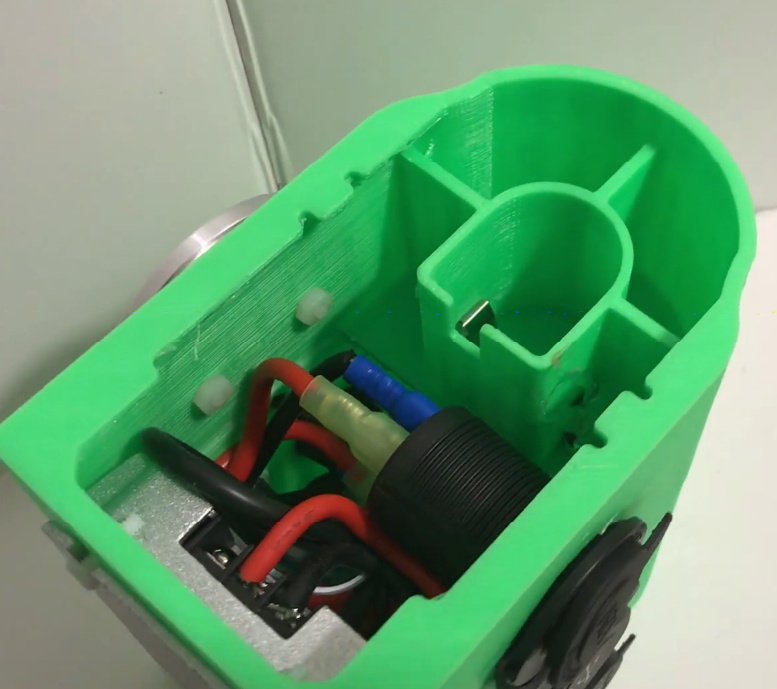
Inside there’s 150 watt 240 VAC inverter, complete with a temperature-controlled fan to keep it cool under load. There are also four USB ports providing 2.1 A each, a standard 12 VDC accessory port, and a LED display that shows battery voltage and current being drawn. Rather than come up with his own battery pack, [Taylor] used a 3D printed interface that accepts an 18 V Milwaukee cordless tool battery. Naturally, the design could be adapted to take another brand’s cells if you were so inclined.

Around these parts, we know that a good project doesn’t have to be cheaper or even more practical than what’s already on the market. There’s an inherent value in building something exactly the way you want it that you simply can’t put a monetary price on.

Continue reading “Heavy Metal Power Bank Uses Tool Batteries”

DIY Power Station Puts Ryobi Batteries To Work

Anyone with a few cordless tools has probably amassed quite a collection of batteries for them. If you’re a professional contractor, having a fleet of batteries you can swap out during the day’s work is a necessity. But if you’re just doing the occasional DIY project, those batteries are probably going to sit unused more often than not.

Looking to find alternative uses for his growing collection of Ryobi batteries, [Chris Nafis] has come up with a portable power station design that lets him put all that stored energy to use. With support for multiple charging standards and even an integrated work light, this device would be perfect to have around for power outages or to take with you on a camping trip.

Ryobi standardized on an 18 V battery a while back, so [Chris] is using a 10 A DC-DC buck converter to step that down to a more generally useful 12 V. From there he’s got a standard “cigarette lighter” automotive power connector which offers compatibility with a wide range of mobile devices such as small inverters or mobile radios. There’s also dual 2.4 USB “A” ports and a Quick Charge 3.0 compatible USB-C port for charging your mobile gadgets.

As an aside, this project is an excellent example of how powerful 3D printing can be when building your own hardware. Trying to make an interface for a Ryobi battery, without sacrificing a tool as a donor anyway, would be maddeningly difficult with traditional at-home manufacturing methods. But with a pair of calipers and a bit of time in your CAD package of choice, it’s possible to design and build an exact match that works like the real thing.

Which incidentally should make adapting the design to other battery types relatively easy, though editing STLs does pose its own set of unique challenges. A future improvement to this project could be making the battery interface a separate piece that can be swapped out instead of having to reprint the entire thing.

Continue reading “DIY Power Station Puts Ryobi Batteries To Work”

Building A 3D Printer That Goes Where You Do

Back when one of the best paths to desktop 3D printer ownership was building the thing yourself from laser cut wood with some string thrown in for good measure, just saying you had one at home would instantly boost your hacker street cred. It didn’t even need to work particularly well (which is good, since it probably didn’t), you just had to have one. But now that 3D printers have become so common, the game has changed. If you want to keep on the cutting edge, you’ve got to come up with a unique hook.

Luckily for us, [Thomas Sanladerer] is here to advance the status quo of desktop 3D printing. Not content with a 3D printer that spends its time loafing around the workshop, he decided to build a completely mobile 3D printer. For a guy who spends a lot of time traveling to different 3D printing conferences and shows, this is actually a pretty handy thing to have around, but there are probably some lessons to be learned here even if you aren’t a 3D printing YouTube celebrity.

Given the wide array of very popular low cost 3D printers out there, some will likely be surprised that [Thomas] decided to mobilize a printer which is nearly an antique at this point: the PrinterBot Play. But as he explains in the video after the break, the design of the Play really lends itself perfectly to life on the road. For one, it’s an extremely rigid printer thanks to its (arguably overkill) steel construction. Compared to most contemporary 3D printers which are often little more than a wispy collection of aluminium extrusion and zip ties, the boxy design of the Play also offers ample room inside for additional electronics and wiring

The most obvious addition to the PrintrBot is the six Sony NP-F camera batteries that [Thomas] attaches to the back of the printer by way of 3D printed mounts, but there’s also quite a bit of hardware hidden inside to break the machine free from its alternating current shackles. The bank of batteries feed simultaneously into a DC boost converter which brings the battery voltage up to the 12 V required for the printer’s electronics and motors, and a DC regulator which brings the voltage down to the 5 V required by the Raspberry Pi running OctoPrint. There’s even a charge controller hiding in there which not only frees him from carrying around a separate charger, but lets him top up the cells while the printer is up and running.

On the software side of things, the Raspberry Pi is configured to work as a WiFi access point so that OctoPrint can be controlled with a smartphone even if there’s no existing network in place. A fact demonstrated when he takes the printer outside for a walk while it’s in the middle of a job. The ability to control the printer without any existing infrastructure combined with the estimated six hour runtime on a charge means this modified PrinterBot can get the job done no matter where [Thomas] finds himself.

The hacker community was saddened by the news that PrintrBot was closing its doors last year, an unfortunate casualty of an increasingly competitive desktop 3D printing market. But perhaps we can take some comfort from the fact that their eminently hackable open source printers still live on in projects such as this.

Continue reading “Building A 3D Printer That Goes Where You Do”

A New Take On Building A Portable N64

When home consoles go mobile, whether in the form of modded original hardware or emulation, they usually take a pretty standard shape. A screen in the middle, with buttons either on the sides or below it. Basically the same layout Nintendo popularized with born-handheld systems such as the Game & Watch series and original Game Boy. Like the saying goes, if it ain’t broke…

But [Le Nerdarto] had a different idea. He came across a broken N64 and wanted to turn it into a portable console, but not necessarily a handheld one. Noticing the cartridge was about the perfect size to contain a small LCD and in an ideal position, he set out to make what is arguably the most literal interpretation of “portable N64” we’ve ever seen. It might not be the most practical iteration of this concept, but it definitely gets extra points for style.

After he stripped the N64 of its original hardware, he installed a Raspberry Pi 3 and an RC battery eliminator circuit (BEC) to get 5V out of the internal 6200 mAh 7.4V battery. [Le Nerdarto] says this provides power for the Pi, the LCD, and the various lighting systems for up to 10 hours. He’s also added USB ports in the front of the system for controllers, and an HDMI port on the back so he can still connect the system up to a TV when not on the move.

The 3.5 inch LCD in the cartridge is arguably the centerpiece of the build, and while it might be on the small side, we can’t deny it’s a clever idea. [Le Nerdarto] had the good sense to tilt the it back a few degrees to put the display at a more comfortable angle, but otherwise it looks stock since he was able to fit everything in without cutting the back of his donor cartridge out. For those who might be wondering, the “cartridge” can’t be removed, but we’ll admit that would have been a killer feature to add especially with the HDMI port on the back.

Of course, since it’s running emulators on a Raspberry Pi, this isn’t only a portable N64. The front mounted USB ports allow him to plug in all sorts of controllers and emulate classics from pretty much any console that’s older than the N64 itself. Ironically the Raspberry Pi 3 isn’t exactly an ideal choice for N64 emulation, but a good chunk of titles are at least playable.

If you’re more of a purist and want a true portable N64, we’ve covered plenty of those over the years to get you inspired.

Continue reading “A New Take On Building A Portable N64”

Talking To Laptop Batteries With The ESP8266

It’s not something you often give a lot of thought to, but the modern consumer laptop battery is a pretty advanced piece of technology. Not only does it pack several dozen watt-hours of energy into a relatively small and lightweight package, but it features integrated diagnostic capability to make sure all those temperamental lithium cells are kept in check. Widely available and extremely cheap thanks to the economies of scale (unless you try to get them from the OEM, anyway), they’re a very compelling option for powering your projects.

Of course, it also helps if, like [teliot] you have a bunch of the things lying around. For reasons we won’t get into, he’s got a whole mess of Acer AL12x32 battery packs which he wanted to use for something other than collecting dust. He had the idea of hooking one up to a solar panel and using it as a power supply for some ESP8266 projects but wanted to be able to talk to the battery for status and diagnostic information. After studying the Smart Battery System (SBS) protocol the batteries use, he was able to come up with some code that lets him pull 37 separate fields of information from the pack’s onboard electronics using his ESP8266.

Battery consumption over time

It took some fiddling with a multimeter to figure out which pin did what on the eight pin interface of the battery. Two of the pins need to be shorted to enable the dual 12 VDC pins to kick in. Technically that’s all you really need to do if you want to utilize the battery in a low-tech sort of way. But to actually get some information from the battery, [teliot] had to identify the two pins which are for the System Management Bus (SMBus) interface where the SBS data lives.

Once he knew which pins to talk to the battery on, the rest was fairly easy. SBS is well documented, and the SMBus interface is very similar to I2C. Like all the cool kids are doing these days, his code publishes the battery info to MQTT where he can plot it and get finely grained info on the performance of his solar power system.

This isn’t the first time we’ve seen a hacker wrangle laptop batteries through SMBus, but it’s always nice to get multiple perspectives on a topic. If you plan on making this kind of thing part of your standard bag of tricks, you might even want to take the time to build a dedicated SMBus scanner.

[via /r/esp8266]

It Keeps On Going And… Arduino Edition

How long can you keep an Arduino circuit running on three AA batteries? With careful design, [educ8s] built a temperature sensor that lasts well over a year on a single charge of three 2250 mAH rechargeable cells (or, at least, should last that long).

Like most long-life designs, this temperature sensor spends most of its time sleeping. The design uses a DS18B20 temperature sensor and a Nokia 5110 LCD display. It also uses a photoresistor to shut off the LCD display in the dark for further power savings.

During sleep, the device only draws 260 microamps with the display on and 70 microamps with the display off. Every two minutes, the processor wakes up and reads the temperature, drawing about 12 milliamps for a very short time.

Along with the code, [educ8s] has a spreadsheet that computes the battery life based on the different measured parameters and the battery vendor’s claimed self discharge rate.

Of course, with a bigger battery pack, you could get even more service from a charge. If you need a refresher on battery selection, we covered that not long ago. Or you can check out a ridiculously complete battery comparison site if you want to improve your battery selection.

Continue reading “It Keeps On Going And… Arduino Edition”

A Mobile Radio Power Controller

[Pete], a.k.a. [KD8TBW] wanted to install his Yaesu radio in his car. From experience, he knew that having a radio in a car inevitable led to leaving it on once in a while, and this time, he wanted a device that would turn his rig on and off when the key was in the ignition. He ended up building a mobile radio power converter. It takes the 12V from the car when the alternator is running, and shuts everything off when the engine has stopped.

The Yaesu radio in question – an FT-8800 does have an automatic power off feature, but this is a terrible way of doing things. There is no way to turn the radio back on, and the radio must be left in a non-scanning mode.

In what he hopes to be his last design in EagleCAD, [Pete] whipped up a board featuring an ATtiny85 that measures the voltage in the car; when it’s ~14V, the alternator is working, and the radio can be switched on. When it drops to ~12V, it’s time to turn the radio off. It’s a great project, and with the 3D printed case, it can easily be shoved inside the console. Video below.

Continue reading “A Mobile Radio Power Controller”