
It’s an unwritten rule that all proper pieces of shop equipment need a nameplate. Otherwise, how are you going to know what name to use when you curse it under your breath? In the old days these would have been made out of something fancy such as brass, but for the modern hacker that doesn’t stand on tradition, you can now easily outfit all your gear with custom 3D printed nameplates using this online tool.
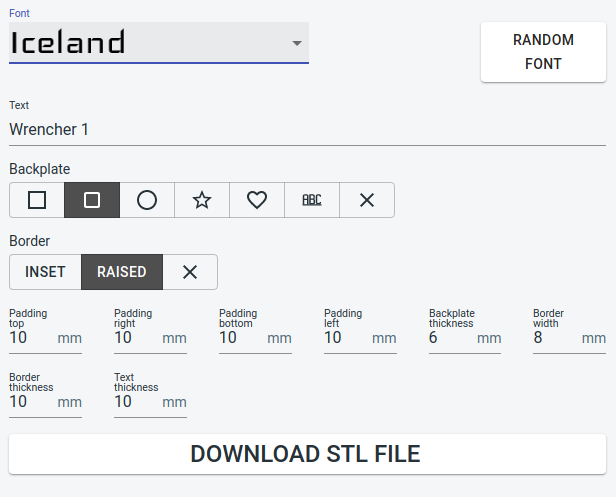 Granted, it wouldn’t be very difficult to throw one of these together in whatever CAD package you happen to have access to. But with the tool [Tobias Weber] has developed, you don’t have to. Simply pick the font, the shape of the border, and fill in a few variables to fine tune things such as padding and base thickness.
Finally, enter your text and marvel at the real-time 3D preview that’s rendered thanks to the magic of modern web technologies. In seconds, you’ll have an STL file that’s ready for the warm liquid goo phase.
The huge collection of fonts are a particularly nice touch, ranging from delicate scripts to military style stencils. Depending on your CAD software, getting arbitrary fonts imported and extruded into a three dimensional shape can be tricky for new players. If we do have one complaint though, it’s that there doesn’t seem to be a clear indicator of how big the nameplate is going to be when exported. First time around, it spit out an STL that would have been 300 mm long if we hadn’t scaled it down in the slicer.
This project is very reminiscent of another web-based tool we featured recently. That one allowed you to make 3D printed QR codes which would whatever entomb in plastic whatever data your cold hacker heart desired.


Thanks a lot for the article. I really hope some people will like it.
Multi material support is high up on my Todo list. Currently the software just creates a manifold 3D model. Having the text, border and backplate as indiviual objects will give more gradual control over color of these parts, for those who have a printer that supports multiple materials.
I use to paint them with acrylics or just prime them and give them as gift to kids along with some acrylic colors and a brush.
Optional rulers for the preview render are possible too. But the stl format does not support units so the slicer will decide for itself or by settings if metric or imperial units are used. That probably resulted in the really long nameplate in the article. A modern format like 3mf will probably solve that too.
Please write here or via email if you have any ideas or feature requests.
I dont think you’ll be able to incorporate it into the web app, because as far as I know, it lives in the G-Code, but Cura (and I assume, most slicers) has a “pause at layer height” post-process command I use all the time to make two (or more!) colour prints from my single extruder Ender3.
You might also want to look at a “Traffolyte” style as an option, effectively inverting the text layer with cutout, rather than relief.
The plan is to provide backplate, border and text individual stl files. They then can be imported, ground and aligned at origin. Just to make it possible to select one of the items. That also has led me to an idea how I can improve the preview render times.
Yeah and the cutout, how could I miss this obvious feature?! Thank you!
I am an early owner of a M3D QuadFusion printer which is multicolor. We’ve been making use of multicolor prints a lot since these are 4 color printers. You might consider looking at the file capabilities of something like Voxelizer 2, which is a multicolor capable slicer. They orignally had it out only for the Zmorph printers, but opened it up to others later on.
Part I thought you might be interested in is what file types they accept. ..and there are a few other color capable slicers out there, but the ones Ive found are all mostly early work not so finished stuff. At any rate there is a lot of conversation going on what file types to use instead of STL to natively include the color information and still be open and useable by majority of slicers. I haven’t been keeping track of late but I think simplify3d was also looking into this. So may be good to see what they decided too.
That way you dont have to reinvent the wheel. :)
Looks like a neat tool.. ty!!!
Worked like a charm! I tried two colored print just by pausing and replacing filament on my ender 3 when it started the text layer. Very usefull generator, thank you.
Only because you asked…
Feature Requests: SVG import and “Tie Points”
Very nice!
Funny how sometimes projects featured here can line up well with stuff one is currently working on at home. In the last few weeks I have made 2 name-tags, for entirely unrelated uses myself. They were one-off’s in OpenSCAD, not a cool tool to share like you wrote.
One thing that I did in both was to import svg files. With one I replaced the two letter i’s in a name with svgs of dancers in a vertical, sort of i-like position. That sort of thing would be hard to do in a web tool as you would probably need a full canvas based designer to position them. The other I just put an svg of a character at the end of a name. That might not be too hard, there could be an option to import the svg at the begining or the end.
The dancer tag was meant to be hung from a larger decoration. It had a little loop at the top for tying to, kind of like at the top of a pocket watch or a medalion of some sort. I don’t know what to call that, it’s what I meant above by tie point. Maybe other people would want something like that?
Best nameplate generator out there, so simple, but clean and fast. Just WISH I could put two lines, one for my name, other for my city.
This is really cool. I think will use it.
Thank you. I’m glad you like it.
Yeah, I made one, but realized that the border width and spacing were really big, so I scaled it down a bit, only to realize how big the entire sign must be, I need to scale it down to 33% or even less, but I haven’t got a printer either, so whom ever is going to print it for me can scale it down to a reasonable size for their printer, because I need about 5 signs with my callsign on to go on my station, my go-bag, my car, myself and so on…
It wold look really good painted, or in those fancy “brass” or “wood” filaments with painted letters.
I might need one even smaller, mirrored to make a stamp for my QSL cards too, oh the possibilitys if only I had a printer.
Thank you. As stated before, the stl format used does not contain any scale information so your slicer probably used imperial instead of metric units.
Looking forward to see your signs.
Will use it, really cool, kids love having their name printed, usually in glow in the dark filament or colour changing 🙂feature request would be some drill holes on the plate, as that would come in handy.
Amazing idea the glow in the dark filament, will order that tomorrow.
Also the holes for wall mounting are on my list, I will assemble a post with all feature requests soon in the subreddit r/3d_nametag_designer for discussion
Missing Comic Sans 0/10 would not use again.
Missing Comic Sans, 0/10, Wouldn’t use again.
Sorry cannot offer that due to the licensing fees.
Try architects daughter instead, it’s definitely not comic sans but maybe it suits your needs.
Oh its a joke, but thanks for actually responding.
I stop my printer mid-print and swap filaments for color changes. This works well as long as color changes are linear by layer (rear black plate and white lettering as it moves up, for example).
That will work for most two color nameplates (except stand).
But I am already working on a feature to export the backplate, border and text as perfectly matching STLs so they can be printed in different colors. The next step would be converting those files to the more modern 3mf format.
After all we love 3D printing because it is an automated process.
I do these in fusion all the time – this looks way quicker. To get contrast for the raised lettering i usually just hit it with one of those fat liquid chalk pens. Dab away and you’ve got white on black etc. Surprisingly robust finish once it’s dry too.
Yeah I used to do a lot of them in blender and paint them with acrylic colors (some examples can be seen on instagram “nametag.designer”).
When my wife wanted me to do 5 more as christmas gifts (after I had only done 3 the week before) it was too much manual work for me and I had to automate the process.
I loved that it rendered on my phone- curious to learn what technologies you used to build the site.
It would be great if it supported exporting just the text, which would allow me to apply the text to my specific design.
I found this post by blecheimer (the “blecheimer method”) very useful:
https://community.ultimaker.com/topic/7403-multicolor-print/
I had great results using settings described in the above link to print text in silver PLA with a blank black PLA background, face down on the glass build plate of our Ultimaker S5 at work. The trick is the text is two 100 micron layers and the background first layer is thick at 300 microns.
Another cool feature would be the ability to filter typeface options by typographical properties such as sans-serif, script, constant width (e.g. SolidWorks “stick fonts”) etc.
Nice work!
Hi Chris thanks for the reply.
The technology used is a modified version of openjscad and reactjs. It uses webgl to render the preview.
The typeface filter is a great idea. I could get all that info from google fonts, will think about it.
A feature that filtered the available fonts to those that support the characters used would also be great. As the available font choice for kyrilic, arabic and asian languages are very limited. Also special character like ❤️ are only supported by some fonts.
Also the ability to download text only is already available, just choose “X” for backplate.
How to change the Font size?
Text scale?
To everyone manually stopping their printers mid-print. Open your gcode file, find layer change command at the height that you want, insert M600. If using octoprint, make sure the inactivity timeout is set to some very long time. It defaults to some absurdly short time and your print will fail while you’re changing the filament.
For more complex multicolour prints, set up the slicer for multiple extruders. Then replace the extruder change with M600. That way you can create amazingly complex color 2d prints.
Check out my username on thingiverse for some examples.
Would be great if it provided for multiple lines
It’s now on the list in my subreddit (r/3D_nametag_designer) I have also just received that request via email. The implementation won’t be trivial but I see it will add a lot of value to the tool.
Today I have added the text cutout feature and categorized the parameter form fields in tabs by “text”, “backplate”, “border” as what was already a mess would have gotten much worse with each new feature added.
Any chance ITC Avant Garde Gothic STD Demi (adidas font) can be added to font options?
Simply wonderful and very useful, my new “go-to” place for whenever my co-workers nags me about their new signs for offices and so on. VERY userfriendly and simple…. 10/10 Stars from me . Highly appretiated, thanks.
Hello!
Have github with source code?
Love it! Would love to be able to add 2 holes on left and right corner.
First of all, thank you for the fantastic free tool. I see that you haven’t been working on it for the past four years, but I would still like to ask a question and offer a suggestion. Would it be possible to implement the use of vector graphics, such as SVG, in the future?
Just tossing my $0.02 in here – I wanted to say thanks. I know I’m a little late to the party, but I had booked mark this for future use, and I got to use it today. Worked like a charm! (I was making nametags for a project involving our family names). It was easy to use, and did exactly what I was hoping (including the hole). Only minor thing I could suggest/recommend would be a little view cube kind of widget in the 3D view to make it easier to view on a particular axis. Other than that, amazing tool – and much appreciated!
very cool , but it doesn’t support some languages such as Arabic.
Is this website still up-to-date? It’s currently unavailable. It would be great for a current project.