Gesture Control The Easy Way

Gesture control is a technology that has floated around for quite a while, but never quite reached mainstream acceptance. Wii Bowling was fun for a while, but we’re not regularly using gestures to open doors or order pizza just yet. Doing it yourself can be quite easy, however, as [RC Lover san] found with a barebones, hacky build.

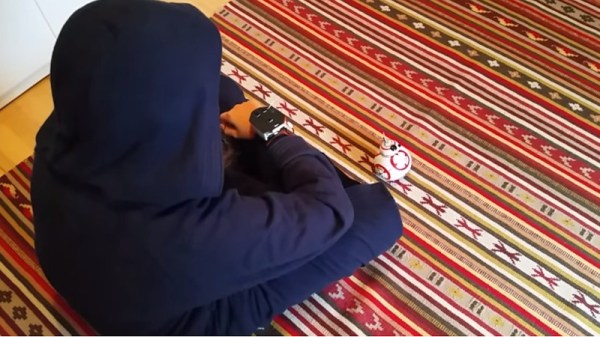
Typically, when we think of gesture control, we envisage object tracking cameras or MEMS accelerometers. Instead, this build uses simple tilt switches, as you might find in a pinball machine from days of yore. Four of these are placed on a wrist-mounted device, allowing the user to tilt their arm to move an RC car in different directions. The tilt switches are easy to hack into the controller for a toy RC car, as they simply replace the existing buttons on the PCB.

It’s a project that goes to show that not everything has to be done with advanced sensors and complex algorithms. Sometimes, it can all be done with a handful of cheap switches and some ingenuity. Plus, using arm movements to scoot BB-8 around on the floor looks like great fun. We’ve seen other attempts to build simple gesture controls with pots, too. Video after the break.

Continue reading “Gesture Control The Easy Way”

3D Printable Nameplates From Your Web Browser

It’s an unwritten rule that all proper pieces of shop equipment need a nameplate. Otherwise, how are you going to know what name to use when you curse it under your breath? In the old days these would have been made out of something fancy such as brass, but for the modern hacker that doesn’t stand on tradition, you can now easily outfit all your gear with custom 3D printed nameplates using this online tool.

Granted, it wouldn’t be very difficult to throw one of these together in whatever CAD package you happen to have access to. But with the tool [Tobias Weber] has developed, you don’t have to. Simply pick the font, the shape of the border, and fill in a few variables to fine tune things such as padding and base thickness.

Finally, enter your text and marvel at the real-time 3D preview that’s rendered thanks to the magic of modern web technologies. In seconds, you’ll have an STL file that’s ready for the warm liquid goo phase.

The huge collection of fonts are a particularly nice touch, ranging from delicate scripts to military style stencils. Depending on your CAD software, getting arbitrary fonts imported and extruded into a three dimensional shape can be tricky for new players. If we do have one complaint though, it’s that there doesn’t seem to be a clear indicator of how big the nameplate is going to be when exported. First time around, it spit out an STL that would have been 300 mm long if we hadn’t scaled it down in the slicer.

This project is very reminiscent of another web-based tool we featured recently. That one allowed you to make 3D printed QR codes which would whatever entomb in plastic whatever data your cold hacker heart desired.

Continue reading “3D Printable Nameplates From Your Web Browser”

A High Performance Ski-Sled For The Big Kids

Sledding is a pastime often left to younger humans, though there is no good reason why this must be the case. [JoshXarles] is an adult with a strong enthusiasm for carving up the snow, and set out to build a high-performance sled this winter. 

It’s a ski-based design, and [Josh]’s goal from the outset was to build a rig with serious handling credentials. His favored run features several 180 degree switchbacks, so it’s important to be able to corner well without losing speed. This was achieved by using sidecut skis with a carefully designed steering system, allowing the sled to carve corners in the same way as a downhill skier. The frame of the sled is built out of aluminium box tubing, bolted together to form a strong structure. There’s also attractive wooden decking which completes the look.

The sled performed admirably in initial testing, with good steering feel and plenty of speed downhill. We’d love to try ourselves, weather permitting, of course. There are also electric options for those not blessed with geologically-suitable features to sled down. Video after the break.

Continue reading “A High Performance Ski-Sled For The Big Kids”

Fun-Size Tesla Might Be The World’s Smallest

We get all kinds of tips about “the world’s something-est” widget, which normally end up attracting the debunkers in droves. So normally, we shy away from making superlative claims about a project, no matter how they bill themselves. But we’re comfortable that this is the world’s smallest Tesla, at least if we have to stretch the definition of Tesla a bit.

This clown-car version of the Tesla Model S that [Austin] built is based around a Radio Flyer replica of the electric sedan. The $600 battery-powered original doesn’t deliver exactly the same neck-snapping acceleration of its full-size cousin, so he stripped off the nicely detailed plastic body and put that onto a heavily modified go-cart chassis. The tiny wheelbase left little in the way of legroom, but with the seat mounted far enough back into the wheelie-inducing zone, it was possible for [Austin] to squeeze in. He chose to pay homage to Tesla’s battery pack design and built 16 modules with fourteen 18650 cells in each, a still-substantial battery for such a small vehicle. Hydraulic brakes were also added, a wise decision since the 4800 Watt BLDC is a little snappier than the stock motor, to say the least. The video below shows the build, as well as a dangerous test ride where the speed read 72 at one point; we’re not sure if that’s MPH or km/h, but either way, it’s terrifying. The drifts were pretty sick too.

It seems [Austin] has the need for speed, and for drifting.  We’ve seen his water-cooled electric drift trike before, as well as his ridiculously overpowered crazy cart.

Continue reading “Fun-Size Tesla Might Be The World’s Smallest”

This Mallet Has Backwards Dovetails… That’s Impossible!

Dovetails are a wedge-shaped joint found in woodworking. The wedge makes for strong joinery because a force that tries to pull it apart also increases the friction on the joint. This mallet has dovetails on either side that keep the head from flying off, but there’s also a through tenon in the center. This is an impossible joint as there’s no way to slide the mallet head onto the handle. The two pieces of wood must have grown that way!

As with everything, there’s a trick here, let it scratch your brain for a while before reading on… if you can guess how it’s done it’ll be very satisfying when you confirm your theory. Both the trick of the impossible mallet and the superb hand joinery are shown off in this video from the [Third Coast Craftsman].

The trick comes in the form of internal voids hidden from view once the two pieces of the mallet have been assembled. The through tenon is exactly as you’d expect: a straight tenon slides into a straight mortise in the mallet. The dovetails to either side of the handle and the pockets they mate with in the mallet head are not at all what you’d expect. The edges of the dovetail have been chamfered at 45 degrees so you can’t pull them to the outside of the mallet as you slide them into place. The opposite is the actual trick. Each of the dovetails bends inward until a ramp at the very end of the mallet pocket pushes it back into place.

The impossible mallet isn’t a new concept and stands as a formidable challenge for any accomplished woodworker. The images above are of [Jim Guilford’s] impossible mallet. Here the trick is fully exposed, showing the dovetail tenons of the handle clamped together as it is driven into place. Two things are striking here; the joints cannot be tested and must be perfect before assembly, and there is a real chance the tenons will break or the mallet head will split apart from the force of assembly. This project will test your courage as much as it will your patience.

Continue reading “This Mallet Has Backwards Dovetails… That’s Impossible!”

PaintBot Does The Art For You

Digital imagery is great, but there’s a certain charm to a real, handpainted piece. However, we live in an age of CNC, and the robots are always willing to try something new if they’re properly instructed how to do it. In this vein, [Alexander Leiser] developed PaintBot to paint beautiful pictures for him.

The ‘bot uses aluminium extrusion and stepper motors to move around. A 3D printed bracket was printed to hold a paintbrush so the artbot can do its work. [Alexander] wrote a script in C# to parse images and generate the requisite G-code for the ‘bot. Over time, this expanded into a full application, with a GUI and provision for automatic color changing. There’s plenty of logic required, to cover things like cleaning the brush between colors and composing the image properly. The medium of choice is acrylic on canvas, after early experiments with paper were found to be unsatisfactory.

The output from PaintBot is impressive, with a certain digital quality to the way the individual paint strokes make up the final image. [Alexander] has also wrapped up the software and named it PaintCam. Distributed on Thingiverse, it allows anyone with a 3D printer to use it as a robot painter themselves.

The project shows that it’s possible to create a nice artwork using CNC hardware, and we’d love to see what this could do with a neural network back end doing some artistic interpretation. If you build such a system, be sure to let us know! Video after the break.

Continue reading “PaintBot Does The Art For You”

Espresso Machine Now Powers Plants

This thing has what plants crave! No, not electrolytes exactly — just water, light, and moisture polling every 30 minutes. We think it’s fitting to take something that once manufactured liquid liveliness for humans and turn it into a smart garden that does the same thing for plants.

So let’s just get this out of the way: the espresso machine was abandoned because it was leaking water from a gasket. [The Plant Bot] cleaned it up, replaced the gasket, and got it brewing, and then it started leaking hot water again from the same gasket. We might have gone Office Space on this beautiful machine at that point, but not [The Plant Bot].

Down in the dirt, there’s a soil moisture sensor that’s polling every 30 minutes. If the moisture level falls below the threshold set appropriately at a life-sustaining 42%, the Arduino is triggered to water the plant through a relay board using the espresso machine’s original pump. If the plant is dry, the machine will pump water for two seconds every minute until the threshold is met. [The Plant Bot] tied it all together with a nice web interface that shows plant data and allows for changes over Bluetooth.

[The Plant Bot] started by disconnecting the heating element, because plants don’t tend to like hot steam. But if the cup warming tray along the top has a separate heating element, it might be neat to reuse it for something like growing mushrooms, or maintaining a sourdough starter if the temperature is right.

Via r/duino