No, it’s not the kind of honeycomb you’re probably thinking of. We’re talking about the lightweight panels commonly used in aerospace applications. Apparently they’re rather prone to dents and other damage during handling, so Boeing teamed up with students from the California State University to come up with a way to automate the time-consuming repair process.
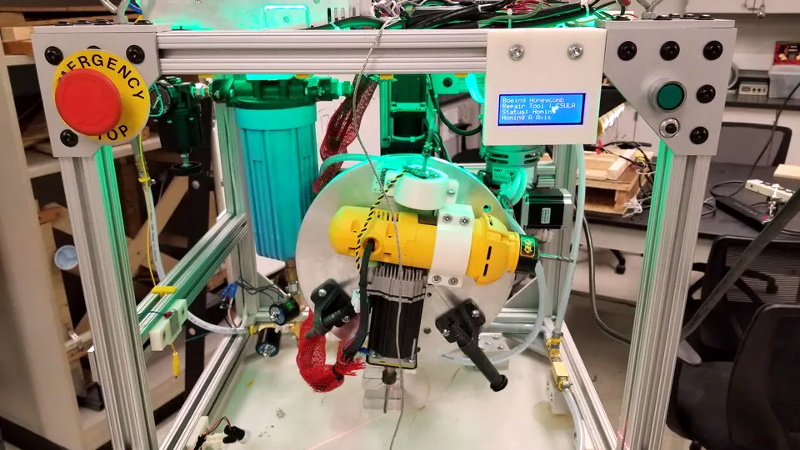
The resulting machine, which you can see in action after the break, is a phenomenal piece of engineering. But more than that, it’s an impressive use of off-the-shelf components. The only thing more fascinating than seeing this robotic machine perform its artful repairs is counting how many of its core components you’ve got laying around the shop.
 Built from aluminum extrusion, powered by an Arduino Due, and spinning a Dewalt cut-off tool that looks like it was just picked it up from Home Depot, you could easily source most of the hardware yourself. Assuming you needed to automatically repair aerospace-grade honeycomb panels, anyway.
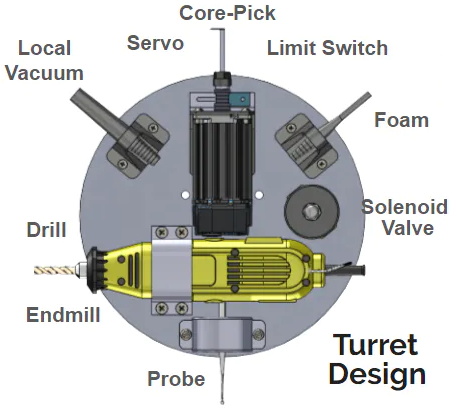
At the heart of this project is a rotating “turret” that holds all the tools required for the repair. After the turret is homed and the condition of all the cutting tools is verified, a hole is drilled into the top of the damaged cell. A small tool is then carefully angled into the hole (a little trick that is mechanical poetry in motion) to deburr the hole, and a vacuum is used to suck out any of the filings created by the previous operations. Finally a nozzle is moved into position and the void is filled with expanding foam.
Boeing says it takes up to four hours for a human to perform this same repair. Frankly, that seems a little crazy to us. But then again if we were the ones tasked with repairing a structural panel for a communications satellite or aircraft worth hundreds of millions of dollars, we’d probably take our time too. The video is obviously sped up so it’s hard to say exactly how long this automated process takes, but it doesn’t seem like it could be much more than a few minutes from start to finish.


My engineering experience does not include much in the way of structural or aerospace stuff. So I would like to know how the injection of a solid into the honeycomb effects a repair?
Minor point. The Cal State University ‘system’ comprises 23 schools. Too be precise, this project was apparently done at CSU Los Angeles. For undergrad STEM stuff (I went to CSU Fullerton many many years ago) is mucho grande better than the elitist and expensive mobs of the UC system. But beware that there are a few recent;y established CSU schools that focus on basket-weaving and have yet (if ever) to receive ABET accreditation (such as CSU San Marcos).
From one of those “eletist and expensive mobs” you mentioned, the used of “expanding foam” (we call it foaming adhesive) is commonly used to join core details together. The issue with the use of foam isn’t one of strength so much as it is weight since the adhesive is heavier than the core itself. Not much of an issue in localized areas but it all adds up.
You are certainly entitled to your opinion but be careful insulting an entire group of people here in what I would call mixed company. I think we are all adult enough here to keep it civil.
I can’t tell: Was the patching robot violently thrashing its enclosure around, or was there an earthquake happening during the demonstration, or are the folks at Boeing just incapable of holding a camera steady?
Looks like it was a handheld camera and the video was sped up significantly to make the video take less time. The result is that small movements are exaggerated.
They should make a robot for removing gloves, rags and tools from inside wings ;)
That core pick move was impressive
I agree. It means that tool needs to be able to orient itself as well as perform that tilt.
This kind of repair has been used (if manually) for decades to repair decayed/damaged deck coring (usually balsa or foam) in sailboats, though the angled tool is usually just an allen wrench chucked into an electric drill. I’m a little surprised that there isn’t an annular vacuum fitting on the material removal tools (drill & reamer) though.
Every time I see “powered by an Arduino” I picture someone shoveling Arduinos into the firebox of a steam boiler.
Has anyone burned various Arduinos and measured the heat output?
This is a nice piece of engineering – as far as it goes. Repairing a honeycomb panel requires more than just core replacement. The upper skin also has to be patched. This involves step or taper sanding of the surface around the hole and bonding of new material (usually prepreg) plies to the prepared surface. Perhaps Boeing’s time estimate includes this work as well. The “old school” method of repair would be to use a hole saw to remove the damaged core and bond a new core plug in place with core-splice (foaming) adhesive, then repair the surface skin as stated above.
Many of the fiberglass repairs are on aerodynamic fairings and panels outside the airplane due to the environment they are in. Simply filling the hole with expanding foam still provides a path for water to enter into the core over time. Without fiberglass overlays to seal the hole, the constant freezing, expansion and thawing will cause ever increasing growth of the original damage.
Looks like a Teknic Clearpath motor for the core picker. Those are pretty handy servos that will take step and direction input as one option. Too bad they are a bit out of the usual hobbyist price range though.