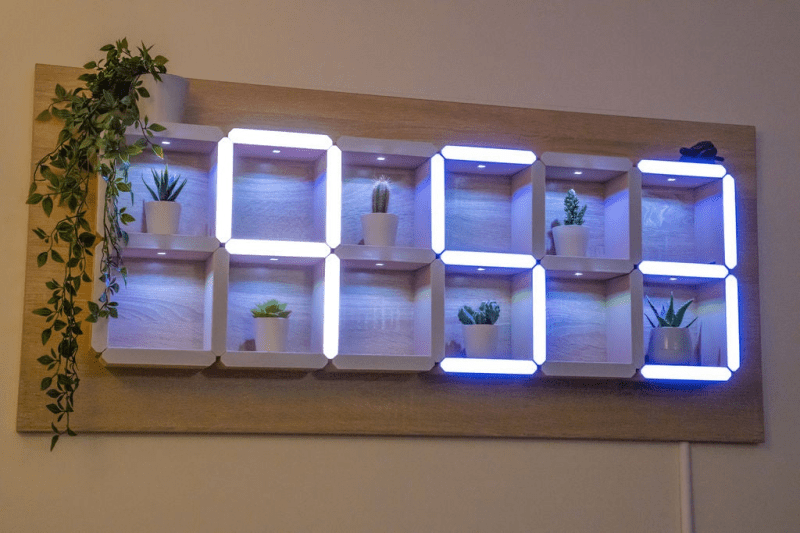
[Lewis] of [DIY Machines] was always on the lookout for that perfect something to hang above the couch. After spending a lot of time fruitlessly searching, he designed and built this awesome shelving unit with recessed lighting that doubles as a huge 7-segment clock.
The clock part works as you probably expect — an Elegoo Nano fetches the time from a real-time clock module and displays it on the WS2812B LED strips arranged in 7-segment formations. There’s a photocell module to detect the ambient light level in the room, so the display is never brighter than it needs to be.
Don’t have a 3D printer yet? Then you may need to pass on this one. Aside from the wood back plane and the electronics, the rest of this build is done with printed plastic, starting with 31 carefully-designed supports for the shelves. There are also the LED strip holders, and the sleeve pieces that hide all the wires and give this project its beautifully finished look.
You may have noticed that the far left digit isn’t a full seven segments. If you’re committed to 24-hour time, you’d have to adjust everything to allow for that, but you’d end up with two more shelves. Given the fantastic build video after the break, it probably wouldn’t take too long to figure all that out.
We like big clocks and we cannot lie. If you have room for it, build something like this blinkenlit beauty.


That looks really neat.
Nice project, but i still can’t think it is a good idea to use so much plastic. I prefer projects using wood or metal.
You can make something similar out of (partially) very thin wood.
Here on Hackaday I even saw a project to make wood transparent.
Anyway. I like it.
My concern with plastic, especially PLA, would be long term stability with even modest weight on the shelves. But making this fully out of wood or metal would be orders of magnitude more difficult, so I’m not going to knock it for that.
It’s a very cool project!
I thought it was a nice idea until I saw he actually printed *the entire shelf* just to have a sliver of LED lights in the very front. You could just as easily have just that seven-segment sliver in front of a regular shelf with square compartments, maybe even an off-the-shelf one (pun intended) … and save yourself roughly 300 hours of printing time (that’s almost two weeks non-stop printing!) and tons of filament.
Nice, yes, but rather wasteful.
What about using smoked acrylic strips? I believe it would work, maybe not as nicely as this one, but would work.
I hate using those terminal blocks. They are not ‘electronic’ terminal blocks, they are not meant for electronics.
A much nicer solution would have been a carrier PCB with the Arduino and all the wire distribution on it, so that you solder all wires directly to the board. Looks really neat, the silk screen can tell everyone how it should be connected, and no chance of a bad connection caused by oxidation of the copper wire.
It’s just the difference between being an ‘advanced amateur’ and a ‘semi-professional’. You’re giving away your designs to the public domain. So your designs are your portfolio, your business card. It would have cost at most one evening to design a carrier PCB. Using those terminal blocks just shouts ‘I don’t care about details’ all over the place.
It took him weeks to design everything, and it looks really good and thought-out. But he didn’t take that ONE evening to design a nice carrier board, send it to a PCB maker. This one thing made him drop from the category ‘semi professional’ into ‘advanced amateur’.
Ok. Rant over. Don’t skimp on a detail when you spend so much time making your thing look good. :)
I totally agree on the terminal block vs. custom PCB, but it’s not just this project, you see that all the time. It took an effort, not arguing it doesn’t, but once I learned KiCad, I’ve never used a retail Arduino board for anything but prototyping/working up the programming. It’s so easy to whip up a PCB with a 328p or 32U4 and, like you said, it takes the project into the semi-pro range.
Just use Wago connectors instead. They are way more practical. Like these > https://www.homelectrical.com/sites/default/files/Teaser_How_to_Use_Wago_Connectors.jpg
By the way that was awful soldering…use more flux, and correct temperature.
Shoulda twisted it all together and stuck it in a wire nut :-P
I am surprised this was not done with an ESP8266 instead of a nano so you could use NTP to set the RTC.
That project has a very high density of absurd design decisions.
This is really neat!, i’ve never seen anything like this before. The numbers look great on the cabinet, or whatever it’s called.