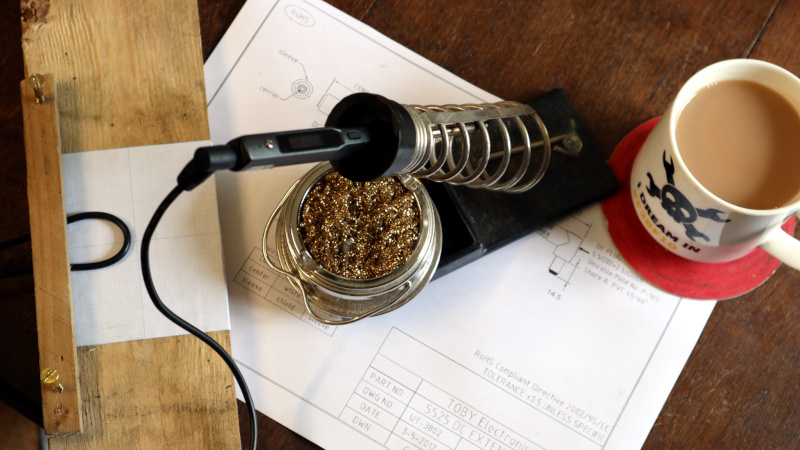
By now, I must have had my Miniware TS100 soldering iron for nearly three years. It redefined what could be expected from the decent end of the budget soldering iron spectrum when it came on the market, and it’s still the one to beat even after those years. Small, lightweight, powerful, and hackable, it has even spawned direct imitations.
If the TS100 has a fault, it comes not from the iron itself but from its cable. A high-grade iron will have an extra-flexible PVC or silicone cable, but the TS100 does not have a cable of its own. Instead it relies on whatever cable comes on its power supply, which is frequently a laptop unit built with portable computing rather than soldering in mind. So to use it is to be constantly battling against its noticable lack of flexibility, a minor worry but one that I find irksome. I determined to find a solution, making a DC extension cable more flexible than that on my power supply.
Unexpectedly Spawning A Product
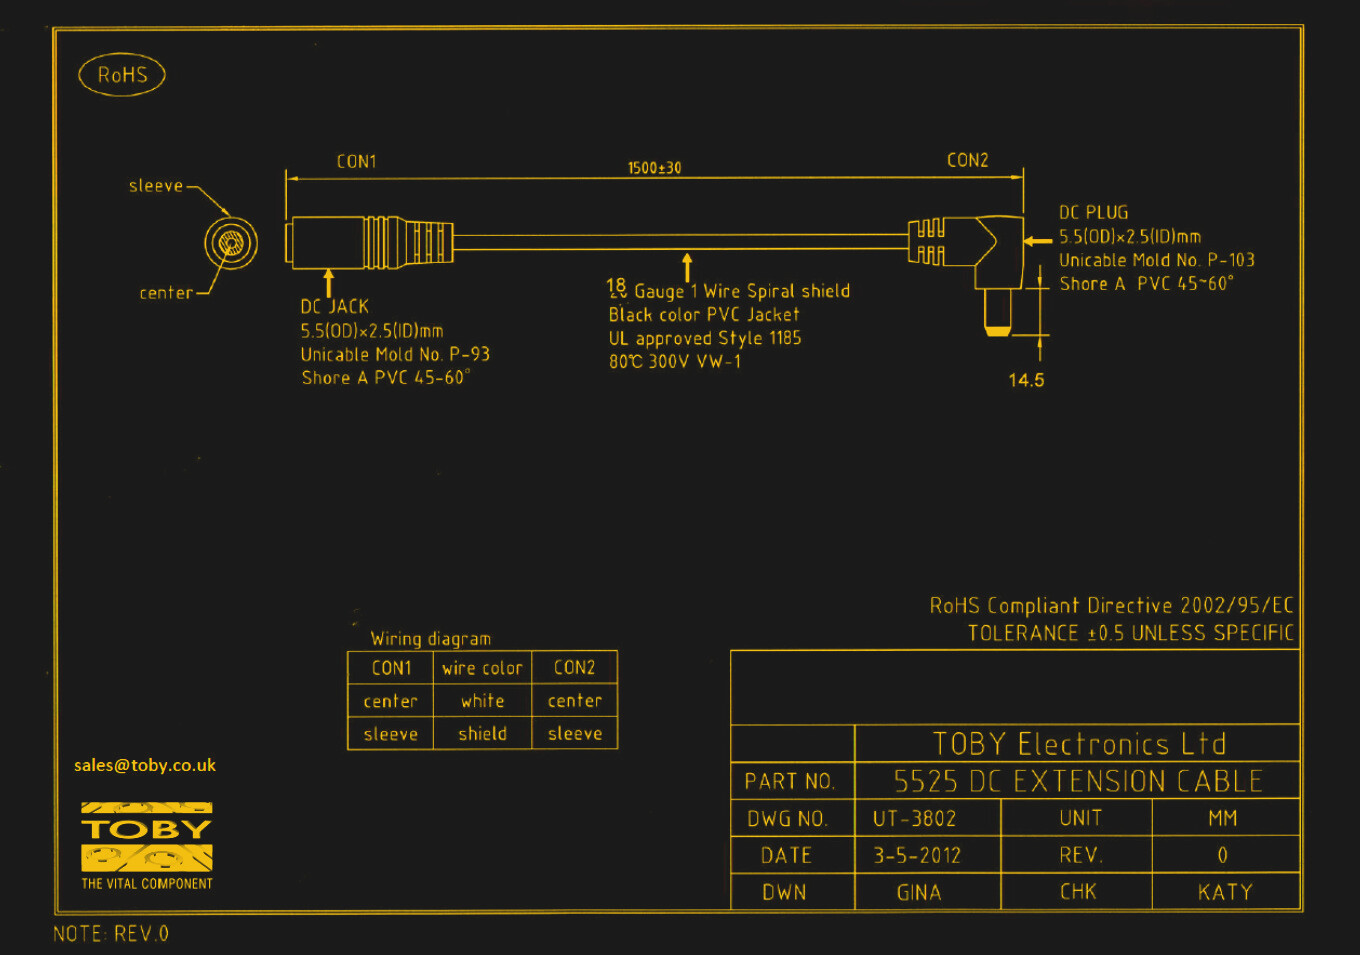
The TS100 has a standard DC barrel jack, but surprisingly it’s rather an unusual one. It requires an extraordinarily long reach of about 15mm, and the plugs on some laptop supplies won’t mate with it satisfactorily. For my cable I would have to find the longest plug I could, and it turned out that there are surprisingly few on the market. Lumberg do one, but it tops out at too low a current rating for a soldering iron so I was rather stumped.
I approached Toby Components, my go-to supplier for connectors who have helped me secure unobtanium in the past, to see whether they had any better options. And that was where this saga took an unexpected turn. They didn’t have any off-the-shelf connectors, but they could get their cable people to make up a custom extension using an extra-flexible PVC cable. I parted with some cash, and duly received a package containing a couple of their prototypes. My build-a-cable project abruptly turned into a product test.
The first thing I did was plug it in and do some soldering, at which it was fine, and noticeably more flexible than the stock cable on my PSU. But merely saying that doesn’t give much information, I need some means of quantifying the flexibility of a cable. We can all tell by feel that one cable is more or less flexible than another. Holding it in our hands, the less flexible cable requires more force to bend it than the flexible one. Researching standard tests for cables reveals a surprise, they have a focus on safety and stress performance rather than its static physical properties, so while there are a host of fascinating tests to ensure that they don’t fail under repeated flexing or when being pinched, the standards don’t seem to include a simple measure of flexibility. It deserved some thought, so I considered and rejected measuring the droop angle of a set length of cable under its own weight, wondered whether a test rig could be set up in which a horizontal cable could have weights attached to it, and finally arrived at something much simpler.
How Do You Characterise Cable Flexibility?
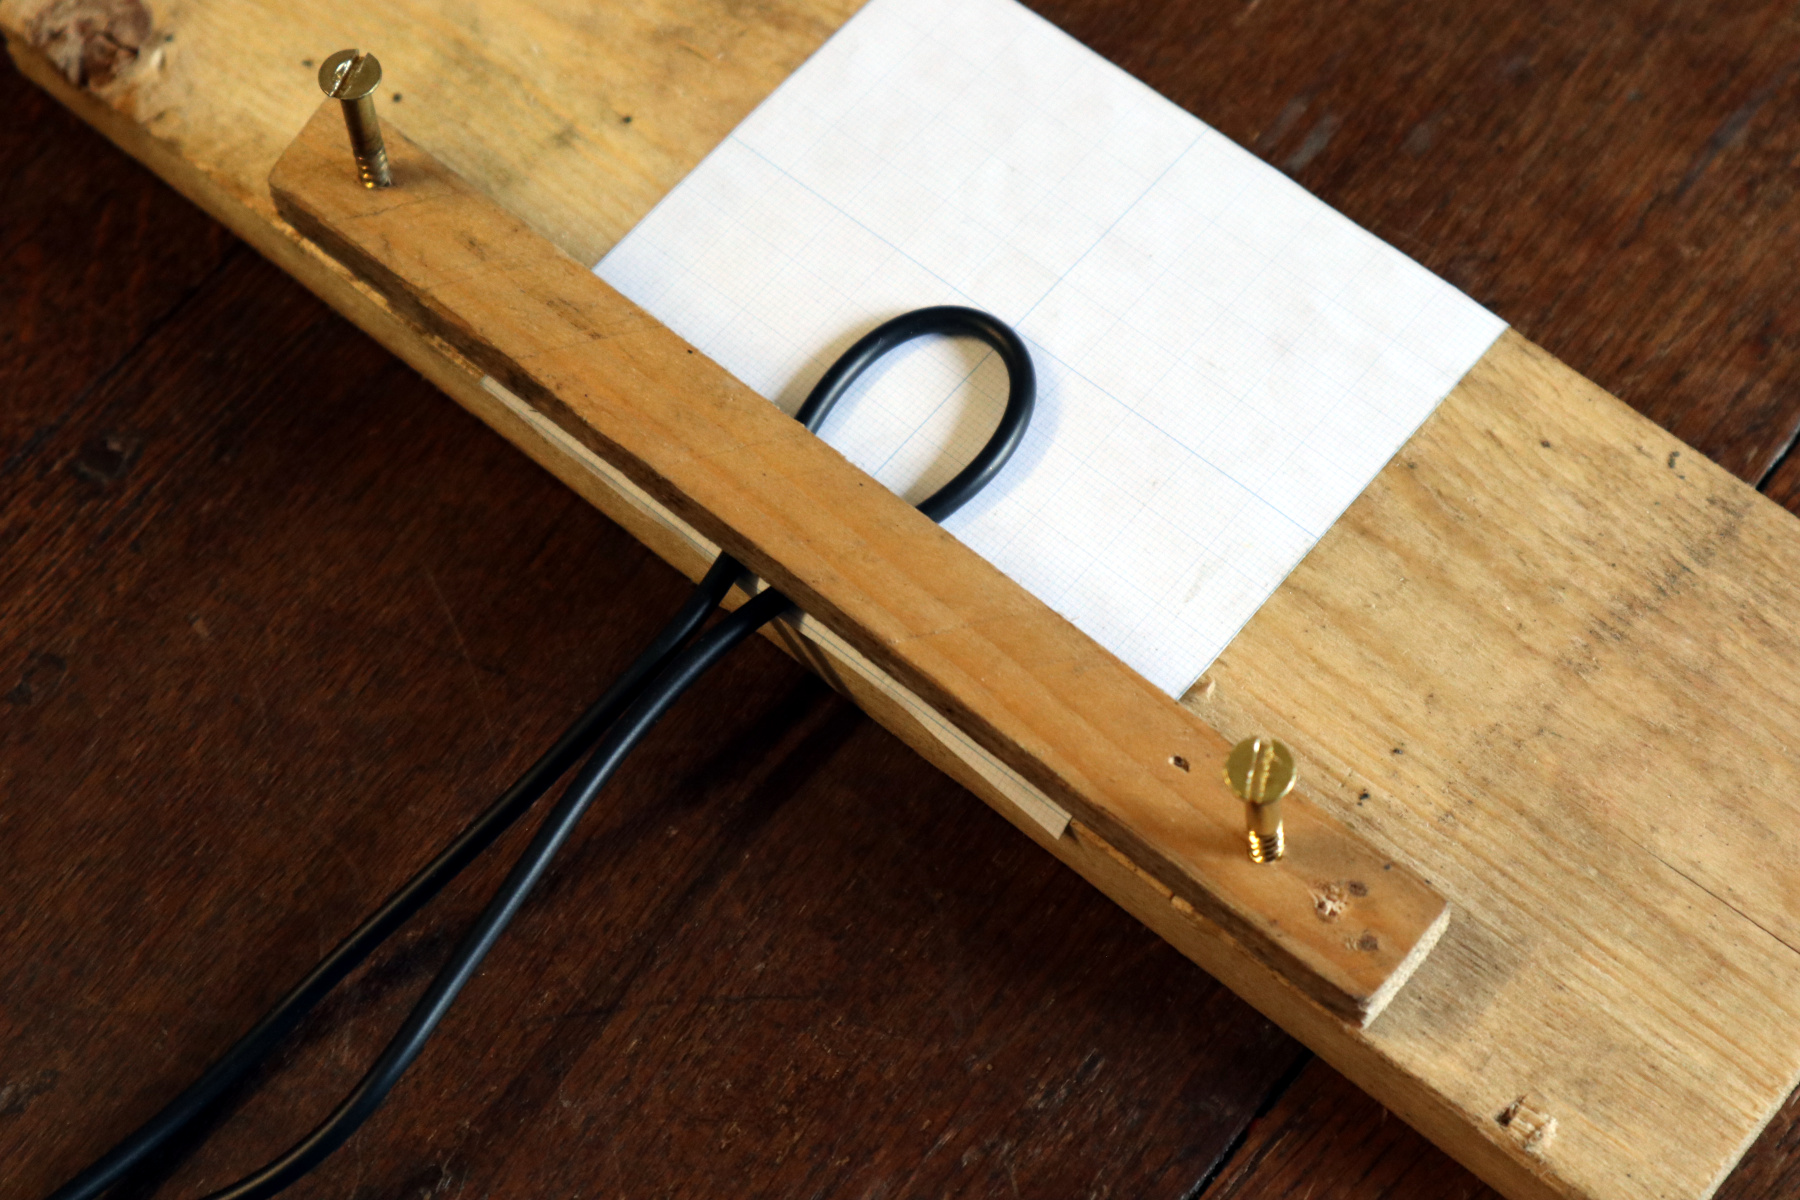
If you take a piece of cable and hold it between your hands, it forms a line with 180 degree angle. Should you now bend it, it won’t form a point as it takes a narrower angle, instead it will curve and tend towards a circular outline. You’ll find there is a natural minimum bend radius it will comfortably take, at which it forms the circular outline and readily returns to straightness, yet is not bent to the extent that it kinks. So measuring the natural minimum bend radius of a cable is a straightforward and easily-reproducible test that can allow comparison of cable flexibilities.
My bend radius rig is simple enough, a flat piece of wood with another slim piece of wood held above its edge using a pair of screws. The cable is bent at 180 degrees back upon itself to form a loop of its minimum natural radius, then it is clamped between the two pieces of wood, thus the diameter can be easily measured and the radius calculated. I’ve added a piece of graph paper on top of my wooden base so that I can easily judge measurements, however I found my caliper to be the most convenient way to take them. As well as the two TS100 cables I’ve measured a few others from around my bench for comparison.
| Cable | Diameter | Radius |
|---|---|---|
| Toby TS100 extension cable | 20mm | 10mm |
| TS100 laptop-style PSU cable | 33mm | 16.5mm |
| “Grundlagen Audio” gold USB cable | 29mm | 14.5mm |
| Multimeter test lead | 16mm | 8mm |
| IEC computer mains lead | 48mm | 24mm |
It can straight away be seen that this is a readily reproducible way to characterise the flexibility of a piece of cable. At the extremes are the multimeter lead and the computer mains lead, no surprise as the former is designed to be as flexible as possible while the latter is a thick and heavy mains lead. That’s a cheap multimeter, it’s likely that had I been less miserly and bought a decent one it would have a significantly more flexible set of leads. The fake “Grundlagen Audio” USB lead from my April 1st sojourn into using GNU Radio for audio analysis meanwhile is surprisingly stiff for what was in reality a cheap Amazon Basics item. This is probably due to two factors; it has a braided outer in a bid to copy more expensive leads, and my spraying it with gold paint has only made it stiffer.
To the point of the test though, the TS100 cables. The Toby cable is under two-thirds the stiffness of the laptop-style power supply cable, which does make a significant difference to the ease of soldering. I didn’t expect to spawn a product when I asked them about connector availability, but if you’d like one they have it for sale on their website. And meanwhile, Hackaday now has another test in its armoury, measuring the bend radius whenever we take a look at a cable.


The last link (the “have it for sale”) is 404.
Yep. Says 404 Page not Found
What they both said.
Can somebody else check? The results seem inconclusive so far.
Yep, that’s definitely 404.
Oh, and I fixed it.
A “?” symbol appears to have been acquired on the link, if you drop it, it works.
You can get silicone flex cables. They are extremely flexible as they use much finer wires inside. The added bonus of being able to handle high temperatures e.g. accidentally contact with your soldering iron.
Indeed you can. But I couldn’t find anything that fit the bill at anything like an affordable price.
FYI: https://www.aliexpress.com/item/4000095604784.html
Wire Soft silicone cable 2-4 cores 24-13 AWG 180C
Prices are for 5m.
I purchased 1m lenght (too short) AWG18 individual silicone wires for 1 EUR. Works good. Very flexible.
I have found that tattoo machine cables work well, are readily available, and quite cheap. https://www.ebay.com/itm/2-Silicone-6-Tattoo-Machine-Power-Supply-Clip-Cords-1-4-Phono-Plugs-BLUE-RED/151957375248?
Great story! Since I started carrying a large USB-C battery/jump start pack around so I’ve switched to the TS80. It came with a silicone cable that is amazingly fexy and passes the eevbolg “with the iron melt its own cable?” test with flying colors! My TS100 moved into my quadcopter bag and hasn’t been used since :'(
I keep different irons with different bits. TS100 for fine soldering, Antex with big spade bit for heavy stuff. And the TS100 knock-off as my mobile tool bag iron.
Having used both do you find any meaningful difference in use? I’d have thought the TS80 was more annoying in use because of its connector comparatively – but that could just be my bias as I like barrel jacks – durable, rotatable and easy to replace if they do get damaged…
Heard lots of good things about both, but not knowingly from somebody that has used both. Though I can see why the TS80 would be your choice if you have the battery bank etc is it actually a nicer iron as well – for me best in use matters most as I don’t have any portable power connector compatibilities to worry about (yet at least – all my stuff has a different end on, and its not worth the effort and cost to fix that yet).
Apparently you can use a TS100 with a USB-C battery/adapter. Somebody made a USB-C to 9V barrel jack adapter: https://thinkl33t.co.uk/usb-pd-miniware-ts100/#usb-pd-miniware-ts100
So, is the Hackaday coffee/tea mug available for purchase?
(lf so, please provide a link)
I got a batch of four done last summer as a one-off. It says “I dream in #F3BF10”, in #F3BF10 colour text.
Awww! I was hoping Hackaday found a way to sell swag after they closed https://store.hackaday.com
(a Tindie search for Hackaday mug, did not produce results)
I’ll mention it, but I’d have to advise you not to get your hopes up. It’s possible that the mug people will be at MCH next year if you’re going to be there.
Sadly, in my workplace, beverage containers must be spill resistant and ESD safe.
Toby Electronics – thanks for the tip!
I’ve bought things from them for years, and they have never let me down.
Mine came with a nicely flexible silicone cable ending in a XT60 connector for use with lipo batteries.
I just chopped off the barrel jack off the PSU cable and replaced with a XT60 connector so I can always use this much nicer silicone cable.
There was one check I’d like to see and it would be heat dissipation. The higher the wattage usually the higher the heat on the power cord. I know …UL… safety but it’s also about keeping costs down. Some manufacturer’s may skimp or cut corners. Thanks.
The cable was built to my spec for a supplier in Banbury, not to a penny-pinching spec for a mass-market auction house. So in this case, no, but I didn’t really need to. It certainly didn’t get warm.
I’ve read this a couple times and I think it says “pull on the cable some” and measure the bend radius. Am I missing some quantitative measure of how hard to pull on the wire?
More like “Bend it until it won’t naturally bend any further without forcing it and it kinking”.
Fair enough, but that still seems pretty wide open for inconsistent results depending on (at least) human performance and temperature.
Perhaps the same measure the loop idea, but with the free ends of the wire pulled down with a known force and the wire guided between rollers? I’d suspect the roller dimensions and spacing would depend on the cable dimensions …
So, use a fishing scale between the hands and cable to measure the amount of tension applied.
All you have to do is loop an established length and zip tie it then measure the distance between the two sides. Should be highly repeatable and give good results.
The ‘Type’ tests for cable assemblies are clearly specified in the various ANSI and IEC standards that would be scoped.
” “Bend it until it won’t naturally bend any further without forcing it and it kinking”. ” is not found in any of the approximately 871 IEC/ISO/ANSI standards sitting on my shelf that could be scoped for electrical equipment.
Strangely enough I looked at all of those tests, and they’re not what I was looking for. They’re all about safety, so “How many times can I flex it without it breaking”. I wanted “How bendy is it” which is a different question entirely.
The price is right and the have guest checkout so the have a new client ! Unless…
Shipping only with DHL which cost almost 3 time more that the item…
Too bad how shipping can be a dealbreaker…
I ended up purchasing a few to re-sell in the US to spread the shipping cost out a bit. Still pricey but better. I’ll have them for sale here: http://ecc.ws/ts100extension and maybe on Tindie if I feel like dealing with it.
Seems silly to abide such an inconvenient and non-standard connector on a soldering iron… implying that you work with electronics anyway. Just bypass it. I would never be spending this much time and money accommodating somebody else’s engineering mistake. I’d probably just solder a lamp cable straight to the board, and when that wears out I’d solder another one.
You presume here that someone will have another soldering iron, to adjust the first one.
Oh hang on. This is Hackaday, what am I talking about…
What’s normal? I’ve got a 150W, 90W, 45W, 2x35W (One is a pistol grip) 25W, 17W and 15W.
There was the time I found myself having to rewire the mains switch of my weller soldering iron…. A car battery and 12V iron were the solution….
detachable cable makes for a much easier to pack setup, so I’d not solder a wire onto it myself unless it has become a desk soldering iron and never ever moves.. Which doesn’t really seem to be the market for these things anyway..
Seems like this cable is the easier out than modifying the iron with a ‘standard’ connector – also I expect its that long for good reason – to spread the load of the cable over a greater area which will reduce the likelihood of breaking the socket off the pcb.
Now you have to test the test and have two or more other people repeat it for the same cable – see if they report the same results.
Does the JLI in the part number stand for JennyLIst?
I’m using a generic DC5525 extension from Amazon that is advertised for CCTV cameras. It is thin and lightweight but I’ve no idea what the gauge of the wire is inside. It doesn’t get warm and the TS100 seems to be fine but YMMV.
Surprised to see the date on this custom product datasheet is 2012…
I promise it was earlier this year. :)
Mouser has 490-PPM-2-5521L-S at 46 cents each for one.
They’re ridiculously long at 23mm, but that’s what I keep in my box in case I need a long one.
I’ve ordered one from bangood, nice fitting dc5525 in the iron and flexible silicon wire :
200 cm: https://www.banggood.com/200cm-RJX-XT60-Male-Bullet-Connector-to-Male-DC-5_5mm+2_5mm-DC5525-Rubber-Power-Cable-for-Electric-Soldering-Iron-p-1512838.html?rmmds=search&cur_warehouse=CN
150 cm: https://www.banggood.com/RJXHOBBY-XT60-Male-Bullet-Connector-to-Male-DC-5_5X-2_5mm-DC5525-Rubber-Power-Cable-for-Electric-Soldering-Iron-p-1418863.html?rmmds=search&ID=515815&cur_warehouse=CN
It’s weird to hear about some “extra long” DC5525 used in TS100, because mine actually requires an extra _short_ one: only about 9 mm long (instead of about 12 or 14). And what I see advertised specifically for TS100 on Aliexpress comes with a 9 mm long DC5525 (it’s easy to tell visually).
how is a short cable a “requirement” in your case?
Clicked the wrong “Reply” button. See my answer below: https://hackaday.com/2020/07/09/the-simplest-ts100-upgrade-leads-down-a-cable-testing-rabbit-hole/#comment-6268365
I’m not talking about a cable, but about the DC5525 connector, which may be of different lengths: 9, 12, 14 mm (approx.). The article states the right DC5525 length for TS100 is 14 mm, but my TS100 accepts (requires) the shortest, 9 mm connector.
nice post
nice post
With 23 years in the prefabricated construction industry, GS Housing offers comprehensive solutions from design to installation. Their product range includes container houses, mobile homes, and steel structures suitable for diverse applications from military camps to disaster relief. The company’s strong R&D capabilities and construction services make them a one-stop solution. Learn more: https://www.gshousingchina.com/
An ACS conductor refers to the current-sensing technology in Allegro Microsystems’ devices (e.g., ACS712, ACS770), featuring a low-resistance copper conduction path integrated with Hall-effect sensors. It enables precise AC/DC current measurement with galvanic isolation (up to 2.1 kVRMS) and minimal power loss (e.g., 100 µΩ typical resistance). Applications include motor control, power management, and overcurrent protection 4911.
TDDL specializes in power cables for UHV transmission, rail transit, and renewable energy, while diversifying into aerospace components and aluminum composites. https://www.tddlcable.com/
Jieli UPVC has become a top choice in modern construction due to its durability, cost-effectiveness, and versatility, especially for roofing and wall cladding. Unlike traditional materials like metal, clay, and concrete, Jieli UPVC roofing sheets are resistant to weathering, corrosion, and cracking, even in harsh environments. Their low thermal conductivity also helps reduce energy costs by minimizing the need for heating or cooling. Lightweight and easy to install, Jieli UPVC reduces labor costs and speeds up construction.
Jieli UPVC is also fire-resistant, self-extinguishing, and recyclable, offering both safety and environmental benefits. The material is available in various colors and textures, providing aesthetic flexibility for designers. Additionally, its long lifespan and low maintenance needs make it a more economical choice in the long run.
Jieli’s commitment to quality, backed by continuous research and development, ensures that its products meet international standards. With excellent technical support, Jieli guarantees that their roofing and cladding perform as expected. Resistant to chemicals and ideal for a range of environments, Jieli UPVC is a reliable, cost-effective solution for residential, commercial, and industrial projects, offering both functional and aesthetic advantages.
Jieli UPVC roofing sheets offer a durable, cost-effective, and easy-to-install alternative to traditional roofing materials like metal or clay tiles. Made from unplasticized polyvinyl chloride (UPVC), these sheets are resistant to rust, corrosion, and chemicals, making them ideal for humid or harsh environments. They also provide excellent insulation, helping reduce energy costs by keeping buildings cooler in summer and warmer in winter.
Jieli’s UPVC sheets feature a multi-layer design, with a top ASA coating for UV protection, ensuring long-lasting color retention even in areas with intense sunlight. They are lightweight and easy to handle, cutting down on labor costs and installation time. The interlocking system creates a watertight seal, preventing leaks and water damage.
While UPVC is susceptible to impact damage and thermal expansion, Jieli’s reinforced sheets and expansion joints address these concerns. Although the initial investment may be higher, the long-term benefits of durability, low maintenance, and energy savings make Jieli UPVC roofing a wise choice.
Additionally, Jieli prioritizes sustainability with recyclable materials and eco-friendly manufacturing practices. As the demand for cost-effective, sustainable roofing grows, Jieli UPVC roofing remains a reliable solution for various construction needs.“http://jlrooftile.com”