Custom weather stations are a common enough project these days, especially based around the ESP8266. Wire a sensor up to the MCU, power it up with an old phone charger, and you’re half way there. But if you want something that’s going to operate remotely on the long term, you’ve got to put a little more thought into it.
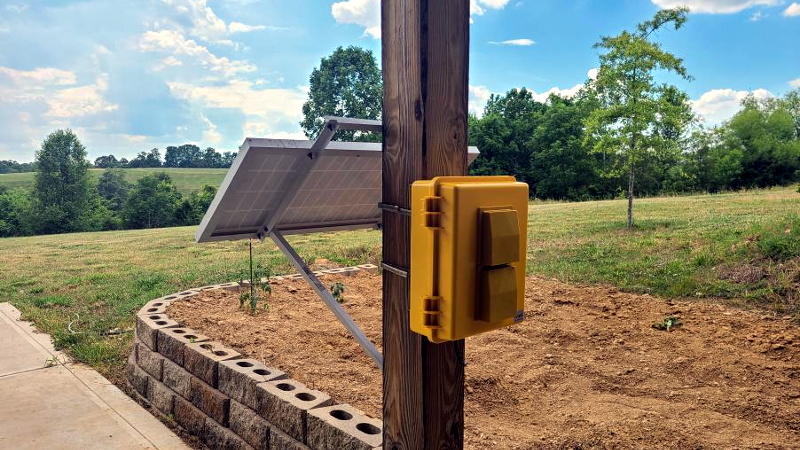
 Which is exactly what [BuckarewBanzai] did for his solar powered Raspberry Pi weather station. With an industrial NEMA-rated enclosure, a beefy 35 watt photovoltaic panel, and enough lead-acid battery capacity to keep the show going for days, this build is certainly more robust than most. Some might call it overkill, but we think anyone who’s ever deployed hardware outdoors for more than a few days knows you can never be too careful when Mother Nature is involved.
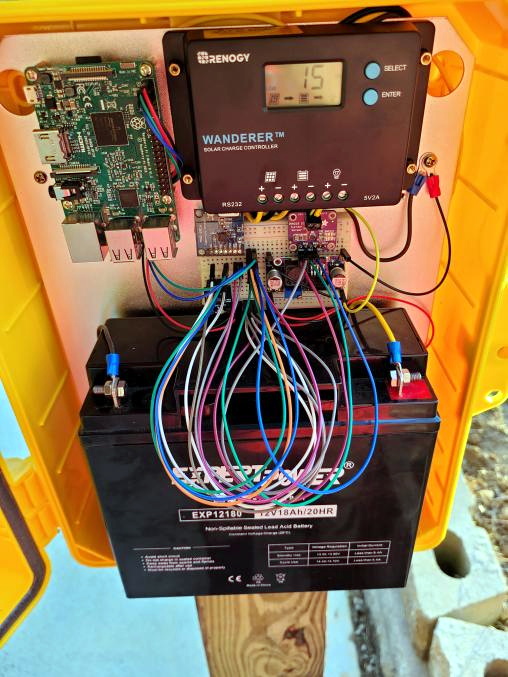
To keep the 18 Ah battery topped off, [BuckarewBanzai] is using a 10 amp Wanderer charge controller. It sounds as though he burned through a few lesser models before settling on this one; something to consider for your own off-grid projects. An LM2596 regulator is then used to provide a stable 5 V for the Raspberry Pi.
In addition to the BME280 environmental sensor that picks up on temperature, humidity, and pressure, there’s also a AS3935 lightning sensor onboard which [BuckarewBanzai] says can pick up strikes up to 40 kilometers away. All of this environmental data is collected and stored in a local SQLite database, and gets pushed offsite every five minutes with a REST API so it can be visualized with Grafana.
Critics in the audience will no doubt pick up on the solderless breadboard located in the center of the weather station, but [BuckarewBanzai] says he’s already on the case. He’s working on a custom PCB that will accept the various modular components. Not only should this make the station more reliable, but he says it will cut down on the “spaghetti” wiring. Though for the record, this is hardly the worst offender we’ve seen in that department.


Does anything need to be calibrated before use?
The AS3935 module everyone seems to use has a tiny loop antenna in it, so its actually pretty directional. Calibration will be varied based on the axis you care about. Alternately, a pair run in an X-Y orientation could be a feasible way to correct for that, but you’d have to compensate for the antenna sensitivity lobes.
They make some testers for these devices (not cheap).
An enterprising individual could use some other antennas, an SDR, and an up-converter and figure out some math to get an accurate model.
Check out datasheet for those AS3935 sensors, they support antenna tuning procedure that can be done when sensor is in use.
I know they do an antenna tuning procedure, but its still VERY inaccurate. That was one of the problems we ran into.
I built one of these YEARS ago, except instead of an ESP8266, it phoned home over a pair of XBEE pro’s with a high gain antenna. Got pretty good positioning with a few nodes.
Ok idea, but if you put temperature/humiditiy sensor inside that closed box together with RPi and charge controller you’ll get temperature data that’s completely irrelevant, wrong by like 10 degrees or so. Humidity will also be very wrong as it’s related to temperature. This weather station needs proper sensor enclosure, those things that look like white pine combs, and that enclosure has to be at least a meter away from panel and box with electronics.
Certainly not ideal, but should be relatively consistently wrong so its probably calibrateable. Will still show trends somewhat anyway- not every sensor package has to be superbly accurate to be useful. Looks like they are trying to allow pretty decent ventilation through the box so its probably not going to be quite as bad you expect, though I would definitely put the sensors in a separate enclosure or at least partition this enclosure with the heat generators at the top – which will create a convection in the box that should pull fresh air over the sensor packages for more accurate results.
> Looks like they are trying to allow pretty decent ventilation through the box so its probably not going to be quite as bad you expect
I think it’s going to be much worse than _you_ expect ;-). You get solar heating when the sun hits the box creating extra heat at certain times of the day, depending on cloud cover and wind speed. I have some sensors in a home-made stevenson screen and they show a couple of degrees higher than sensors at the same location in a good radiation shield. That stevenson screen has much more airflow than the box used in this project.
Aye its not perfect – but looks like its trying to be in the shade of the panel and have ventilation. So it shouldn’t be wildly off in weird inconsistent ways from the self heating or solar heating.
There is a difference between reading 5-7 when its 0 with good regularity and reading anything in the ballpark of 5-20 at that same 0 temp.. This won’t be correct without serious calibration efforts and even then is clearly going to be noisier data than a better setup. But it should show trends, and could be considered useful for it – not like the proper weather boxes actually get you true representation of the day – just a (supposedly) consistent frame of reference so measurements from any box are comparable to any other.
Haha, I hadn’t picked up on that. Having the sensors inside the box makes the whole set-up completely worthless. Spend $$$ on solar, enclosure, etc and then measure heated indoor temperature…
The best low-cost radiation shield I’m aware of is either https://www.aliexpress.com/item/32793243933.html (there are many other sellers and it helps to spray paint it with a very white paint) or as a DIY https://www.youtube.com/watch?v=LkVmJRsw5vs / https://www.fs.fed.us/rm/pubs_other/rmrs_2013_holden_z001.pdf
I finally gave up and bought a Barani Meteoshield and … it makes a difference!
Not completely worthless. For example you can still measure relative temperature rises and with calibration you could also improve accuracy. While it may not measure up to a official weather station, it still has value
Another thing that people often neglect is the fact that the habit of keeping tables of temperatures etc. started at the higher latitudes and spread south form there. The further back in history you go, the less data you have and the narrower the area it is from – while being subject to all those other objections.Though you have observations starting from 1700’s or something to that extent, it tells you absolutely nothing about global average temperatures because it’s just one guy measuring his back garden in Paris.
There really isn’t any reliable and representative data until satellite measurements started in the 60’s, which is why there was the whole brouhaha about Michael Mann’s hockey stick graph back in the early 00’s. The outcome of that was a bunch of revisions and new proxy models, which was completely suppressed and ignored by the political public side of the debate where anyone doubting the data was cancelled out as “deniers”, and what was left over from purging the doubters was the 97% consensus that everyone now uses as an argument.
Breadboard, jumper wires, bare board (not conformal coated) , all this in an enclosed waterproof box. This is screaming for failure in few month (weeks?) .
Condensation will get down to it at the end, period.
As it’s solar powered, you cannot rely to heater and fan, so it’s need to be coated / potted.
So no, sorry HaD, it’s not overkill, it’s barely a POC! I think we need to set new standards, with state of the art crimping!
I should have read your comments first then ditto would have surficed.
Could you make it any more obvious that you didn’t read the whole post?
When I want a vacuous comment, you’re first on the list.
All the electronic components need to be in a sealed enclosure with desicant to protect from corrosion due to moisture from the air that will condense on everything. Sensors of course must be exposed and will go bad over time due to corrosion and grime accumulation unless they are specifically designed for outdoor use so plan on making those easily replaceable.
Definitely sealed, but with a RPI running continuously, the excess heat within may keep the temperatures above the due point. Then again, descant is cheap, worst case scenario a jar full of rice should suffice.
I replace the Pi with a simple RF board and MCU to send raw sensor data to the Pi periodicaly which can kept all safe and protected inside and then you can dump the charge controller , big SLA, and use a smaller solar array and Lion battery because you’d cut your power budget by 95+%. Temp, pressure and humidity don’t change fast enough to need constant reading but if you want that the local MCU could compute and average over the report interval to smooth out sensor noise.. that lightning detector will likely work indoors … And old AM would also work.
I’m puzzled how people get those AS3935 to work. I bought a couple (3): none detect any lightning at all. Also the local hackerspace had one; nothing but noise.
I’ve had a similar experience (my third one is in the mail right now). The first one I used ran well for maybe 3-4 months but eventually died. I managed to come up with a hacky tuning script in python that would show me the antenna frequency and print out the best internal cap. The data sheet shows anything within 3.5% of 500khz is ideal but the best my board could do was somewhere around 380khz.
Are you willing to share the script?
Try this https://gist.github.com/BuckarewBanzai/7e4f44c477a38d5207164c50f625d2d9
There are a number of citizen science projects which fulfill similar aims.
the luftdaten project (https://luftdaten.info/) measures particulate data as well as weather parameters (they are also adding noise)
While blitzortung (http://en.blitzortung.org/live_lightning_maps.php) measures lightning and also correlates it with other detectors to create a accurate map of lightning strikes
I have a luftdaten box in my garden, and i must admit it would be nice to have to solar powered, but it looks like a lot of work and cost
Blitzortung is the most amazing project, BTW. I used to archive the images and turn them into videos spanning a few days’ worth of lightning in time-lapse. Very cool.
But what’s most amazing is how well a distributed citizen science project can work.
It seems to me that much of the power requirements are due to the choice of the RaspPi as the controller. A much lighter ESP32/LoRa solution and a couple of 18650 cells should have been quite enough for the task. Leave the heavy lifting to the desktop part of the system where power isn’t an issue.
+1 for the
“the retaining wall block cappings can wait, the lightning detector has to be implemented”
prioritisation of jobs.
To keep the box from letting water in (which it will even with that seal) add a breather vent near the top. Gore-tex breathers allow water vapour out but not back in, and will actually dry out the insides over time. Also if you are reading barometric pressure, will allow pressure equalisation inside.