Weatherproof Raspberry Pi Camera Enclosure, In A Pinch

The Raspberry Pi is the foundation of many IoT camera projects, but enclosures are often something left up to the user. [Mare] found that a serviceable outdoor enclosure could be made with a trip to the hardware store and inexpensive microscopy supplies.

A suitably-sized plastic junction box is a good starting point, but it takes more than that to make a functional enclosure.

The main component of the enclosure is a small plastic junction box, but it takes more than a box to make a functional outdoor enclosure. First of all, cable should be run into the box with the help of a cable fitting, and this fitting should be pointed toward the ground when the enclosure is mounted. This helps any moisture drip away with gravity, instead of pooling inconveniently.

All wire connections should be kept inside the enclosure, but if that’s not possible, we have seen outdoor-sealed wire junctions with the help of some 3D-printing and silicone sealant. That may help if cable splices are unavoidable.

The other main design concern is providing a window through which the camera can see. [Mare] found that the small Raspberry Pi camera board can be accommodated by drilling a hole into the side of the box, cleaning up the edges, and securing a cover slip  (or clover glass) to the outside with an adhesive. Cover slips are extremely thin pieces of glass used to make microscope slides; ridiculously cheap, and probably already in a citizen scientist’s parts bin. They are also fragile, but if the device doesn’t expect a lot of stress it will do the job nicely.

[Mare] uses the Raspberry Pi and camera as part of Telraam, an open-source project providing a fully-automated traffic counting service that keeps anonymized counts of vehicle, pedestrian, and bicycle activity. Usually such a device is mounted indoors and aimed at a window, but this enclosure method is an option should one need to mount a camera outdoors. There’s good value in using a Raspberry Pi as a DIY security camera, after all.

Solar Weather Station Listens For Lightning

Custom weather stations are a common enough project these days, especially based around the ESP8266. Wire a sensor up to the MCU, power it up with an old phone charger, and you’re half way there. But if you want something that’s going to operate remotely on the long term, you’ve got to put a little more thought into it.

Which is exactly what [BuckarewBanzai] did for his solar powered Raspberry Pi weather station. With an industrial NEMA-rated enclosure, a beefy 35 watt photovoltaic panel, and enough lead-acid battery capacity to keep the show going for days, this build is certainly more robust than most. Some might call it overkill, but we think anyone who’s ever deployed hardware outdoors for more than a few days knows you can never be too careful when Mother Nature is involved.

To keep the 18 Ah battery topped off, [BuckarewBanzai] is using a 10 amp Wanderer charge controller. It sounds as though he burned through a few lesser models before settling on this one; something to consider for your own off-grid projects. An LM2596 regulator is then used to provide a stable 5 V for the Raspberry Pi.

In addition to the BME280 environmental sensor that picks up on temperature, humidity, and pressure, there’s also a AS3935 lightning sensor onboard which [BuckarewBanzai] says can pick up strikes up to 40 kilometers away. All of this environmental data is collected and stored in a local SQLite database, and gets pushed offsite every five minutes with a REST API so it can be visualized with Grafana.

Critics in the audience will no doubt pick up on the solderless breadboard located in the center of the weather station, but [BuckarewBanzai] says he’s already on the case. He’s working on a custom PCB that will accept the various modular components. Not only should this make the station more reliable, but he says it will cut down on the “spaghetti” wiring. Though for the record, this is hardly the worst offender we’ve seen in that department.

Improved Outdoor Solar Harvester Now Handles All The Parts

[Vadim Panov]’s 3D printed solar harvester is in effect a rechargeable outdoor battery, and the real challenge he faced when designing it was having it handle the outdoors reliably. The good news is that part is solved, and his newest design is now also flexible enough to handle a variety of common and economical components such as different battery connectors, charge controllers, and solar panel sizes. All that’s left is to set it up using the GoPro-style mounting clamp and let it soak up those solar rays.

We saw his first version earlier this year, which uses inventive and low-cost solutions for weatherproofing like coating the 3D print with epoxy (the new version makes this easier and less messy, by the way.) It was a fine design, but only worked with one specific solar panel size and one specific configuration of parts. His newest version makes a few mechanical improvements and accommodates a wide variety of different components and solar panel sizes. The CAD files are all available on the GitHub repository but he’s conveniently provided STL files for about a dozen common sizes.

When it comes to harvesting light, staying indoors offers less power but requires a far less rugged setup. If that interests you, be sure to check out the Tiny Solar Energy Module (TSEM) which can scrape up even indoor light.

Animated Bluetooth Bike Turn Signals

Tired of risking his life every time he had to signal a turn using his hands while riding his bicycle in rainy Vancouver, [Simon Wong] decided he needed something a bit higher tech. But rather than buy something off the shelf, he decided to make it into his first serious Arduino project. Given the final results and the laundry list of features, we’d say he really knocked this one out of the park. If this is him getting started, we’re very keen to see where he goes from here.

So what makes these turn signals so special? Well for one, he wanted to make it so nobody would try to steal his setup. He wanted the main signal to be easily removable so he could take it inside, and the controls to be so well-integrated into the bike that they wouldn’t be obvious. In the end he managed to stuff a battery pack, Arduino Nano, and an HC-05 module inside the handlebars; with just a switch protruding from the very end to hint that everything wasn’t stock.

On the other side, a ATMEGA328P microcontroller along with another HC-05 drives two 8×8 LED matrices with MAX7219 controllers. Everything is powered by a 18650 lithium-ion battery with a 134N3P module to bring it up to 5 VDC. To make the device easily removable, as well as keep the elements out, all the hardware is enclosed in a commercial waterproof case. As a final touch, [Simon] added a Qi wireless charging receiver to the mix so he could just pull the signal off and drop it on a charging pad without needing to open it up.

It’s been some time since we’ve seen a bike turn signal build, so it’s nice to see one done with a bit more modern hardware. But the real question: will he be donning a lighted helmet for added safety?

Continue reading “Animated Bluetooth Bike Turn Signals”

Automated Weatherproof Timelapse System With DSLR And Raspberry Pi

[madis] has been working on time lapse rigs for a while now, and has gotten to the point where he has very specific requirements to fill that can’t be done with just any hardware. Recently, he was asked to take time lapse footage of a construction site and, due to the specifics of this project, used a Raspberry Pi and a DSLR camera to take high quality time lapse photography of a construction site during very specific times.

One of his earlier rigs involved using a GoPro, but he found that while the weatherproofing built into the camera was nice, the picture quality wasn’t very good and the GoPro had a wide-angle lens that wouldn’t suit him for this project. Luckily he had a DSLR sitting around, so he was able to wire it up to a Raspberry Pi and put it all into a weatherproof case.

thumb
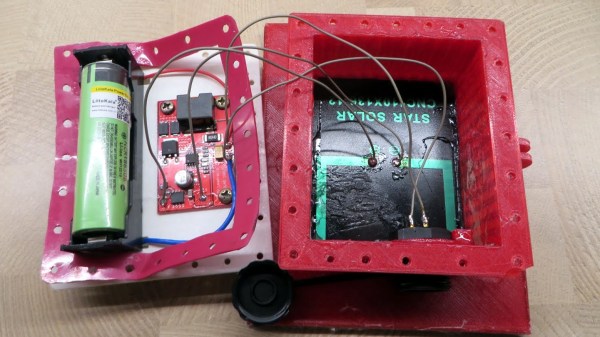
Once the Pi was outfitted with a 3G modem, [madis] can log in and change the camera settings from anywhere. It’s normally set up to take a picture once every fifteen minutes, but ONLY during working hours. Presumably this saves a bunch of video editing later whereas a normal timelapse camera would require cutting out a bunch of nights and weekends.

The project is very well constructed as well, and [madis] goes into great detail on his project site about how he was able to build everything and configure the software, and even goes as far as to linking to the sites that helped him figure out how to do everything. If you’ve ever wanted to build a time lapse rig, this is probably the guide to follow. It might even be a good start for building a year-long time lapse video. If you want to take it a step further and add motion to it, check out this time lapse motion rig too!