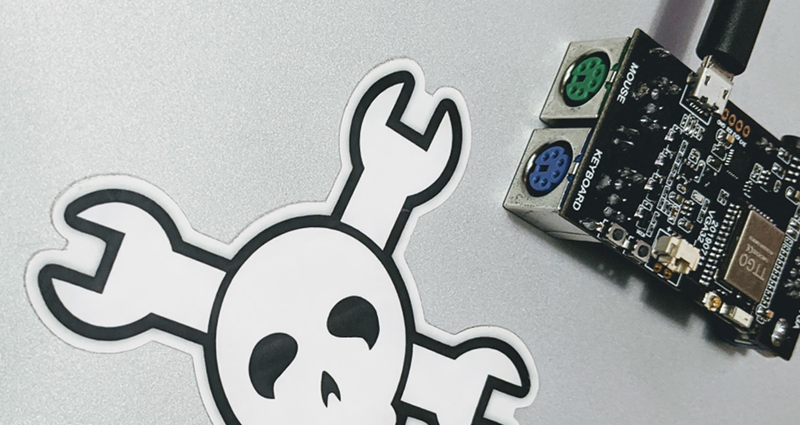
If you wanted me to demo CP/M running on an emulated Altair 8800, I’d pull out a tiny board from my pocket. You might wonder how I wound up with an Altair 8800 that runs CP/M (even WordStar), that fits in your pocket and cost less than $10. Turns out it’s a story that goes back to 1975.
When the Altair 8800 arrived back in 1975, I wanted one. Badly. I’d been reading about computers but had no hands-on experience. But back then, as far as I was concerned, the $400 price tag might as well have been a million bucks. I was working for no real pay in my family’s store, though in all fairness, adjusted into today’s money that was about $2,000.
I’d love to buy one now, but a real Altair costs even more today than it did back then. They also take up a lot of desk space. Sure, there are replicas and I’ve had a few. I even helped work the kinks out of Vince Briel’s clone which I’ve enjoyed. However, the Briel computer has two problems. First, it takes a little work to drive a serial port (it uses a VGA and a PS/2 keyboard). Second, while it’s smaller than a real Altair, it is still pretty large — a byproduct of its beautiful front panel.
So to quickly show off CP/M to someone, you need to haul out a big box and find a VGA monitor and PS/2 keyboard — both of which are becoming vanishing commodities. I made some modifications to get the serial port working, but it is still a lot to cart around. You could go the software route with a simulator like SIMH or Z80pack, but now instead of finding a VGA monitor and a PS/2 keyboard, you need to find a computer where you can install the software. What I really wanted was a simple and portable device that could boot CP/M.
The ESP32 Solution
The FABGL library lets the EPS32 drive a VGA monitor and also provides terminal-like capabilities using a PS/2 keyboard. It also covers quite a few other functions, like working with a flash file system or an external memory card. One of the examples is an Altair 8800 emulation adapted from another open source project. The VGA32 board is made to work with the library and is very inexpensive. It took a little work, but the Altair emulation worked fine on the board, so I wound up with a $10 replacement for the Briel computer that fits in my pocket. The only problem was it still needed a VGA monitor and a PS/2 keyboard.
I wanted to change the code a bit so that I could use the serial port and because of the nice design of the emulator, it turned out to not only be relatively easy but also pretty simple to allow for both modes — you can drive a VGA or use it via the USB cable with a normal serial terminal program.
The Emulation
Before I get into the changes, let’s look at the emulation as it existed before I started tinkering with it. Fabrizio — the FAB in FABGL — had certainly come up with a nice design. The main Arduino Sketch file organized the configuration of the Altair, and it included disk images that you can mount as read only or read write.
 The only issue I ran into was that the emulation used some features that don’t appear to be in the library the Arduino IDE installs via the library manager. The manager claims to have version 1.8 which matches what’s on GitHub, but there were still unresolved symbols when building the example.
The solution was to remove the existing library, download the entire GitHub repository as a ZIP file, and then ask the library manager to install from the archive. After that, everything went fine. If you want to do the install, you might as well start with my fork, so you can get the updated Altair example code.
The next layer of abstraction down is in the /src directory’s machine.cpp file. This file has a hardware abstraction layer for the actual CPU emulations in a different file. The machine.cpp file contains the code to manage memory, disk drives, I/O devices, and actually run programs.
The CPU code is in two parts. There’s an 8080 emulation originally from Viacheslav Slavinsky and a Z-80 emulation by Lin Ke-Fong. There were modifications, but overall, these files are just the emulation logic.
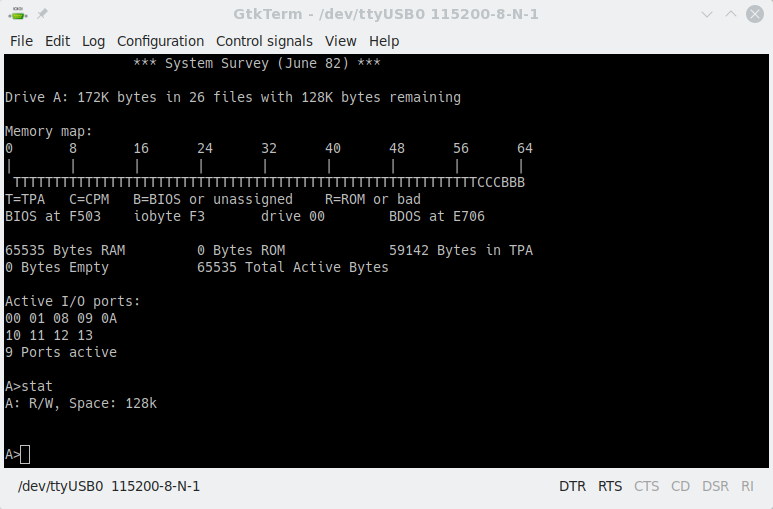
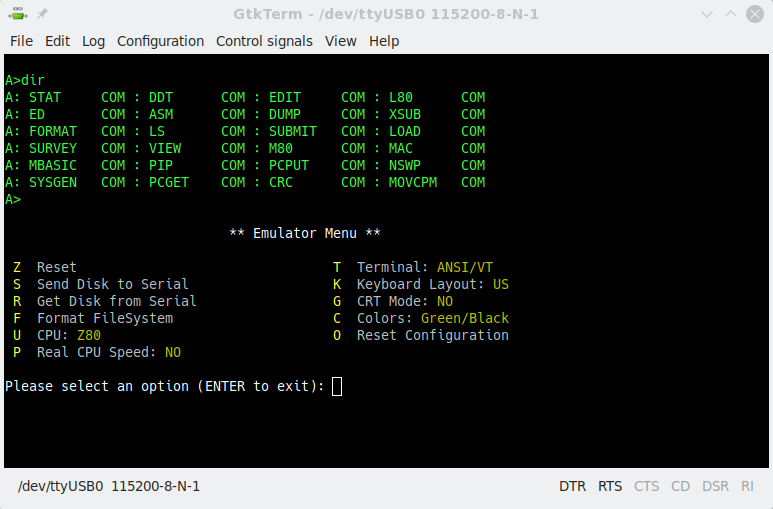
When you run the code it tries to find an SD card, but if it doesn’t find one, it will use internal flash for the disk drive emulation. It has all the bootloader code and pretty much operates like a real Altair, albeit without a front panel, of course. There is an emulation menu that you can bring up with the Pause key on the keyboard. Though obviously that won’t do us much good without a PS/2 keyboard connected.
From the emulation menu, you can dump and read data from the punch and reader device. However, the CP/M disks also have utilities you use to XModem files back and forth to your PC. You can also do things like select the 8080 vs Z80 CPU and set the emulation speed.
The Investigation
I started digging around the code to see how hard it would be to add the serial port. Turns out, the configuration has the serial port setup but uses it as the CP/M punch/reader device. In the code, there are three lines that attach different streams to the SIO0, SIO1, and SIO2 devices. The console devices (SIO0 and SIO1) are set to the terminal stream that FABGL provides. SIO2 uses the standard serial stream.
That was a good sign, and sure enough, the terminal stream is compatible with the serial one. As a simple experiment, I just changed the terminal references to serial. The system booted up and gave me a CP/M prompt over the serial terminal.
That left a few minor problems. Without a PS/2 keyboard, there’s no way to get to the emulation menu. In addition, the emulation menu was hardwired to the terminal. It was reasonably easy to fix both of these problems.
Fixing the Emulation Menu
There’s only one user button on the VGA32 board, so it made sense to use it to call up the emulation menu on the serial port. It wasn’t hard to change the code that calls it (in machine.cpp):
IRAM_ATTR int Machine::nextStep(CPU cpu)
{
    auto keyboard = fabgl::PS2Controller::instance()->keyboard();
    static int  inmenu=0;
    if (m_menuCallback && keyboard->isVKDown(VirtualKey::VK_PAUSE))
        m_menuCallback(0);

    // check for menu
    if (!digitalRead(USER_BUTTON))
    {
        if (inmenu==0)
        {
            inmenu=1;
            m_menuCallback(1);
            inmenu=0;
        }
    }
With this change, the emulation menu callback gets an extra argument and that argument is set depending on the entry method. The problem is, you have to change in the main file. I factored out the code that the menu uses to read the keyboard to a getChar function. It appears the terminal blocks until you press a key, but the serial port does not, so it took a little change to make that work right.
To minimize the code changes, I changed all the references to Terminal to CONSOLE and added this line to the start of the emulator_emu function:
Stream &CONSOLE=stream?(Stream &)Serial:(Stream &)Terminal;
Using a reference means I didn’t have to change all the dots to arrows which would have been the case had I used a pointer.
Dual Personality
The final change I wanted to make was to allow the original code to work so you could still use the VGA and keyboard. I thought about making a new item on the emulation menu but decided to use the user button again, instead. On startup, the code looks at the state of the button. With the button up, the board starts in serial mode. If the button is down, the board sets up the VGA terminal and waits for the button to release:
if (!digitalRead(USER_BUTTON))
{
    streamsel=0;
   // TTY
   SIO0.attachStream(&Terminal);

   // CRT/Keyboard
   SIO1.attachStream(&Terminal);</pre>

   // Serial
   SIO2.attachStream(&Serial);
}
else
{
    streamsel=1;
    // TTY
    SIO0.attachStream(&Serial);

    // CRT/Keyboard
    SIO1.attachStream(&Serial);

    // Serial
    SIO2.attachStream(&Serial);
}
// wait for button release
while (!digitalRead(USER_BUTTON));
Open Source Fun
 This is a great example of how you can build on other’s work. The emulators were from different sources, and Fabrizio did a great job of providing reusable components. It was very straightforward to modify the code to do what I wanted to do.
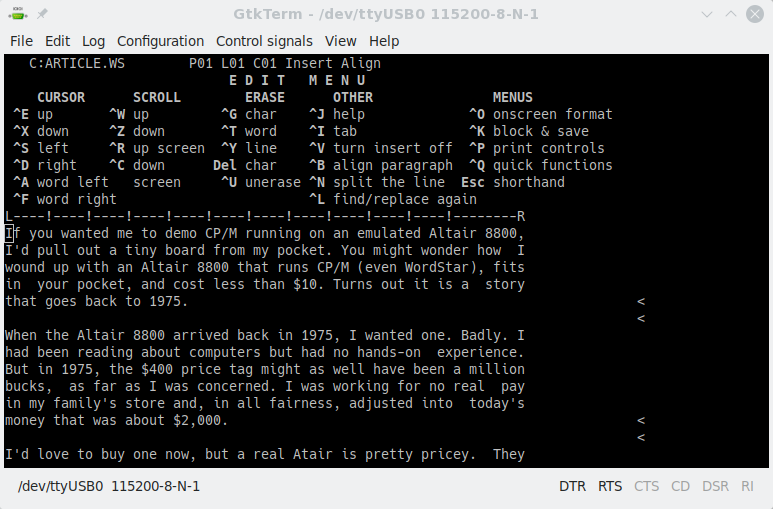
Am I writing this post using WordStar? Maybe. Just remember, you’ll either need the right terminal emulation or you’ll want to install the WordStar disks to a read write disk so you can run WSChange and pick the terminal type you have.
For a few bucks, this was a great way to have a bootable CP/M computer with a lot of options. The idea isn’t limited to the ESP32 either, as you could certainly put something together using the Arduino. It might not be quite the same as building the real thing from scratch, but it’s certainly a lot cheaper.


What is the vendor hardware used?
Looks like a LILYGO TTGO VGA32. Available via Aliexpress, Amazon, Banggood, etc.
I split the difference in my Blinkencard project by having blinkenlights and cutting out the switches: https://hackaday.io/project/169140-blinkencard
It also uses an ESP32, but as a frontend to an FPGA Altair emulation.
You could do something similar with the ESP32 hosted emulation using a SPI shift register.
I think you forgot to do a ^Q-Y on this:
Though that won’t do us much good without a keyboard connected. Though obviously that won’t do us much good without a PS/2 keyboard connected.
BUT WHERE ARE THE BLINKING LIGHTS! they are very important.
Woops, sorry. I guess I scrolled on your comment.
As someone who learned machine language on an Altair, I can tell you it’s just not the same without the toggle switches and LEDs…
Bloody millenials
This is very cool! Have your considered using a web based terminal? It would eliminate the need to hook up to a monitor and keyboard.
https://s2js.com/altair/sim.html
This site just straight up steals this content: https://nationalcybersecuritynews.today/computerhacking-computer-hacking-esp32-altair-emulator-gets-split-personality/
its funny how that site lists the source link as hackaday….
Yeah.. click source at the bottom..
Thanks for the heads up on that! We’ll chase them down.
You’d be surprised how many of those sites there are. We get a few per year, and I’m sure we don’t see them all.
It’s a legitimate colloquial usage of very, very long standing. I don’t think anyone is actually offended by it. If they are, let them take their own offense,
Does being offended by something that doesn’t apply to you count as cultural appropriation?
It’s OK – the term has been considered archaic for quite a while now.
Thank you for your work! You may also take a look to a CP/M with multitasking, multisession, subdirectories, FAT32, etc… still as demo program of FabGL.
https://github.com/fdivitto/FabGL
Very cool! Here’s the full link for those who are interested: https://github.com/fdivitto/FabGL/tree/master/examples/VGA/MultitaskingCPM
Hi! How relates this to MP/M ? 🙂
Does it have got support for bank-switching or multiple users etc ?
It is not related to MP/M. Actually both BIOS and BDOS have been rewritten from scratch, recreating a CP/M 3 compatible environment. Each program has an exclusive runtime environment with 64K RAM. It doesn’t support multi-user, maybe in future!
Don’t worry Steven13, you already look like an insensitive jerk just by posting this. In the end it all evens out. Unless you keep denying that you’re just as insensitive of a jerk as the next person.
To everyone else: it’s just a phase. The people who are going with it are bound to end up with an identity crisis. And it will pass if they accept that they are not God-like after all.
Let’s just make sure that their identity crisis won’t spark yet another war, like it often did in the past.
GtkTerm FTW!
What about using the wifi and broadcast a html5 emulated telnet terminal and pipe the serial to that? Then you could have an Altair on any system with Wifi.
I have done things like this with my projects (for example, the esp8266-based Altair emulator on hackaday.io), although the emulators use “raw” telnet or serial/USB serial. They work well with the free version of Attachmate for IOS on a phone. My code is pretty hacky and rough, but works.
Amazing how many people seem to be offended at the idea that certain words and phrases are problematic.
Nice project and nice update too, that makes it even more versatile, thanks!!
I managed to format drive C and D. And if I change the .ino I can attach one of the other disk images included as a header file after reflashing the device. E.G.:
//#define DRIVE_B BDSC_dsk // B: read only
#define DRIVE_B games_dsk // B: read only
I then can use PIP to copy files to the C and D drive which seem to be persistent.
But I can’t figure out how to “mount” one of the, as a header file, included disk images under CP/M, any clues?
Look at “Disks configuration” section in “Altair8800.ino”. You have DRIVE_A, DRIVE_B, etc… defines.
Just set on the right part of the define the disk you want mounted. For example, if you want turbo pascal 3 in DISK_B, set:
#define DRIVE_B turbopascal3_dsk
The “turbopascal3_dsk” value comes from “turbopascal3_dsk.h” file. Inspecting that file you will find that there is an array named “turbopascal3_dsk”, which is the image of that disk.
I can’t get this to work. Tried turbospascal3_3_dsk for drive c, but dir c: reports bad sector. Also, should a SD card work, I can’t getvtgat going either. Bad sector errors.
does following configuration work for you?
#define DRIVE_A cpm22_dsk
#define DRIVE_B turbopascal3_dsk
Yes, this works. I left C & D as previously defined (“drive_c.sk” etc) but get the bad sector errors. A format runs through writing the 77 cyks but then fails the verify.
Thanks for the help btw
Have the same problem. No matter which _dsk I specify it never changes. I have even tried writing a new example to overwrite this one. Nothing works for me. It’s as though the new compile is ignored and a previously created one always gets loaded.
How’s the VGA implemented? I know there are HDMI transmitter chips out there that take in 24 bits a clock and a sync so as long as there’s no serial DACs involved you might be able to hack in an HDMI interface if the resolution is high enough for anything to recognize. That might solve one of the problems.
VGA signals are generated using DMA device (embedded inside the ESP32). There is a frame buffer in RAM, that is continuously read by the DMA and sent to the output. Of course there is a DAC in order to generate analog VGA.
The ESP32 (fabgl library) has a set of primitives in order to draw graphics (lines, circles, text, sprites, etc…etc…etc)
Its a lovely emulation. Works like a charm. But I can not get Drive C or D working, so no writes. Tried formatting, creates driveC.DSK on the SD, I am using both Termianla s Development baord. Always Bad sectors error onC and D. Send a disk file (from a working emu, 330K disk) with the Python transdisk.py, success in transfer, still Bad Sectors error. So no write facility?
Ok, need to format the C: and D: drive in CP/M. Works fine now!