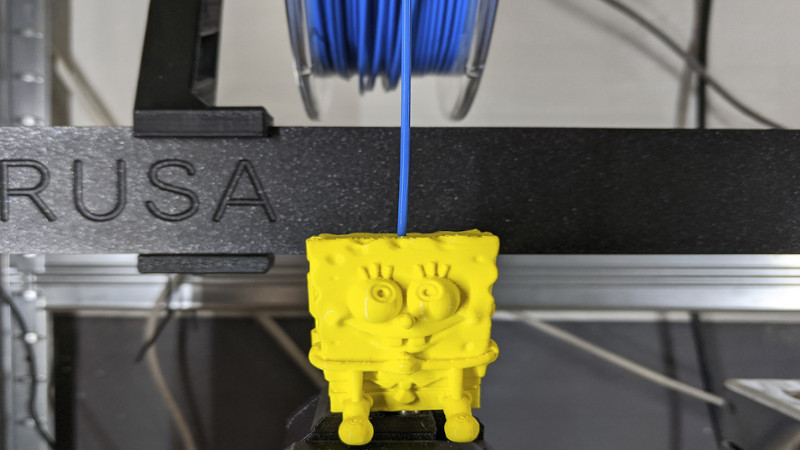
If we’re honest, our workshop isn’t as clean as it probably should be, and likely many makers out there will say the same. This can have knock-on effects, such as iron filings clogging motors, or in this case, dust affecting the quality of 3D prints. Aiming to tackle this, [3Demon] built a fun Spongebob-themed dust filter for their 3D printer.
The filter works in a simple way. The Spongebob shell is 3D printed in two halves, with a hinge joining both parts. Inside each half, a section of sponge is stuck inside. The two halves are then closed with a snap fit, with the filament passing through a hole in Spongebob’s head and out through the (square) pants. With the sponge packed in nice and tight, dust is wiped from the filament as it feeds through bob to the printer.
While it’s important to install carefully to avoid filament feed issues, it’s an easy way to automatically clean filament during the printing process. You may be surprised just how dirty your filament gets after sitting on the shelf for a few months. Getting rid of such contamination decreases the likelihood of annoying problems like delaminations and jams. Avid printers may also want to consider making their own filament, too. Happy printing!


slow news day
Very slow…
Hahaha!
I like the spongebob, but filament goes in a dry box, not on a shelf. Print straight from the box with a teflon cable, and you don’t really have dust issues.
Put a $10 rechargable dessicant dryer in, and you won’t have moisture ruining your prints either.
This is one thing I presume exists but haven’t really seen.
A hermetically sealed spool holder with a gasket for the filament exiting into a bowden tube, and a holder for a common size desiccant bag.
Would make sense for it to exist.. But I guess spools are not consistent in size – so it would either be one brand doing for their own or probably excessively bulky to handle anybody’s spool. Its also rather a marginal gain in my experience – while I can see improvements if you really really take care of the filament round here at least climatic conditions don’t seem to be that bad for them. The improvements are so marginal its the last thing I’d worry about for improving your print quality. But I expect it will be a worse issue in some places and any spool not actively in use tends to live in a sealed box – so only so much air no matter how humid is in there..
Also easy enough to make your own – any old airtight food storage box with a little printed o-ring holder and desiccant pocket glued on and a rod for it hang off.
There’s significant departure between what are brought up in the blogs and what works/necessary in 3D printing. I briefly tried a DIY drybox but it only gave me feed issues and severed filaments so quit. Supposedly my filament is damp wet and swollen up? Admittedly I don’t get clean layer lines but it works and dryboxes don’t seem to solve it anyway.
Likewise, heated bed, glue on the bed, steps/mm calibration were not much useful for me. I’d wanted to know damn cooling fans for drivers, mesh bed leveling, skew correction or closed loop stepper driver solves the problems I’ve met, but blog writers wouldn’t know and those would know don’t blog.
You need to dehydrate you filament. You can use an oven or food dehydrator. Dessicent can only keep it dry, not actually drive it.
We used to take the time to publish everything we did around our shop for the general public. However, the ambitious folks kind of ruined the sense of community with Youtube producers looking to monetize content, instruct-ables not citing their sources, china kit cloners, and various kickstarters for designs developed within the community. We only publish the software to the web now for Apache/GPL distribution ease, and keep the internal projects within off-line groups.
Built quite a few old style Prusa aluminum rep-rap frames with most parts consisting of thread-lock-blue glued fasteners and after-market metal brackets/bearings. Some of these I built myself with friends, customized the external electronics to actually last, and threw out most the china budget-components knowing they will waste our time later. With drip oil (detergent-free 10W motorcycle oil) on rods, bearing blocks, and lead screws: 4 years later they still work well after thousands of hours of runtime, but the nozzles are wider than when they were new (0.4mm). Note, we didn’t use anything fancy like auto-leveling, used 123 blocks to square up our frames, and replaced an entire hot-end when it started to get unreliable. We optimized our printing process around a fixed version of Slic3R, Marlin firmware, and simple half-step Pololu motor drivers (keep several around in case of an issue).
With ABS, we use acetone dissolved old material (goo/snot) thinly spread on a 80’C glass bed, and bring it up to 108’C for printing. The all metal design allows it to sit in a sauna-1”-thick-insulation-foam box with a 100w incandescent light-bulb to form a heated chamber to help the print and reduce warping (about 68’C ambient). Note, most ABS spools can be left out for over 4 months with minimal if any water absorption issues.
With PLA, you get about 3 weeks till the steam “popping sound” starts making tiny holes in prints. Some spools also tend to get a lot more stringy when the water content starts to increase after about 2 weeks. We use Hair-spray to prepare the print surface, as part warping is less of an issue. You can re-dry theses in a regular oven on low-heat for 2 days. Hoverer, some plastics do get old and brittle, so if you shelved some specialty material longer than 3 years it may need to be tossed.
The Prusa i3 MKII/MKIII are probably the easiest FFF/FDM style printer to learn, and I highly recommend them for people entering the hobby. Prusa has done a lot to improve the experience of getting the machines to build the parts you want.
For the Stereolithography/SLA acrylic resin printers, the LCD based $300 units are easier to learn in my opinion. There are some lab-safety precautions needed to handle the resin safely (PPE and fume extraction), but there is also a lot of hype/nonsense around this technology.
*Never use water to clean your printer, as only 99% Isopropyl alcohol is a safe solvent to use near the membrane.
*Never allow the uncured resin to drip onto the printer, as it will partially destroy many plastics
*Never leave the resin exposed to the atmosphere, as after 3 days the chemistry can start to degrade
* Small slight part-overhangs are actually good on resin printers, as this allows you to pop parts off the build plate easier
* Never trust proprietary slicer software, as some have questionable features unrelated to printing
* buy a few replacement membranes, as they will need replaced about once a year (a leak is far worse)
* The resin curing process is exothermic, so those loud fans are important. Try to keep it in a space at 25’C with a 12 second exposure, as many resins are not designed for the default 8 seconds per layer set on many printers. Also, too hot or too cold can cause the print to do weird things.
* white-lithium grease your z-axis lead-screw and linear-rail once a month
* Note, if your printer doesn’t use a Hiwin style z-axis rail the print quality probably won’t last long
* remember to vent the part model near the print bed (hole <5mm along z-axis), as cavities that lift uncured resin each cycle can cause suction-cup membrane popping sounds and loss of build surface consistency
The acrylic resins we use are rigid (slightly more brittle than cast polycarbonate), but have negligible deformation during curing. They are as close to a “3D printer” as you can get in my opinion, but the consumables can get pricey at $40/liitre.
Best regards,
=)
Mine lives in a big ziplock box with a rechargeable desiccant container in it. I drilled a hole and added a push lock connector on there like we use for the bowden tubes. Then stuck a foot long piece of tube in it. I figure the really small gap wouldn’t let in too much humidity. I only have to recharge the desiccant every few months so I suppose it works well enough.
Why can’t we edit posts… https://photos.app.goo.gl/AyCVHymXw8f4T1WM6
https://www.thingiverse.com/thing:2119644
They exist, you can even print them yourself.
A $10 rechargeable dessicant dryer?
I think he’s referring to something like the Eva-Dry that I use in my filament dry-boxes which you just plug-in to rejuvenate. You can also rejuvenate desiccant packets but you’ll need an oven set to low or a something like a food dehydrator.
The “rechargeable” desiccants typically have a color change aspect to them to identify when you need to dry them again, I use a dehydrator for drying filament, but I like the metal boxed desiccants I can throw in the oven to dry them.
Hmmm…
Maybe I’m a bit on the immature side, because all I see is Spongebob is pooping the cleaned filament into the machine.
I thought it was a good idea. That spool sitting there is going to collect dust and your printer is going to suck it straight it.
“If we’re honest, our workshop isn’t as clean as it probably should be, and likely many makers out there will say the same. ”
Enclosure, not just for dust shielding, but temperature and humidity control.
If you don’t like the theme of that one, I made this a number of years ago: https://www.thingiverse.com/thing:190118 I never ended up using it myself though as dust never seems to be an actual problem.