There’s a lot of folklore around post-processing of prints from FDM printers. Proponents swear by their methods, which are generally intended to either strengthen the part or to improve its appearance, or both. But do they actually work?
Knowing that a collection of anecdotes is no substitute for actual data, [Stefan] from CNC Kitchen has again performed some valuable experiments, this time testing the strength of parts that have been annealed in salt. This was a follow-up to his recent experiments with baking prints after entombing them in plaster, which yielded mixed results in terms of strength gains. Viewers commented that common salt makes a good medium for annealing prints, so he set about finding the right kind of salt. It turns out that the finer the grain, the better — powdery salt packs tighter and leaves little space for the softened plastic to flow — but that powdery salt is not easier to find. He ended up making his own by pulverizing table salt in a blender. He also had to play around with temperatures and times until coming up with a good process.
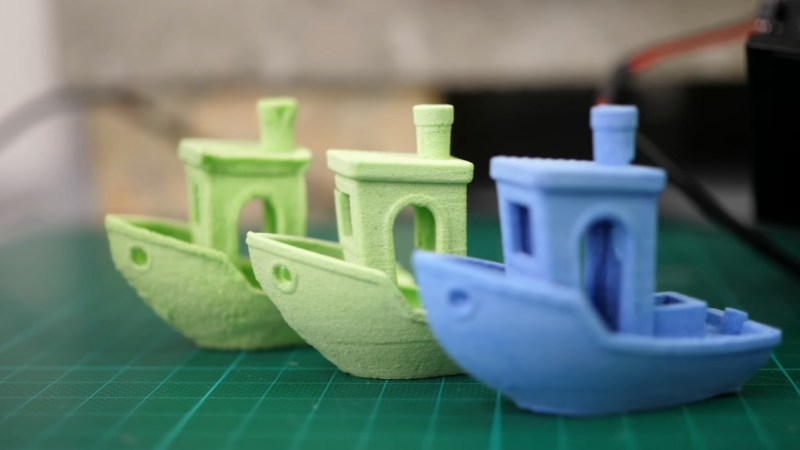
The results are impressive. PETG, ABS, and two varieties of PLA prints tested with force applied perpendicular to the print layers all showed marked increase in strength after breaking, to the point of nearly matching the strength of parts printed with the layers parallel to the stress. As with the plaster, parts were printed at 100% infill; a Benchy printed at 20% was notably unseaworthy after annealing. Surface finish on the annealed parts is an interesting combination of pitting with white residue — not unattractive but still a bit weird.
Salt annealing might be a bit cumbersome, but it’s a neat method to add to all the other post-processing tricks that people have come up with for their 3D prints.


I’ve been watching these stories. I liked his idea when he tried this with plaster but digging the part out, especially without breaking it looked like too much work. The salt idea sounded good but seeing it now I’m not sold on salt given how it seems to merge with the outer layers. making them porous. Also, since salt is corrosive I’d be worried that I might not get all the salt out and any screws or other metal parts that I combine with a 3d print would corrode.
I liked the idea of trying green sand since this is similar to what green sand is actually meant for.
I’ve heard of people painting their foam when they do lost foam casting with green sand to get a better finish. I wonder what would happen if one painted a part then re-melted it this way.
Thinking on this further though, I’m not sure any granular material is going to create a perfect finish which kind of takes me back to the plaster idea.
What if instead of entombing the object in a solid lump of plaster it was only painted with a thin layer of plaster then burried in a grainy material? Could that be a “best of both worlds” approach? Maybe then it wouldn’t even be necessary to have extra fine grains. Would ordinary sand work?
I have leftover sand and plaster from a recent project. I might have to try it this weekend.
Let us know the results!
How about baking soda…
Actually, washing soda might be better, or baking soda that’s been baked at 100C+ for a while.
(Let the sodium bicarbonate->sodium carbonate chemical reaction happen before adding the 3D printed item.)
Interesting idea, paint the figure with PLA or another water soluble substance, pack in salt/sand and bake. Then soak the piece in warm water to remove the PLA/embedded stuff. I have Baked PLA before and gotten really good results, baked PLA was actually stronger than ABS. For uniformly shaped pieces(bars, buckles) I just printed the items 2% larger than final.
I got an idea! Instead of salt, use something more resilient to make a mold of your 3D part. Then as you’re baking the mold, somehow “inject” molten plastic into the mold. I think the plastic parts would come out really strong that way. If only someone could create a process like that.
You sound more salty than this guys prints.
And you sound like a humourless robot.
So how do you propose producing said molds with the ease and versatility of 3D printing?
You 3d print them ofcourse: https://www.3dhubs.com/knowledge-base/3d-printing-low-run-injection-molds/
Why not talc?
Products like baby powder or Gold Bond would seem to be made for this.
Generally “talcum powder” isn’t anymore. There was an issue with natural talc containing asbestos, so mostly it’s corn starch now. Corn starch is likely (I’m not 100% sure) to scorch at annealing temperatures. Washing soda would work better I think, and is water soluble for easy cleanup.
I was rather surprised that, when I went to get talc for pewter casting, it was still available in my local grocery store here in the USA. Not just corn starch. Actual talc. So it might be worth checking.
some stores might still sell the talc version, but johnson&johnson has stopped selling the talc baby powder in the US (they do still sell it in other continents).
Plaster WITHOUT WATER. Any heat resistant fine powder that stays in shape when compressed should work. Rock dust could also be worth a try, this stuff is very cheap and can be washed off like salt.
How about use something that isn’t going to make the part corrosive to any metal it touches later (i.e. if this is a part of a machine,etc).
Better yet, get a real hobby, be green, and learn to make things that won’t end up in a landfill. Plastic is destroying our environment.
Ugh, please give an example of a “real hobby”. “Being green” is pretty easily attained with PLA used for repairing broken items that would otherwise end up in a landfill. PLA is plant based and biodegrades far faster than typical plastics made from fossil fuels. Hackers in general tend to be far more environmentally minded than the average person. So, wtf?
Before you run around ridiculing people, perhaps learn a few things about the topic you’re so critical of.
Actually, the processes that make PLA biodegradable are pretty rare, and very few recycling centers will take it. You’re better off with PETG or, (shudder) ABS for recycling.
https://youtu.be/X_Gh-3PQhiE
most of my ideas follow along what others have suggested — use plaster without water, maybe use a vacuum vibration table to to compact it (you can get close with a vacuum cleaner and a reciprocating saw without a blade in it — you can find people casting concrete and plaster using this to get bubbles out). As far as the “mold” the salt/plaster/sand/whatever is your mold. What you need is to add one or more sprues with chunks of material above the part so that as the printed/casted part sucks the material into itself it has some place to pull it from. Take a look at the metal casting literature and practice.
RC modellers use spray on car filler sanded down.