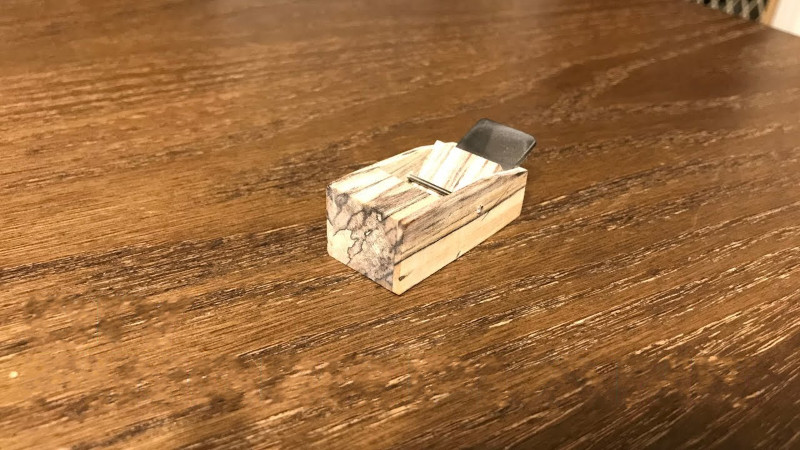
A plane is a tool familiar to all woodworkers, used to shape a workpiece by hand by shaving away material. Regular planes are two-handed tools available at all good hardware stores. For finer work, a finger plane can be useful, though harder to find. Thankfully, [Daniel] put together a video showing how to make your own.
[Daniel]’s build relies on stabilized wood, useful for its density and consistent quality, though other woods work too. A 6″ pen blank is enough to make a pair of matching finger planes. A block and two side panels are cut out from the material, with attention paid to making sure everything remains square for easy assembly. The parts are glued together with a block set at the desired cutting angle for the plane. With the assembly then tidied up on the bandsaw and sander, [Daniel] installs the cutting blade. This can be made from a larger standard plane blade, or a cutdown chisel can be pressed into service. The blade is held in place with a wooden wedge beneath a metal pin. The pin itself is crafted from an old drill bit, cut down to size.
It’s a useful tool for doing fine plane work, for which a full-size tool would be ungainly. We can imagine it proving particularly useful in producing accurate scale models in smaller sizes. If you’re big into woodworking, consider giving your tools a good sharpen on the cheap, too. Video after the break.


It will never fly
That’s what I thought.
Like one of those finger skateboards, right?
trouble is with metal
aus8 will be great or some similar krupp 1150 ?
better buy cheap 2$ from ali
wheres the fun in that?
How do these compare with luthiers planes?
https://youtu.be/JCD84KBqNTk
Unlike this wooden plane, luthiers planes work. There’s a reason why they’re brass or bronze. Blade adjustment needs to be metal. Blade gets adjusted by thousandths of an inch. Wooden planes can work in larger sizes. They rely on inertia to adjust the blade. Tap on the body fore and aft to adjust the iron. That won’t work on a plane this small. And, the blade can’t be cut with a hacksaw. Soft blade will not hold an edge long enough to be useful. Not that hard to make metal planes in this size. Commercial ones are generally cast. DIY can be brazed or pinned. Kell planes are very unusual with adjustable throat. Most are not. And, many luthiers planes are gently curved to allow planing a concave surface. Even flat ones generally have a crowned iron. Sometimes serrated to work with highly figured wood.
“Unlike this wooden plane luthiers planes work”? Really? I’ve made several of these wooden planes using blades from an old plough plane. They work pretty well. Just finished a violin back using both my 6 and 12mm planes built on this idea. Perhaps you should give it a try before pouring negativity on it.
I’m a violinmaker – my fingerplanes don’t have adjustment levers or even depth screws. I adjust by tapping the blade laterally or directly from the back to set protrusion and adjust laterally. You clearly have no idea what you’re talking about. Wooden planes work just as well and are more easily made and customized. Try it before you spew misinformation.
Using spalted wood for a plane?
They keep saying stabilized wood, so it’s impregnated with resin to reduce/eliminate seasonal movement, prevent tear-out, and make it more consistent to work. The stabilizing process often involves dyes, resulting in some extremely wild not-found-in-nature colors.
This could be stabilized spalted wood. or it may have been dyed.
was I the only person who was taught to never put a plane down on it’s bed?
Then explain the racks, where the planes are commonly stored on wooden shelves.
Many instructors make the point to have a point to make about hand planes and handling your tools “correctly”, but really it’s just about not scuffing up your workbench rather than protecting your plane. It sees a lot more abuse while you’re actually using it, and frankly so does the workbench.
I’m religious about that too, but realistically unless you might have some steel on the workbench the wood that the blade’s touching isn’t going to hurt it.
I’ve made a number of similar planes, usually with an oak sole, and a softer wood core that has two oak cheeks to hold it together. You can make a shoulder plane pretty quickly.
I also found that you can tig weld a short tool steel blade to a mild steel tang and it’ll do well after hardening/tempering. (For a shoulder plane, the blade needs to be sort of T-shaped, and this construction means you don’t have to grind a whole bunch of tool steel off: just weld on a narrower tang that fits between the cheeks, with the tool steel blade the full width plus 0.05mm of the plane body.)
That’s more a thing with wood-bodied planes than metal ones, I think.
FWIW Vic Tesolin had a blog post on this very subject a few weeks ago at Fine Woodworking (https://www.finewoodworking.com/2020/11/24/weve-got-a-plane-down)
This is an interesting project – thanks for sharing it!
I was surprised he used superglue to assemble this. I’ve not used it for assembly, but it’s my impression superglue doesn’t resist sudden shocks well – I’d be afraid the plane would fall apart if I dropped it. However, I haven’t tried using superglue that way: maybe my impression is wrong.