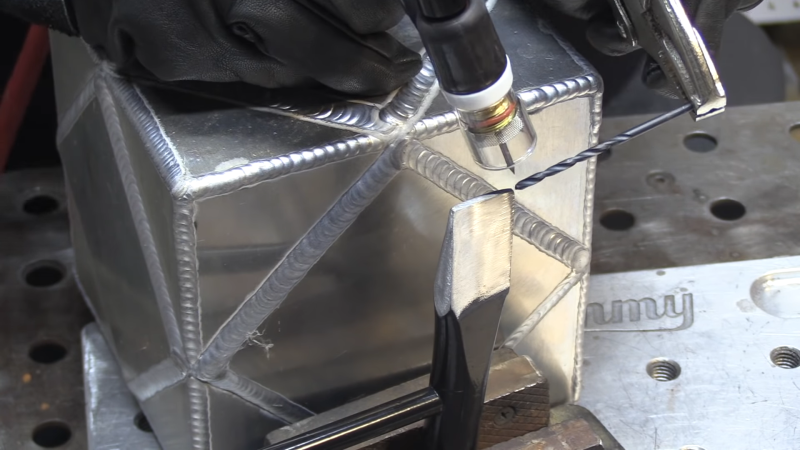
People have been working metal for so long that the list of tips and tricks is now nearly infinite. So it’s always a joy to pick up a new trick, especially one as simple as putting a hardened edge on mild steel using a drill bit as a filler rod.
This tip comes to us by way of [Jody], aka “The Weldmonger” on YouTube. Subscribing to his channel is a sure way to keep your welding ego in check; you may be good, but [Jody] is better, and he’s willing to share as much of his experience in video format as possible. For this tip, he starts with a cheap chipping hammer, the universal welder’s tool that helps remove the glass-like slag that forms during shielded-metal arc welding, or what’s commonly known as stick welding. The mild steel of the hammer makes it hard to keep an edge, so [Jody] pulled out his TIG welder and laid down a bead on the cutting edge using an old drill bit as a fill rod. The video below shows the process in all its simplicity.
The tool steel of the drill bit is far harder than the mild steel of the hammer, but still soft enough to take an edge, and the resulting tool is much improved. We’ve seen something similar to this before, when hard-facing filler rod was built up on the edge of a mild steel slug to make a cutter for internal weld seams. We liked that hack, but knowing the same thing can be done with something we’ve all likely got in abundance in the shop is a neat trick. Thanks, [Jody]!


Case hardening as demonstrated by Chris,of clickspringprojects.com would serve as well and suspect is used on better quality chipping hammers.
Case hardening is not very deep. and you need a furnace. Has to be packed and stay hot a long time. Not real easy or cheap. For a hammer, probably not deep enough. Using HSS as filler is a good idea. HSS retains hardness at red heat and should not need tempering to stay pretty tough. Don’t use cheap carbon steel bits. Those get soft when annealed and would need quenching and tempering.
Actually, you can case harden with casenite and a torch–no oven (or tig) required. It even works with a prpane torch, as long as you can get the steel red hot. It may not be hard thru, but as he said, he does not swing his chipping hammer, he glides it, and this would be more than sufficient for that.
Could also heat treat it afterwards as well?
I am surprised that the HSS ends up hard. I have always avoided using it as the heat treatment schedule needed to harden it seems troublesome to say the least.
An alternative to this alternative is the tool steel filler rod demonstrated by This Old Tony some weeks ago: https://youtu.be/qUzHFLV4IyQ
I am surprised that the HSS remains hard. I have always avoided using HSS as the heat-treatment schedule is more complicated than for plain carbon steel.
This Old Tony showed the use of dedicated tool-steel filler rod a few weeks ago.
I posted links but the system ate the message: https://youtu.be/qUzHFLV4IyQ
I expect it’s not functioning as HSS anymore and doesn’t have anywhere near the temperature resistance, but even without the proper heat treatment I’d expect it’s probably quite a bit better than mild steel.
I think this is the video you’re refering to: https://www.youtube.com/watch?v=qUzHFLV4IyQ
I was going to mention it as well as a good alternative to this. I would expect someone like the OP to be aware of something like this if they’re really that experienced with welding.
That’s the video. I twice tried to link to it, only to have my post eaten by the spam filters.
Hardware stores used to have this in rods https://en.wikipedia.org/wiki/Silver_steel
It’s soft as is but hardens pretty easily, so good as wiki says for making small tools and punches. Anyhoo, haven’t seen it or mention of it much online the last few years, not sure if it’s hard to get or what. No idea how it welds though.
“Silver Steel” is still very readily available. Next-day from RS, or from Amazon. Cheaper from eBay and cheapest of all from Zoro. (they seem bad at pricing, I got a 3m length of 17mm for less than they were charging for 12in)
I used it to make a punch and die set for making radiator gills during my christmas holiday:
https://youtu.be/NlFNOK4abeE
I’m seeing now that US refers to it as O1 oil hardening steel and it welds with SS rods, if rando forum comments believable.
I get stuck between commonwealth and foreign terminology all the time.
I think that the US version of “Silver Steel” is called “Drill Rod”.
Silver steel is actually a water-hardening steel, (W1?) but I rarely use water for the things I make. I should try it on some parts that don’t have multiple hour of work in them.
I wonder if such a method could be used on a dull knife (knife blanks?). The extreme end of this idea is making samurai swords on the cheap by taking crap swords, grinding off the edges by maybe 3-5mm and then filling it in with hardened tool steel. Probably not as good as the real thing but it would be cool to see how close you could get.
He does not harden the steel afterwards. So it is far from what it was as a drill bit.
The HSS doesn’t really seem to care. I’ve melted HSS drill bits and the hardness doesn’t seem to change once they cool. I suspect they are air hardening steel. (Having checked, they are pretty robust – the very short time at liquid before resolidification probably doesn’t melt all the carbide away, and the high rate of cooling of a small area like that means it won’t be far off what it was previously.)
HSS definitely isn’t air-hardening in the conventional sense:
https://www.steelexpress.co.uk/toolsteel/M2-high-speed-steel.html
Whether TIG welding a pre-hardened HSS bit actually results in a hardened result is probably something best determined by someone with a hardness tester.
This could be an amazing discovery.
Or not.
tried a center punch it didn’t leave a mark so it must have been pretty hard
Don’t confuse the procedure for getting the maximum performance out of a particular steel with a general description of it’s behaviour. It’s precisely because HSS air-hardens that it gets it’s temperature resilience relative to other steels.
They install an orange warning light in the HSS bits I buy to let you know when the hardening is toast.
What are these called and who make them?
Pretty much anything that small is going to harden by air cooling if it’s a type of alloy that will harden. If you can’t count to two before the red glow disappears, it’s probably going to be mostly martensite anyways.
yeh, that big lump of steel is going to be a pretty efficient heat sink
It’s a heat flow thing too, if your torch/buzzbox can put more heat into a join than is leaking away from it, by quite a large factor, then you can get it hot quick and not heat up the rest of the piece, and the flow may still be adequate to cool it quickly. If you’ve gotta bring the whole piece up to darn near welding temperature then joint may cool slowly. Soldering works that way too, had ppl say I’m crazy when I break out the 60W for a “delicate” FET, but it’s going to the ground plane, and I can do it this way in seconds or cook the whole board up to 250c over half an hour with the 20W.
Yep. Same thing with thermostat irons – many people assume you need to set the temperature to just above the melting point of the solder, but then the tip cools down below melting when you touch anything with it and it takes forever to get back up, which means you end up burning your components and board.
If instead you crank it up as high as it goes, you can get the job done quickly and cleanly – but you wear out your iron a lot faster.
If you only have a stick welder, then get some hardfacing electrodes:
https://html.duckduckgo.com/html?q=stick+welding+electrode+hardfacing
Also, there is no single alloy for drill bits. Sometimes I have a deep hole to drill and usually do it by stick welding a mild steel rod to the end of a HSS drill. (Needs lots of pegging to get the chips out). With some brands of drills this works quite nicely, while for other brands the weld becomes so brittle that it breaks to easily and it unusable. Result of course also highly depends on attempts to to some heat treatment of the weld area, or just the speed with which it cools after the weld. With hobby equipment it is a bit hit or miss experimentation.
Seems way back in another lifetime I made some drill bit extensions by brazing the extension with brass/bronze rod – also made some hex wrench extensions the same way – drilled a socket into the extension piece then brazed it together – but the air cooling can make things brittle so a bit of annealing or slow cooling was required to prevent having a brittle part.
I also hardened a mild steel chipping hammer by setting the Oxy Acetylene to a carbonizing flame to coat the part with carbon then heated it for a while longer for the carbon to infuse into the mild steel –
I’ve experimented quite a bit with adding tool steel faces on mild steel. Never thought of Trying a drill bit but not surprised it works.
I found some sintered carbon arc rods with copper cladding (q. 50 about 5$) used in arc gouging, carbon torches, and the old school CAW process, which predates SMAW and has disappeared for good reason. I put the carbon rod in my a.c. stick welder stinger, wielded it like a tig torch, and held a regular welding rod (6011) in my other hand, feeding it in like tig. I found that this carborizes the steel quite profoundly, if you hold a tight arc.
I also made my own spring steel welding rods out of small coil springs which I stretched out straight. It works ok on its own, but you can make a primitive flux coating by melting down and purging the water from borax and then dipping the wire. It “burns” like a 6013 after that point, leaving a glassy flux layer to chip off after, which I normally hate, but it’s quite alright for this application.
In all these methods, the filler metal will “quench” hard in the cold steel surrounding the weld puddle. I usually lay the bead, let it cool and then temper it a bit with propane torch.
When welding high carbon pieces together, I preheat to a blue temper with propane to stop this effect, since you don’t want hardened steel in structural situations usually.
I often use HSS welded to a mild steel bar to make a boring bar
I’ve watched Weldmonger videos for years. Dude knows his stuff and his worst welds look better than my best ever.