Retrocomputing With Modern Hardware, No Emulation Required

The x86 processor family is for the time being, the most ubiquitous type of processor in the PC world, and has been since the 1980s when the IBM PC came on the scene. Emulating these older devices is easy enough if you want to play an old LucasArts game or experience Windows 3.1 again, but the true experience is found on original hardware. And, thanks to industrial equipment compatibility needs, you can build a brand new 486 machine with new hardware that will run this retro software as though it was new itself.

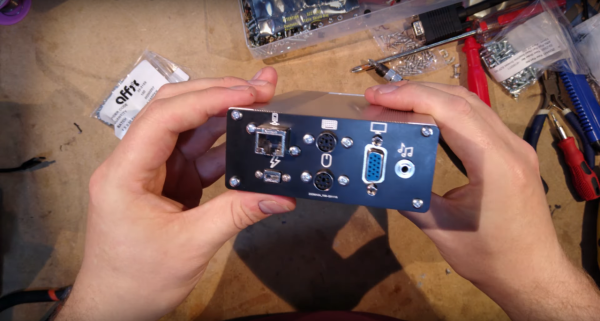
[The Rasteri] masterminded this build which is reminiscent of the NES classic and other nostalgic console re-releases. It’s based on the PC/104 standard which was introduced in the early 90s, mostly for industrial controls applications. The platform is remarkably small, and the board chosen for this build hosts a 486 processor running at 300 MHz. It has on-board VGA-compatible graphics but no Sound Blaster card, so he designed and built his own ISA-compatible sound card that fits in the PC/104’s available expansion port.

After adding some more tiny peripherals to the build and installing it in a custom case, [The Rasteri] has a working DOS machine on new, bare-metal 486 hardware which can play DOOM as it was originally intended. It can also run early versions of  Windows to play games from the Microsoft Entertainment Pack if you feel like being eaten by a snow monster while skiing. [The Rasteri] is no stranger to intense retro computing like this either, as he was the one who got DOOM to run on original NES hardware.

Continue reading “Retrocomputing With Modern Hardware, No Emulation Required”

Rheoscopic Holiday Ornaments

We had to look it up on Wikipedia – “Rheoscopic fluid means ‘current showing’ fluid. Such fluids are effective in visualizing dynamic currents in fluids, such as convection and laminar flow. They have microscopic crystalline platelets such as mica, metallic flakes, or fish scales, in suspension in a fluid such as water or glycol stearate.” And so it seems [Will Donaldson] has figured out a great way to Animate Christmas Ornaments using Rheoscopic Fluid, just in time for the holiday season.

Making the fluid is pretty simple, and uses just a few readily available materials – distilled water, rheoscopic fluid concentrate and your choice of food colouring. The hardware is dead simple too – clear, spherical baubles with lids and core-less DC motors such as used in mini and nano drones, to agitate the fluid. You can use cell phone vibration motors too, but [Will]’s experimentation suggests that the level of agitation is not a lot.

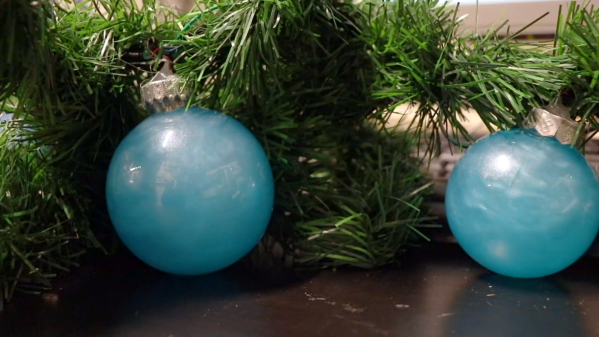
To make a bauble, you fill it with the fluid, hot glue the motor to the lid, close the lid such that the motor and its agitator are dunked in the fluid, and dab a generous amount of hot melt glue to seal it all shut. Then, hook it up to a suitable power supply and get enchanted by the mesmerising movements of the rheoscopic fluid in the bauble. The agitator is just a plain ol’ drone propeller forced in to a shape that is narrow enough to be pushed through the neck of the bauble. It’s a seasonal ornament, so don’t expect the motors to last long being submerged in the rheoscopic fluid. [Will]’s contraptions have not yet failed after a couple of days, and it may be safe to estimate that the motors may last about a week or two at most. Of course, YMMV depending on if you used distilled water or plain tap water and other factors.

As [Will] suggests, if you prefer slower swirls, or random agitation, then it’s best to hook up a micro-controller and motor driver for fancy effects. At this point, it may be tempting to think of embedding LED’s inside the baubles, but doing so reduces the rheoscopic effect since it relies on reflecting light shining on it from the outside. The video embedded after the break has all the build details.

It’s a great way to teach some science to the kids during the holidays and maybe even get them to help with the project. And don’t assume this is just a cheap Christmas trick. Artist Paul Matisse has invented an art device/technique based on rheoscopic fluids which he calls “Kalliroscope©”. He patented it in 1968, and has sold Kalliroscope artworks throughout the world since then. From his website “A Kalliroscope is a device for viewing fluid currents. Kalliroscopes are both works of art and intuitively educational displays of the scientific principles of fluid dynamics. They are glass and steel constructions containing a current-visualizing fluid.” We’re not sure how priceless those works of art are, but it’s safe to assume you need deep pockets to buy one. So go ahead, turn your Christmas Tree in to a work of Art !

Continue reading “Rheoscopic Holiday Ornaments”

Hackaday Links Column Banner

Hackaday Links: December 27, 2020

We’re always pleased to see one of our community’s projects succeed, and we celebrate that success in whatever what it comes. But seeing a company launched to commercialize an idea that started as a Hackaday.io project and a Hackaday Prize entry is especially gratifying. So we were pleased as punch to see that MAKESafe Tools has managed to bring the idea of add-on machine tool braking to market. We’d love to add this to several tools in our shop. Honestly, of all the terrifying ways machine tools can slice, dice, and shred human flesh asunder, we always considered the lowly bench grinder fairly low-risk — and then we had a chance to “Shake Hands with Danger.”

Another great thing about the Hackaday community is the way we all try to keep each other up to speed on changes and news that affects even our smallest niches. Just last week Tom Nardi covered a project using the venerable TI eZ430-Chronos smartwatch as a makeshift medical alert bracelet for a family member. It’s a great application for the proto-smartwatch, but one eagle-eyed commenter helpfully pointed out that TI is shutting down their processors wiki in just a couple of weeks. The banner at the top of each page warns that the wiki is not read-only and that any files needed should be downloaded by January 15. Also helpfully, subsequent comments include instructions to download the entire wiki and a torrent link to the archive. It’s always sad to see a platform lose support, especially one that has gained a nice following, but it’s heartening to see the community pull together to continue to support each other like this.

We came across an interesting article this week that’s was a fascinating glimpse into how economic forces shape  and drive technological process, and vice versa. It turns out that some of the hottest real estate commodities these days are the plots of land occupied by AM radio stations serving metropolitan markets. It’s no secret that terrestrial radio in general, and AM radio in particular, are growing increasingly moribund, and the infrastructure needed to keep them on the air is getting harder and harder to justify. Chief among these are the large tracts of land devoted to antenna farms, which are often located in suburban and exurban areas near major cities. They’re tempting targets for developers looking to plunk down the physical infrastructure needed to support “New Economy” players like Amazon, which continue to build vast automated warehouses in areas that are handy to large customer bases. It’s a bit sad to watch a once mighty industry unravel and be sold off like this, but such is the nature of progress.

And finally, you may recall a Links article mention a few weeks back about a teardown of a super-sized IBM processor module. A quarter-million dollar relic of the 1990s, the huge System/390 module was an engineering masterpiece that met an unfortunate end at the hands of EEVblog’s Dave Jones. As a follow-up, Dave teamed up with fellow YouTuber CPU Galaxy to take a less-destructive tour of the module using X-ray analysis. The level of engineering needed for a 64-layer ceramic backplane is astonishing, and Dave’s play-by-play is pretty entertaining too. As a bonus, CPU Galaxy has some really interesting stuff; his place is basically a museum of vintage tech, and he just earned a new sub.

A Mechanical Edge-Avoiding Robot

In the age of cheap sensors and microcontrollers, it’s easy to forget that there might be very simple mechanical solutions to a problem. [gzumwalt]’s 3D printed mechanical edge avoiding robot is a beautifully  elegant example of this.

The only electric components on this robot is a small geared DC motor and a LiPo battery. The motor drives a shaft fixed to a wheel on one side, while the opposite wheel is free-spinning. A third wheel is mounted perpendicular to the other two in the center of the robot, and is driven from the shaft by a bevel gear. The third wheel is lifted off the surface by a pair of conical wheels on a pivoting axle. When one of these conical wheels go over the edge of whatever surface it’s driving on, it lowers front and brings the third wheel into contact with the surface, spinning the robot around until both front wheels are back on the surface.

Mechanical alternatives for electronic systems are easily overlooked, but are often more reliable and rugged in hostile environments. NASA is looking at sending a rover to Venus, but with surface temperatures in excess of 450 °C and atmospheric pressure 92 times that of Earth, conventional electronics won’t survive. Earlier in the year NASA ran a design competition for a completely mechanical obstacle detection system for use on Venus.

[gzumwalt] is a very prolific designer on ingenious 3D printed mechanical devices. This mechanism could also be integrated in his walking fridge rover to explore the front of your fridge without falling off. Continue reading “A Mechanical Edge-Avoiding Robot”

Put A Hardened Edge On Mild Steel With Just A Drill Bit. Sort Of.

People have been working metal for so long that the list of tips and tricks is now nearly infinite. So it’s always a joy to pick up a new trick, especially one as simple as putting a hardened edge on mild steel using a drill bit as a filler rod.

This tip comes to us by way of [Jody], aka “The Weldmonger” on YouTube. Subscribing to his channel is a sure way to keep your welding ego in check; you may be good, but [Jody] is better, and he’s willing to share as much of his experience in video format as possible. For this tip, he starts with a cheap chipping hammer, the universal welder’s tool that helps remove the glass-like slag that forms during shielded-metal arc welding, or what’s commonly known as stick welding. The mild steel of the hammer makes it hard to keep an edge, so [Jody] pulled out his TIG welder and laid down a bead on the cutting edge using an old drill bit as a fill rod. The video below shows the process in all its simplicity.

The tool steel of the drill bit is far harder than the mild steel of the hammer, but still soft enough to take an edge, and the resulting tool is much improved. We’ve seen something similar to this before, when hard-facing filler rod was built up on the edge of a mild steel slug to make a cutter for internal weld seams. We liked that hack, but knowing the same thing can be done with something we’ve all likely got in abundance in the shop is a neat trick. Thanks, [Jody]!

Continue reading “Put A Hardened Edge On Mild Steel With Just A Drill Bit. Sort Of.”

76-bit Trombones Led By The Big MIDI File

Inspired by the creative genius of Martin Molin of Wintergatan fame, [iSax] set out to create a robotic MIDI-controlled trombone. It takes years for humans to develop the control and technique required to play the trombone well as the tone produced into the mouthpiece (embouchure) is a tricky combination of air pressure, lip tension, airflow, resonance in the mouth, and other sources of complex pressure.

[iSax] gives a thorough walkthrough of the machine, which is powered by two separate sources of air, one for the position of the slide and the other for producing sound. A potentiometer provides feedback on the position of the slide and a servo controls the flow rate into the silicone resonance chamber. The chamber can be tuned via a stepper motor that applies pressure, slightly altering the chamber’s frequency and pressure. An Arduino with Firmata allows the device to controlled easily from any host computer. A detailed writeup in PDF form is on the Hackday.io project page.

As you can imagine, simulating a human mouth is a daunting task and the number of variables meant that [iSax] ended up with something only vaguely trombone-like. While ultimately it didn’t turn out to be the astounding music machine that [iSax] hoped, it did end up being a fun feat of engineering we can appreciate and admire. Progress towards automatic brass instruments seems to be coming slowly as we saw similar results with this robotic trumpet. Maybe someday we’ll have robot brass sections, but not today.

Continue reading “76-bit Trombones Led By The Big MIDI File”

Custom Powerbank In Compact Form Factor

The wide availability and power density of 18650 lithium-ion cells have made them a good option for everything from electric cars to flashlights. [Theo] needed a new power source for his FPV drone goggles, so he designed his own power bank with a very compact charge controller.The narrow PCB slips in between the cells

While [Theo] could charge the batteries with an RC battery charger, he preferred the convenience of one with a standard 5V micro USB input, and wanted battery level indication to avoid having the FPV goggles die unexpectedly mid-flight. When four 18650 cells are held in a cube arrangement, a 8x8x65 mm gap is formed between the cells. In this space [Theo] was able to fit a custom PCB with a micro USB jack, 1.3 mm power jack, BQ25606 charge controller, TPS61085 boost converter, and ATtiny MCU with LED for battery level feedback. The charge controller also allows 5V devices to be charged via USB, while the boost converter outputs 9V via the 1.3mm jack for [Theo]’s FPV goggles. Everything fits inside a nice compact 3D printed enclosure.

The project was not without hiccups. After ordering and building the PCB he discovered some minor PCB layout mistakes, and realized the boost converted could only output 600mA at 9V, which was not enough for his more power-hungry googles. He plans to fix this in the next version.

We’ve seen custom power banks in quite a few shapes and sizes, including one that runs on power tool batteries (which probably also have 18650s inside) and one that has just about every output you could want, including AC and wireless QI charging.