If you want to build cool things these days, you’ve probably had to master surface mount electronics. However, for many people, ball grid array (BGA) is still intimidating. Have a look at [VoltLog’s] video about his techniques for soldering BGA and inspecting that you managed to do it right.
He’s got quite a few tips about things like surface finish and flux selection. It looks easy when he does it. Of course, having a good PCB with good registration markings will help too.
You can’t get a soldering iron under the part, of course. A hot plate provides heat from underneath. A gentle push from a hot air gun will push the solder balls over the melting edge. Even taking the part off the hotplate requires a special technique.
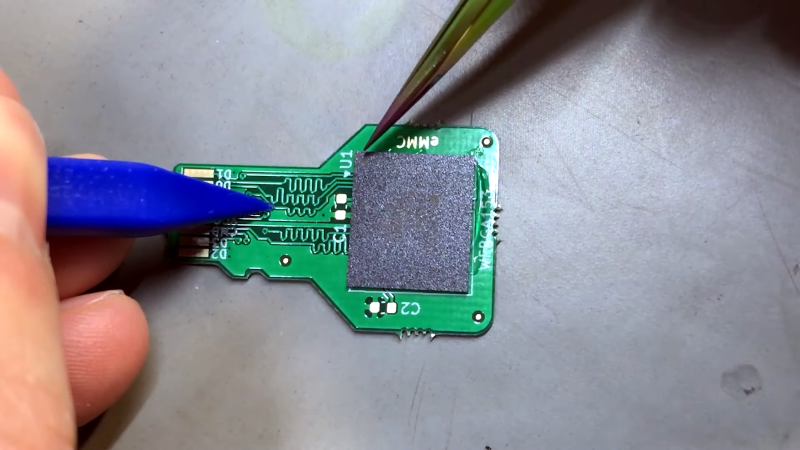
Without seeing the result, how can you know if it was successful? Pros can use an X-ray machine, but you probably don’t have one of those sitting in your shop. [VoltLog] uses a DVM and tests the internal protection diodes that the chip almost certainly has on its pins. However, to do that, you need to put the chip on a bare board. If you were repairing an existing board, the technique wouldn’t be useful since other components on the board would throw the measurements off.
We’ve seen the very patient hand solder wires to BGAs. You can also find more detailed videos and compare other techniques if you want to try them yourself.


I appreciate that he talked about the trouble he has had with proper alignment. I have trouble with QFN, which at least I can inspect and rework. BGA is going to be a new challenge.
I’ve never considered that I/O pin measuring trick before, that’s a good tip!
I agree great tip, great video.
+1!
Another trick I learned in China is to measure the total current copnsumption. If it is in the expected range the chip is soldered ok.
This only works with phones I guess with a known power consumption.
Another trick I use is to use a small piece of chromed metal as a mirror and place it immediately next to the package at a 45 degree angle. That allows ball compression to be inspected with a microscope from above. A chip which hasn’t fully reflowed or has reflowed unevenly will become quickly evident.
Also, I route top-layer traces outward at 45 degrees from the corners of the package to aid in alignment, more accurate than silkscreen which can be misaligned by a fair amount.
clever!
Nice tip.
That’s a good ides! You could even make a footprint that has a short segment of “track” at the 4 corners.
At least a picture pretty please.
USB microscope aimed at the side of the chip also works well, so you can use top alignment and very low angle side view to make sure the balls are correctly lined up before reflow.
Yes the less densly packed BGAs are perfectly doable as a hobbiest. The more densly packed ones however require smaller clearences, vias and trace widths, maybe even buried vias and lots of layers depending on circuit complexity. Can quickly get very expensive.
Order multiple boards. One for each ring of pins.
All the inner pins for each layer just go straight through. Then you stack them up like an pyramid. So each layer only has to break out it’s ring of pins. If you make all the outer dimensions of the boards the same or add holes for alignment pins, you can’t go wrong. Sure it might be a few layers thick but it’s a lot easier to solder.
What we need is a ball dot array to dip adaptor.
AA plastic carrier, with a bed of pogo pins and a clip to hold the chip in place. No need to solder the chip itself at all.
I dount if I were to get them mass produced, if there would be a real market for them, beyond some hobbyists and perhaps a few educational establishments.
something like this?
https://upload.wikimedia.org/wikipedia/commons/thumb/6/67/Socket_1151_closed_01.jpg/800px-Socket_1151_closed_01.jpg
In hobby electronics, avoid them, but if you cant mount them upside down and use wires, problem solved.
BGAs usually have huge amounts of connections. The one here on my desk has 292 balls. Nothing that one wants to hand-wire. Not yet speaking about stray inductivity, impedances or high speed signal integrity.
I agree with you “In hobby electronics, avoid them”, but if you want /have to use them, just do yourself a favor and make a proper PCB.You will probably have enough other issues to debug except BGA solder quality.
I tried that with my BGA image sensor. But now all I get is black pictures :p
Great video, my only comment is that eMCC chips are going to be very forgiving to this process. Most of the balls are no connects and only needed for mechanical stability. One I recently worked with had 122 out of 153 balls as no connects. I would expect that success rates would go down for parts with more balls in use. Such as uC’s, FPGA, RAM.
YMMV
Fun and interesting read. Alas I have had little luck with reliably getting bgas onboard but have generally dealt with what I would consider dense pin layout. I think that may have been my problem is just going too big too soon. I think I might go back and try to find some less pinny/frustrating packages to try out some of the tricks mentioned. Lol I always come back every couple of years hoping for a magic pill to make bga less of a hassle in my life. Reflows tend to go okay but that is almost always a temporary fix anyway. Anyway this has inspired me to go back and hone my bga skills a bit more and hopefully get over that hump :)
If you want/need to use small BGAs, go and watch the YouTube iPhone repair community a little, they do great videos, streaming directly from their microscopes. I found it really fascinating to watch from a skillet point of view, and so I “accidentally” steeped myself into the right techniques. Dabbled a little on iPhone board level repair out of interest, just to see if I could do it. Quickly payed off my microscope, hot air station and soldering iron.
That way, I lost all my fear for tiny components. I would not hesitate to use a WLCSP in a design if necessary. However, I didn’t have to, yet. Most stuff I worked with is available as QFN, luckily. And I actually prefer those packages to *SOP, way easier to solder!
Haven’t tried any bigger BGAs except NAND flash yet, and would probably need some kind of preheater for that.
skill set*
Although a skillet would probably be useful for BGA work 😂
A board with other parts can be tested with a multimeter by noting the resistance values of points on a known good board then comparing to the board being tested.
If suitable test points are added then functional testing can be performed with a bed of nails. I have built a board tester for a product which has a bed of nails together with an ESP32 (plenty of I/O) and an OLED display, very inexpensive and easy to program.