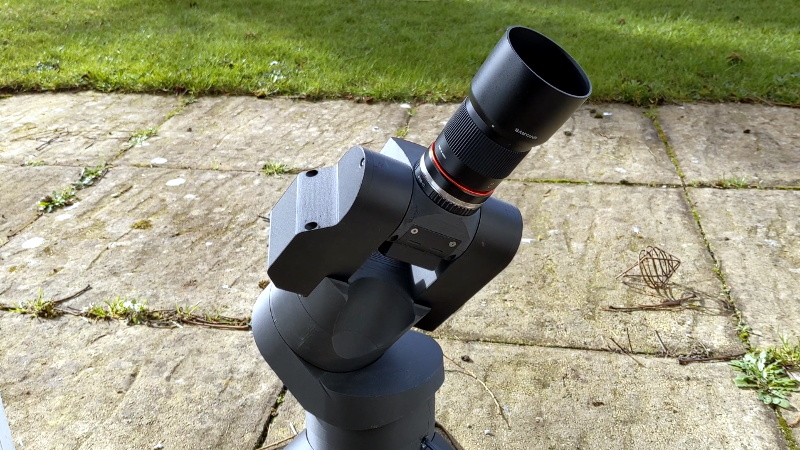
Getting a closer look at the Moon isn’t particularly difficult; even an absolute beginner can point a cheap telescope towards our nearest celestial neighbor and get some impressive views. But if you’re looking to explore a bit farther, and especially if you want to photograph what you find out there amongst the black, things can get complicated (and expensive) pretty quick.
While building this 3D printed automated telescope designed [Greg Holloway] isn’t necessarily cheap, especially once you factor in what your time is worth, the final product certainly looks to be considerably streamlined compared to most of what’s available in the commercial space. Rather than having to lug around a separate telescope, tripod, motorized tracker, and camera, you just need this relatively compact all-in-one unit.
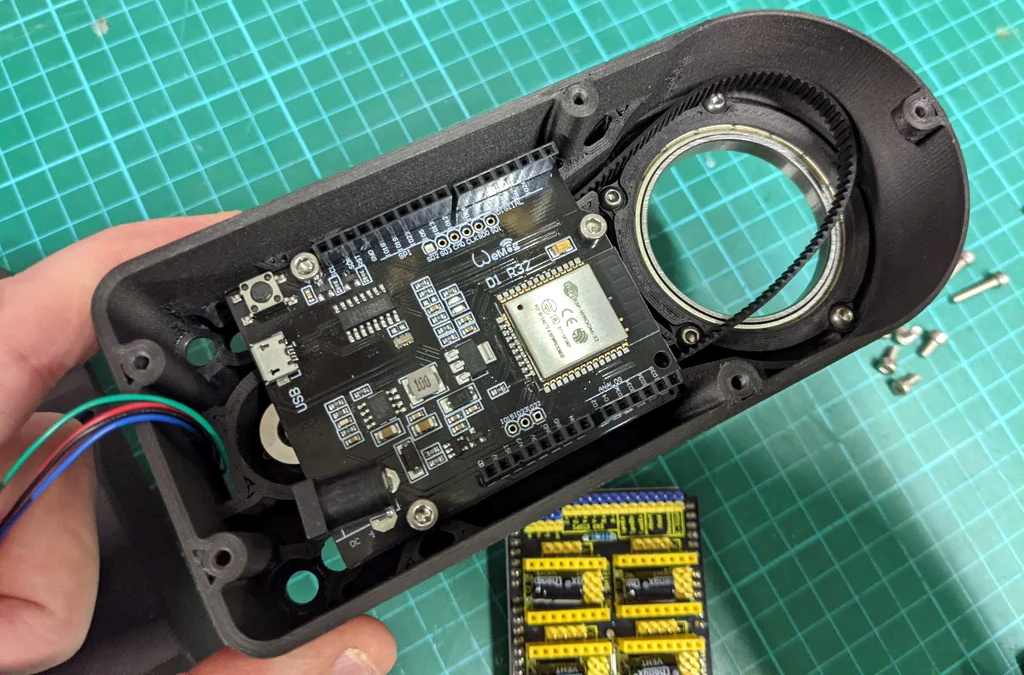 It’s taken [Greg] six months to develop his miniature observatory, and it shows. The CAD work is phenomenal, as is the documentation in general. Even if you’re not interested in peering into the heavens, perusing the Instructables page for this project is well worth your time. From his tips on designing for 3D printing to information about selecting the appropriate lens and getting it mated to the Raspberry Pi HQ Camera, there’s a little something for everyone.
Of course if you are looking to build your own motorized “GOTO” telescope, then this is must-read stuff. [Greg] has really done his homework, and the project is a fantastic source of information about motor controllers, wiring, hand controllers, and the open source firmware you need to tie it all together. Many of the ideas he’s outlined here could be applicable to other telescope projects, or really, anything that needs to be accurately pointed to the sky. If you’d like to get started with night sky photography and aren’t picky about what kind of things you capture, we’ve seen a number of projects that simply point a camera towards the stars and wait for something to happen.
[Thanks to Eugene for the tip.]


Thankyou for this. Yet another project to get onto….
It’s a slippery slope. Just purchased a dead DSLR to practice Bayer filter removal. It cost less than the bottle of DMSO that should hopefully dissolve it. Failing that, there’s always the orbital sander.
Surprised you bought a dead’un when older but functional exist very cheaply – much easier to see if you failed if you can actually try to use it afterwards… So would be my first choice for having a crack at it.
Plus even the old ones can actually be very useful – my oldest (and newest purchased) canon is still massively better than any smart phone in image quality overall, despite a smaller resolution on the sensor, can even (when tied to a computer) do a good job as a HD video recorder/webcam…
So despite buying the camera for the lens selection it came with (something I was rather lacking – previously ‘stole’ Dad’s as needed) I’ve actually used it, Ironically more than my newer better Canon I bought the lens for – the camera body and basic lens that isn’t worth more than £30 you don’t worry about so much, so it stays sat on my desk, with the cheap and nastiest lens on it all the time – great for that screw-hole matching photo, etc, its just there, creating good raw images conveniently on demand (USB powered off the computer so its always got juice too)…
Do you by any chance have any links to resources about DMSO bayer removal? I’d quite like to do this to my A7s but the end qualitly of the wooden stick method isn’t going to cut it for me, and the aggressiveness of the acids needed is quite frankly terrifying.
Looks impressive!
Wow.
This looks like a terrific build. Two thoughts from one who caught the DIY asto-photography bug several years ago and has been tinkering with a home-brew equatorial tracking mount (for a Canon 6D) ever since.
1) Accurate fine focus is hard on home-brew setups, but incredibly important for image quality. Even with my 6D’s live view mode and digital zoom, my results were hit or miss until I stumbled on Bhatinov masks (https://en.wikipedia.org/wiki/Bahtinov_mask). These masks are a temporary overlay for your objective lens that creates interference patterns you use for making final focus adjustments. Easy to create on a 3D printer, and well worth the effort!
2) If you haven’t already discovered Roger Clark’s astophotograhy web site (clarkvision.com), you should check it out. It’s concise, deep and well-documented. In the short term, it will have lots of valuable information on image capture and post-processing for using your current device. Longer term, some topics he discusses might be useful in thinking through any Version 2.0 you consider. (You may find, for example, that the effective focal length of your 300mm lens and Pi sensor is actually TOO long for many desirable deep-sky imaging targets. Several of his pages would be relevant to finding the sweet spot between lens length, aperture size, pixel size and sensitivity, etc.).
SLR lenses are typically a bad match because the effective image size for the sensor is actually too large, and the pi camera sensor only uses a small portion of it, thus emulating a much longer focal length. SLR lenses, depending on what kind you buy, used to be 25mm sized effective image output, older 35mm film camera lenses were around 40mm. If you use a 10mm sensor with a 25mm compatible lens @ 300mm focal length, you will actually be pushing north of 600mm focal length.
The pi HQ camera has a bigger sensor than the original pi cams, so its not too bad with SLR lens.
SLR lens are also usually giving a good image quality (even when cheap) and available in vast ranges, so while the numbers engraved on the side won’t be right (any in many cases aren’t right even if you are using a SLR as most lower end SLR’s are ‘half-frame’ or smaller) its not a bad source of lens. Plus you probably already own a few decent quality SLR lens if you are interesting in doing something like this…
Thing I’m not sure about is why you’d use a pi HQ camera good as they are when you can get for similar price an entirely working DSLR second hand and mount/gut that, at least if you are using SLR lens. As things like gphoto2 let you control the DSLR from the pi/computer, and the DSLR already knows how to speak the language of your lens so it can do the focus and zoom for you (camera and lens dependent of course) after receiving the instruction from the pi…
But again if you have the lens, or even can get hold of old film camera no autofocus lens to play with there is a good enough reason to use em. And old manual only lens seem to frequently be really cheap, and are probably of superb quality…
One additional comment, re: fabrication.
I’m one of the people on this site who shares your affinity for tapping holes in 3D printed parts. Probably not as good as heat-set brass thread inserts, but fast cheap and pretty good.
You can make that process a lot faster, easier, and less prone to clogging by using isopropyl alcohol as a tap lubricant, much as you’d use cutting oil for tapping threads in metal. Besides flushing chips from your tap, ISA’s low boiling point keeps your part cool, which prevents melting. So far, I’ve seen no signs that the ISA in any way damages the filaments I use (PETG and PLA), although it does sometimes leave a white residue.
Thanks for this tip!