Getting great results from a laser cutter takes a bit of effort to make sure all of the settings are just right. But even then, if the air between the material and the laser source is full of smoke and debris it will interfere with the laser beam and throw off the results. The solution is to add air assist which continuously clears that area.
Earlier this year I bought an Ortur laser engraver/cutter and have been hacking on it to improve the stock capabilities. last month I talked about putting a board under the machine and making the laser move up and down easily. But I still didn’t have an air assist. Since then I found a great way to add it that will work for many laser cutter setups.
I didn’t design any of these modifications, but I did alter them to fit my particular circumstances. You can find my very simple modifications to other designs on Thingiverse. You’ll also find links to the original designs and you’ll need them for extra parts and instructions, too. It is great to be able to start with work from talented people and build on each other’s ideas.
A Breath of Fresh Air
 By the end of the last post, I had installed an air assist system but cut the air hose off of it because I never did get around to boiling some water to bend the air tube. However, it did let me move the laser head up and down easily, which is very useful.
This wasn’t the first air assist design I’d tried. If you look at Thingiverse, there are many different takes on this. Some have 3D printed nozzles that take an air needle or a 3D printer nozzle. Some just direct fan air at the part.
I found some just didn’t fit or didn’t work well. Others would interfere with the X stop or interfere with the Z motion of the laser which, admittedly, wouldn’t have been a problem on a stock machine. One of the designs had a custom top plate for the laser that had a little hose guide and even though I didn’t keep that air assist project, I didn’t remove the custom top plate and that turned out to be lucky, as you’ll see.
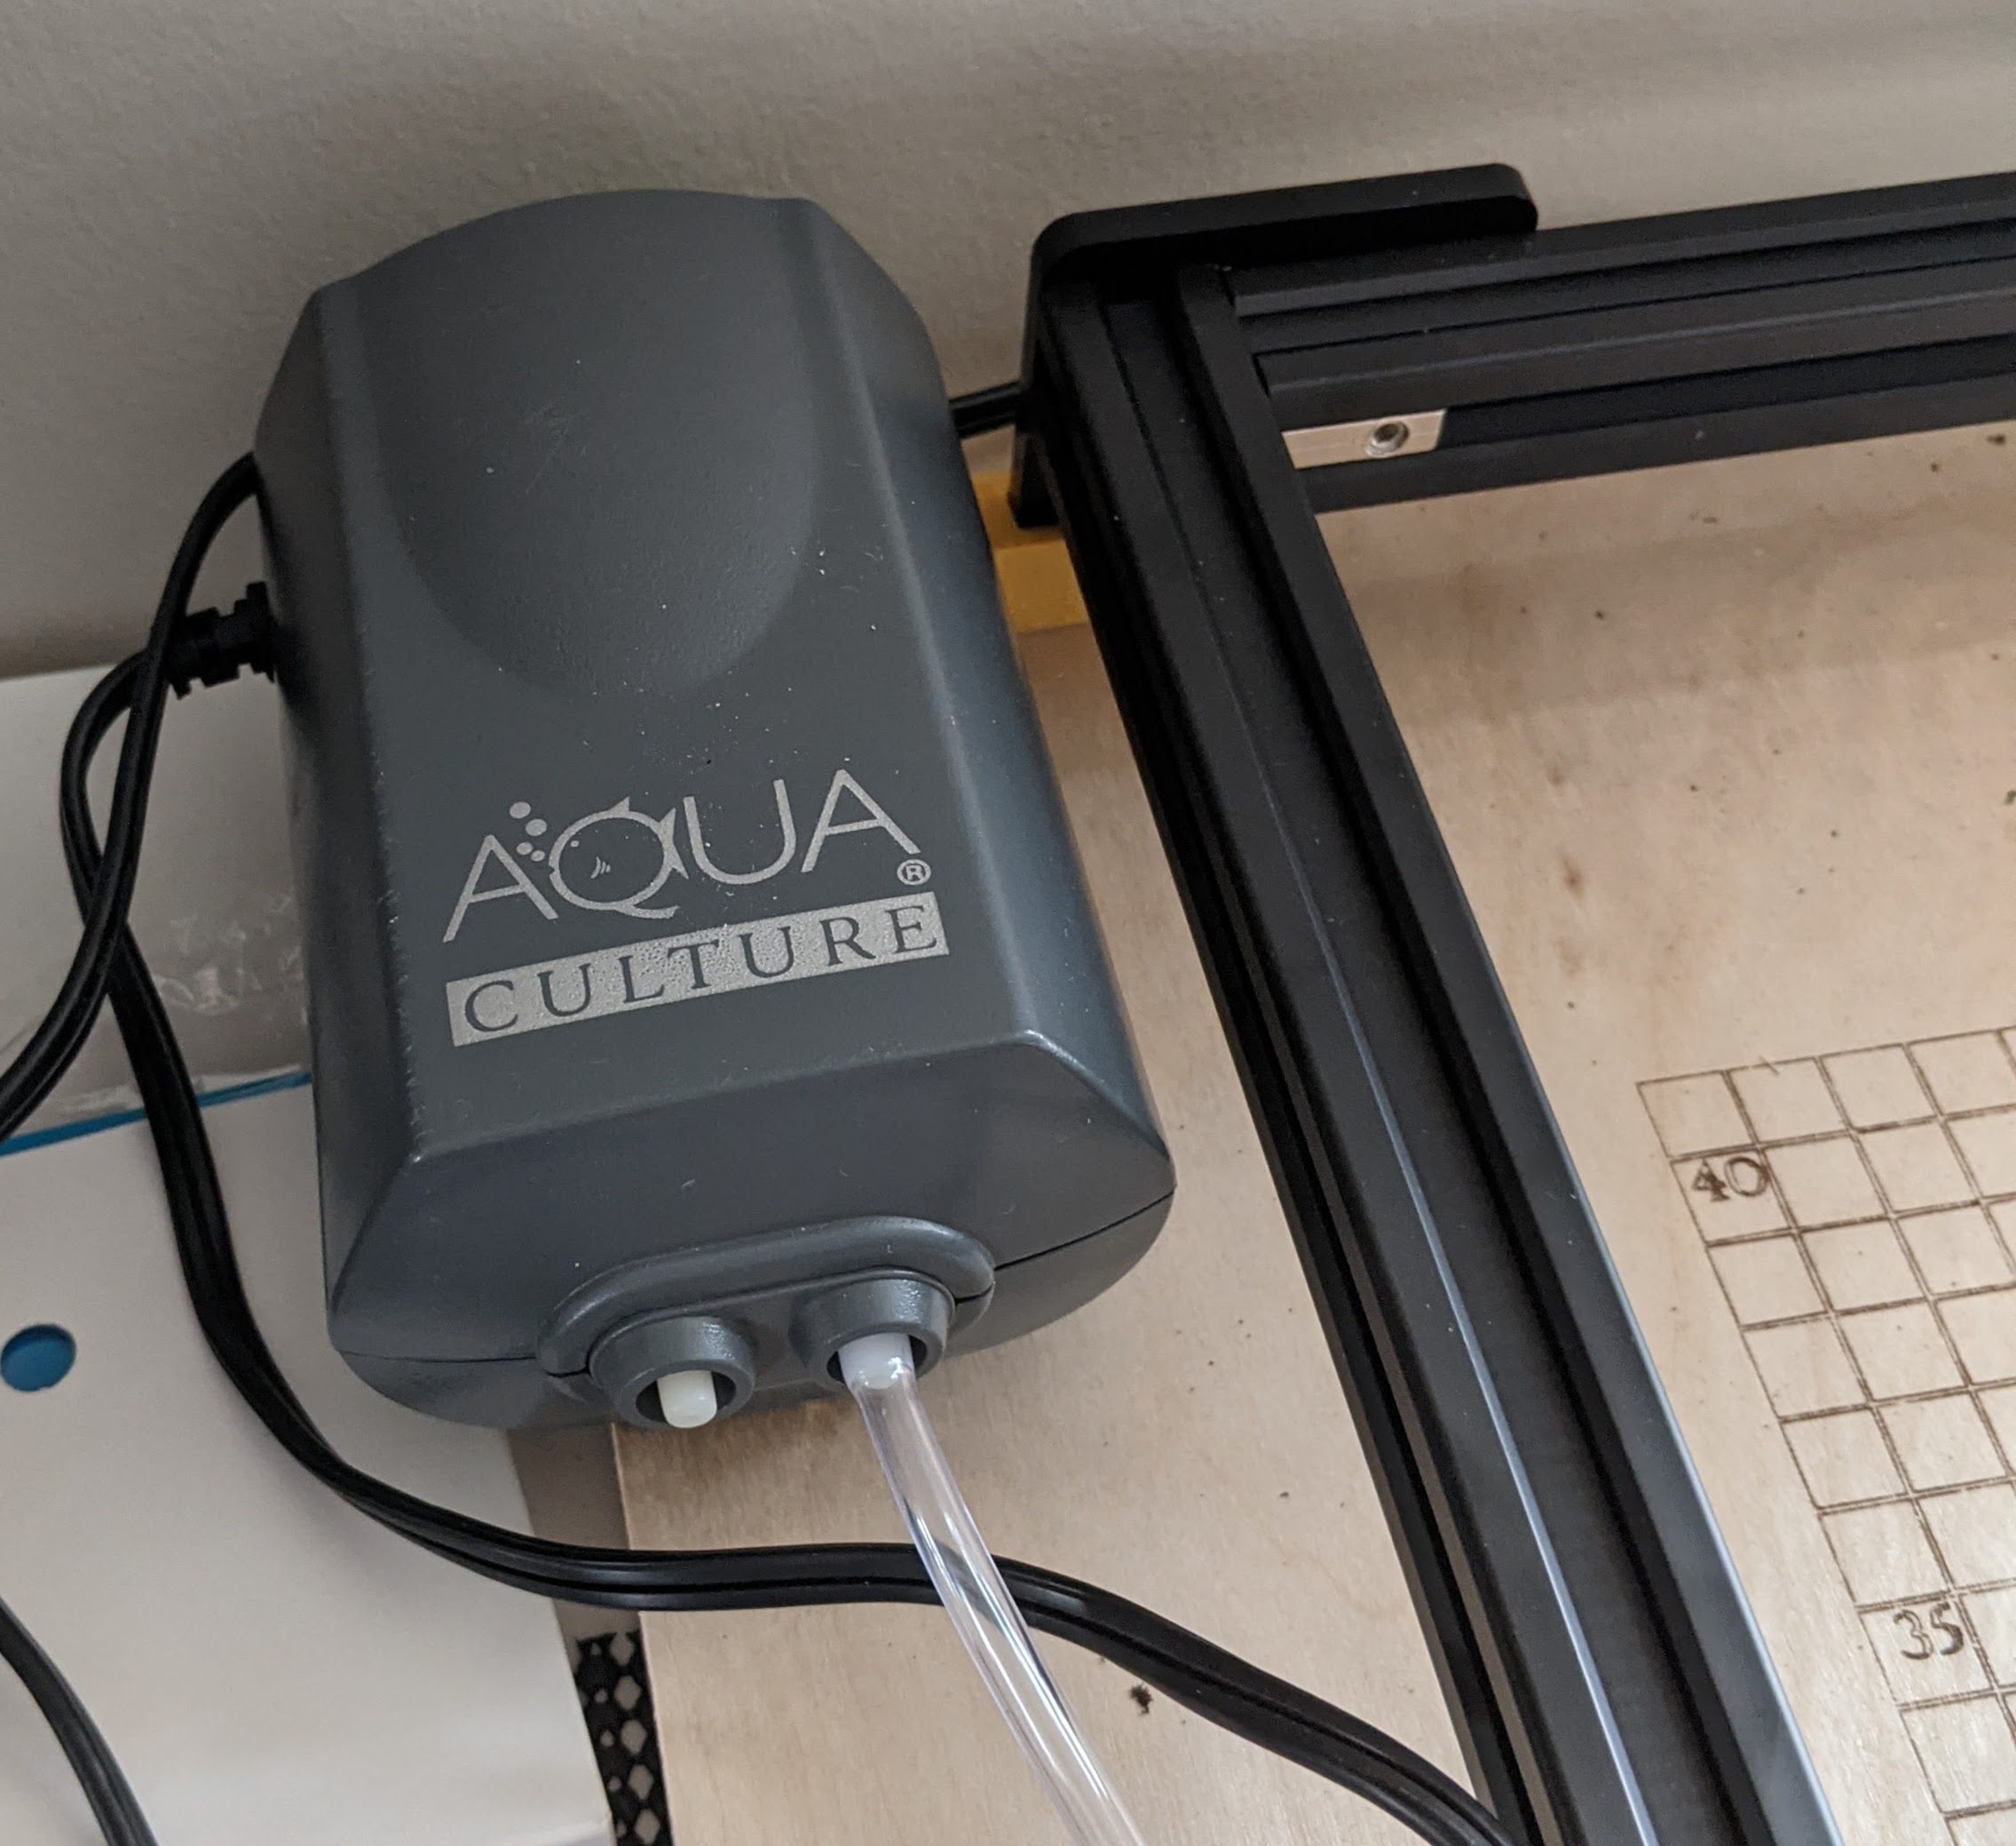
I had really been interested in putting an air assist on ever since I saw [DIY3DTech’s] video on how it improved cutting. I had even bought a small air pump for the purpose before the laser even arrived, but it mostly sat, unused, for lack of a good way to direct the air.
The Solution
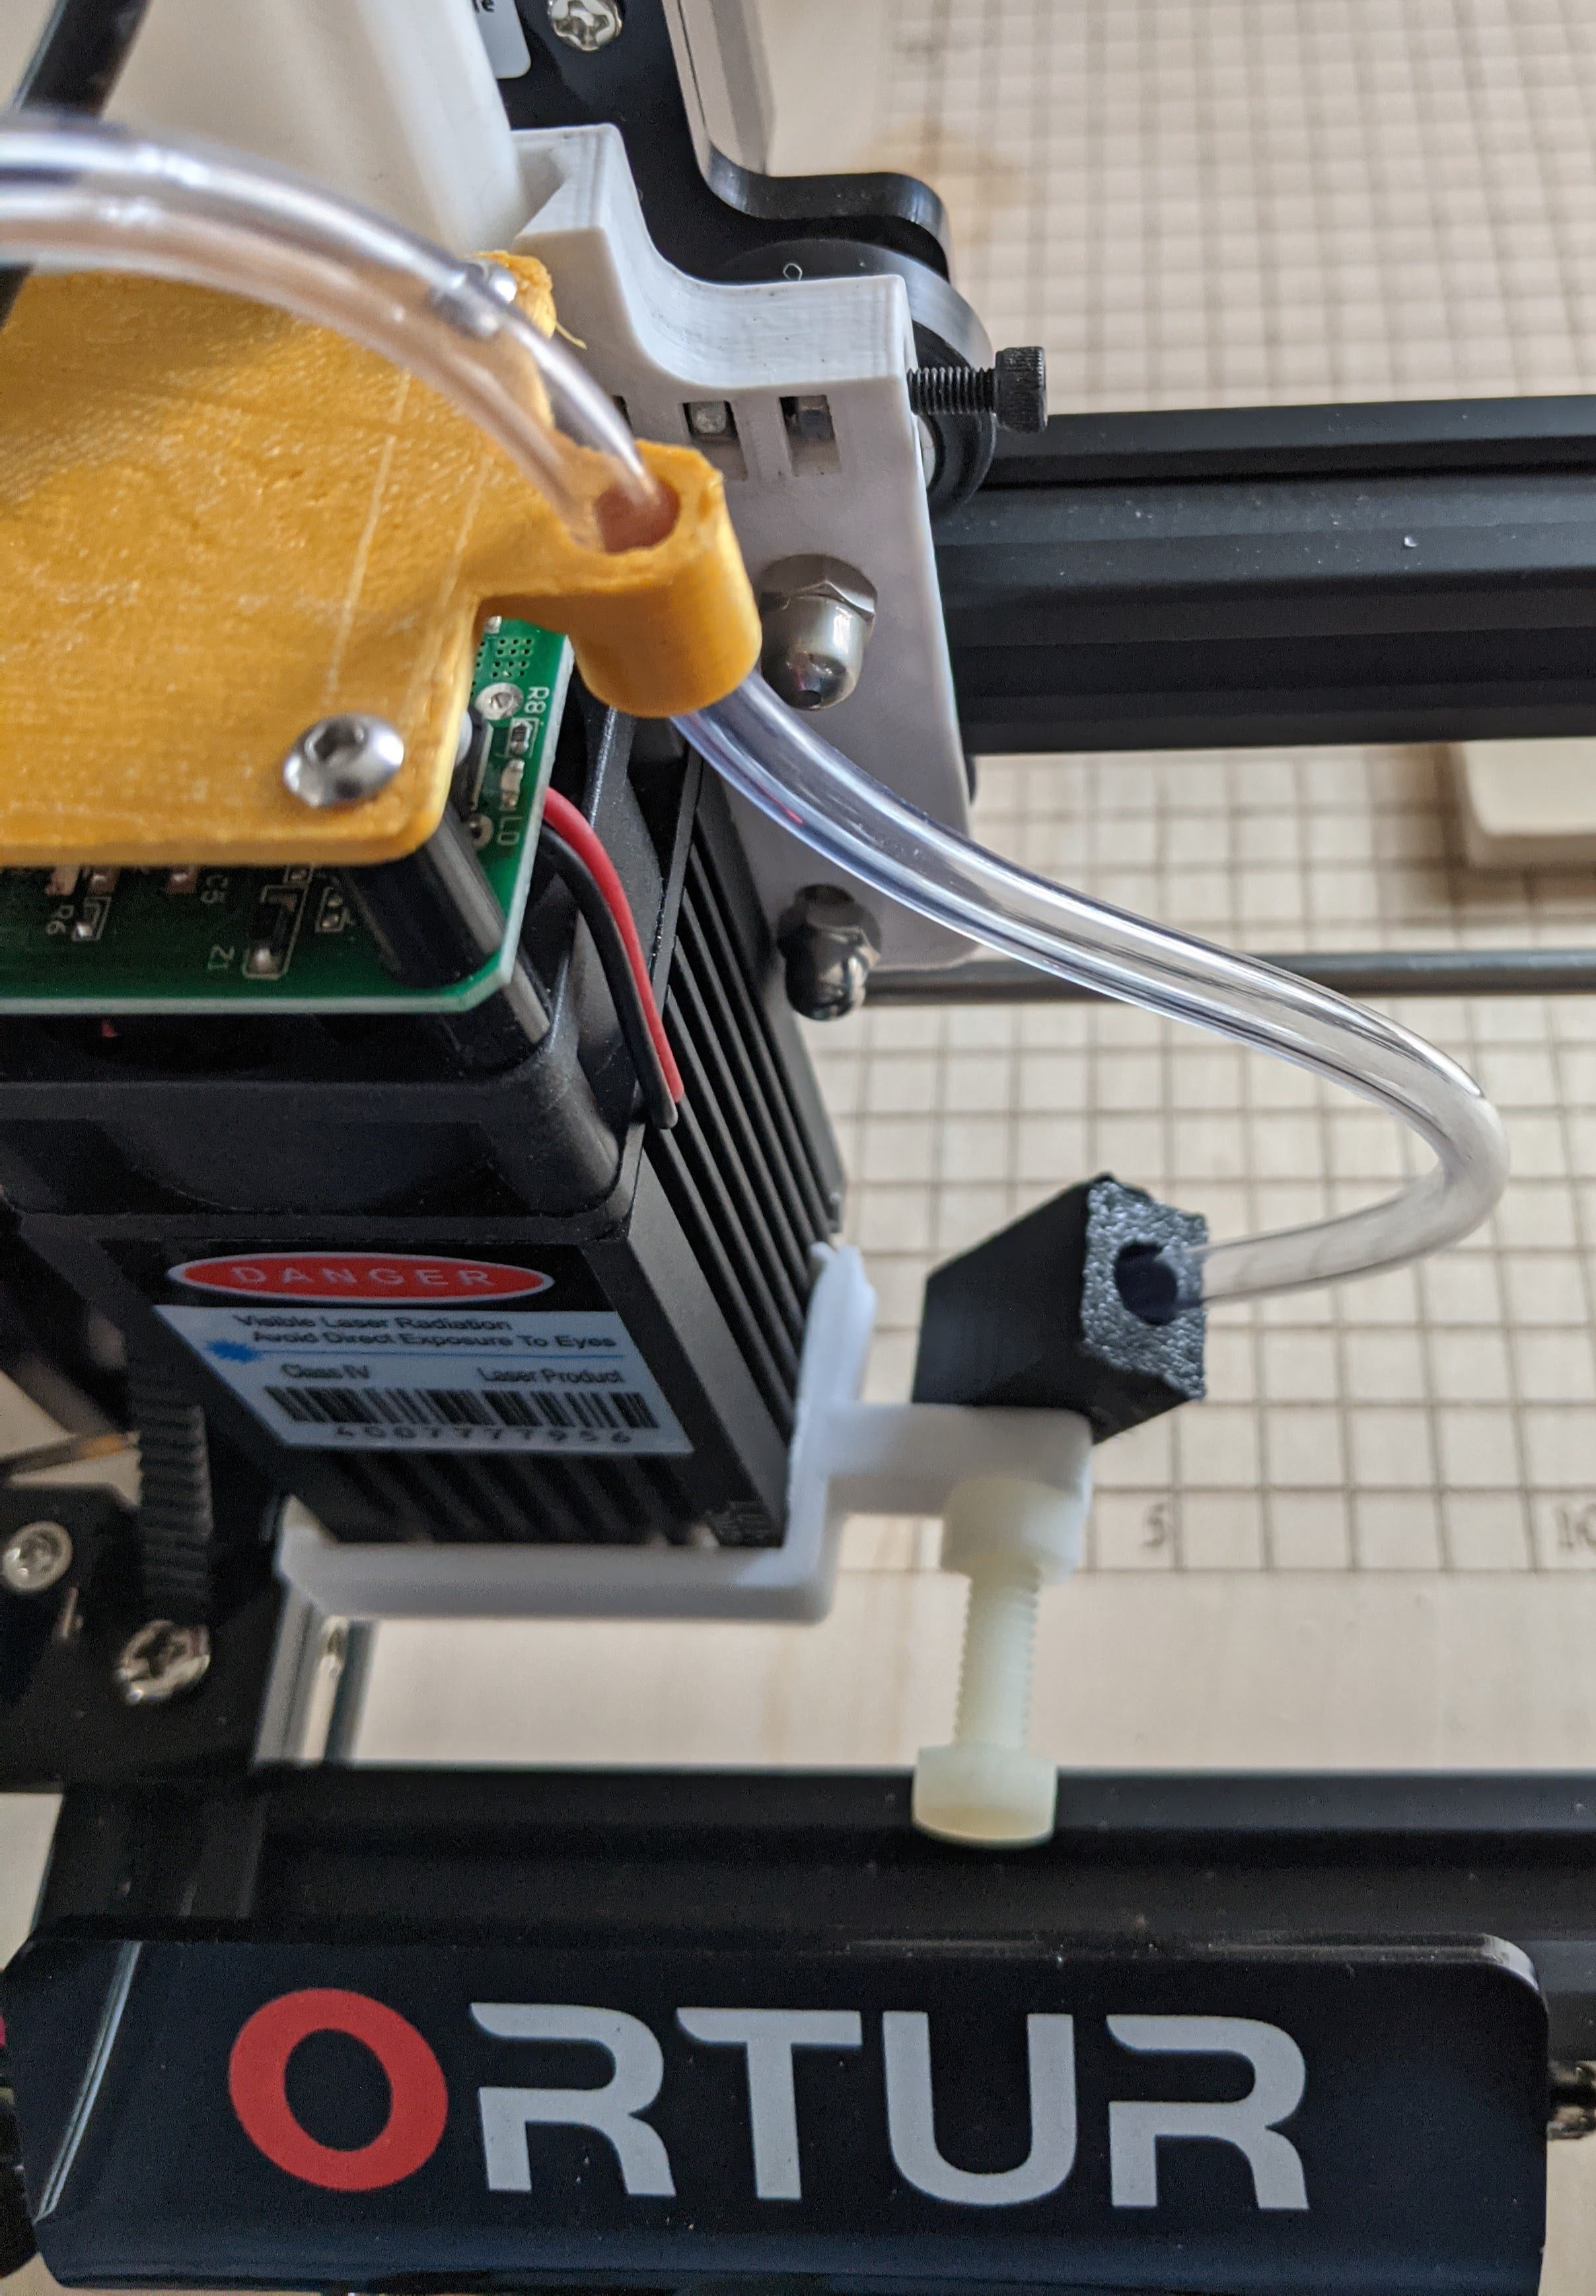
Finally, I found [DIY3DTech’s] design that is very quick and simple to print. A bracket circles the laser head and mounts a small tube holder. You can adjust the angle and a 3D printer nozzle is wedged into the end of the tube. It is a simple design, but very adjustable.
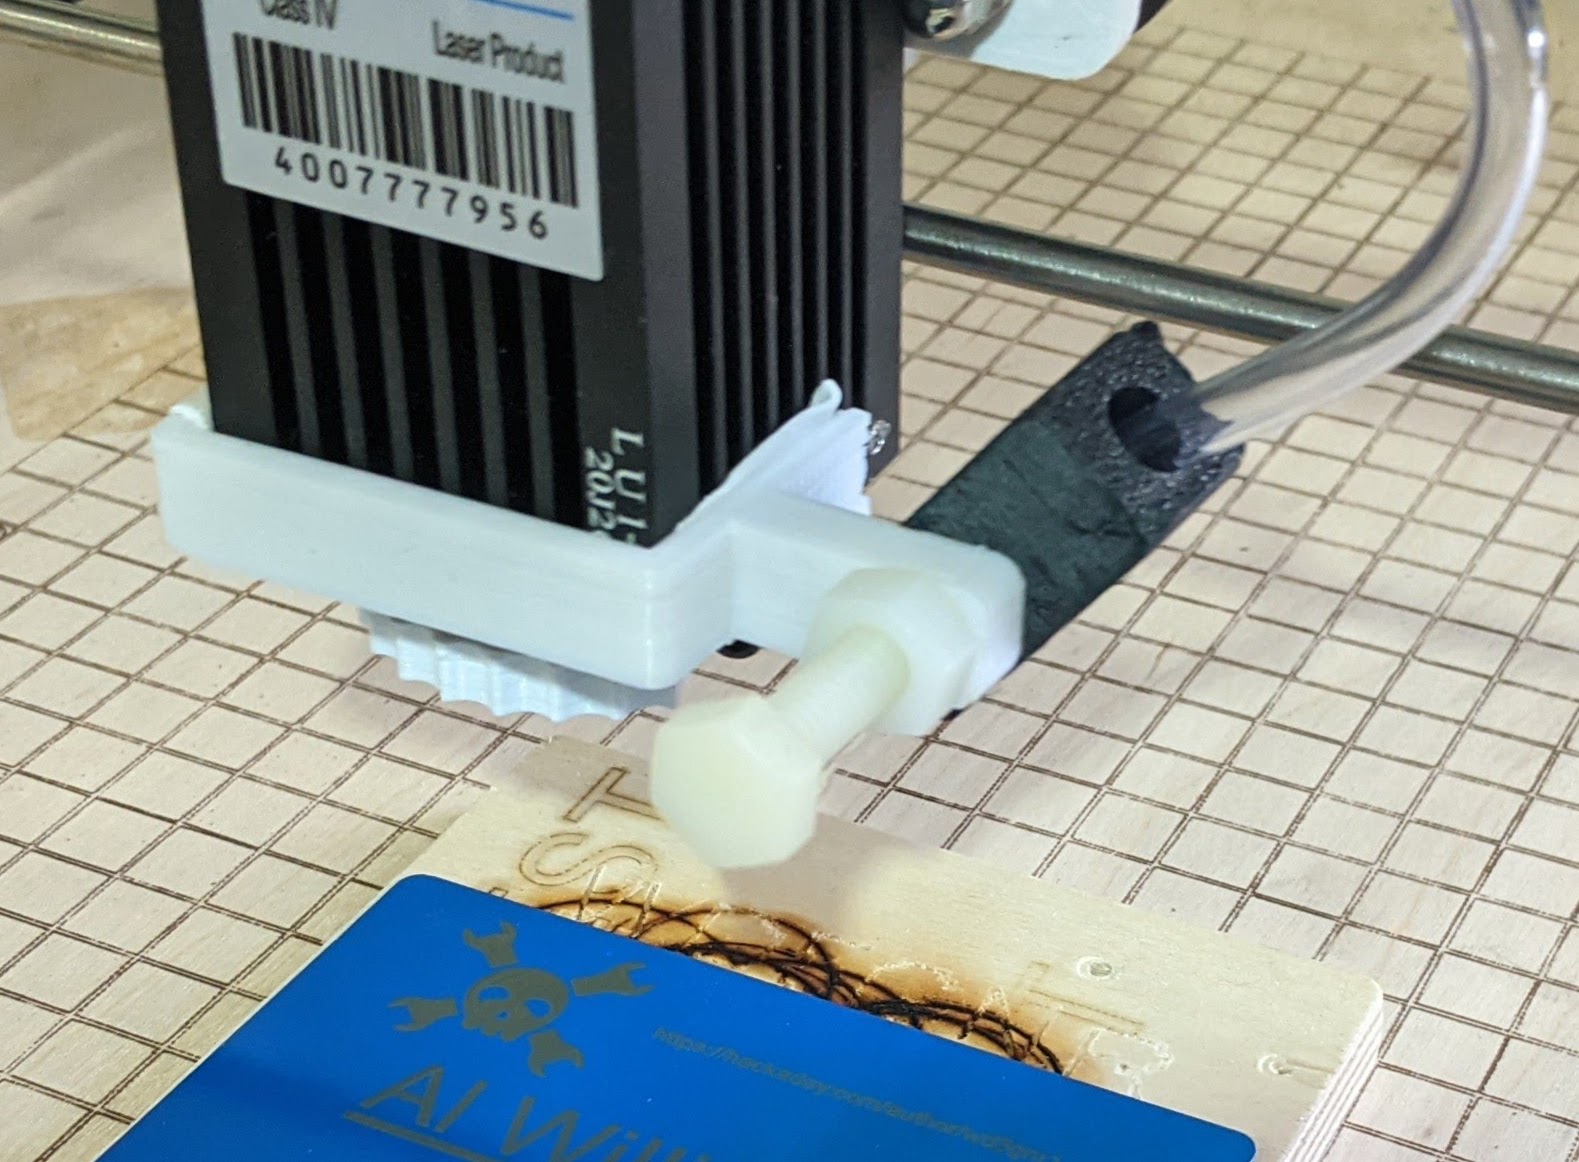
Of course, there’s one small problem. If your laser head doesn’t move, the bracket is no problem. But if you can slide the laser up and down, the bracket needs to clear the big acorn nuts that hold the laser to the X carriage.
At first, I tried putting some washers to move the laser body away from the housing, but that didn’t seem like a great idea — I worried it might not be very stable if there were too many washers and I would have had to fish up some longer bolts. Instead, I did some surgery on the bracket and cut away the offending part, leaving it shaped like a U with the sides about 3cm long. Of course, that removed the fixing screw and made it not grip very well. However, a little double-stick tape nicely holds it on. You could probably also use some hot glue.
A nylon bolt — which could probably be shorter — holds the black hose module to the white bracket. It also grips the tube, so don’t tighten it all the way or you’ll pinch the airflow off. A nylon nut locks it in place. Placing the nozzle in the tube is a bit of a challenge. You might heat the hose a little, but I didn’t. I just used needlenose pliers to stretch the tube in both directions and threaded the nozzle into the widened tube. I didn’t seal it, but a blob of hot glue or silicone might be a good idea.
The only other part of the air assist isn’t strictly necessary. I had a top plate from another air assist attempt still mounted to the laser and it had a little feed tube for the air hose that works well with this design, so I kept it. It keeps the hose lined up nicely and you can also bundle the hose with the rest of the wires if you want to keep it from flopping around everywhere.
Does it Work?
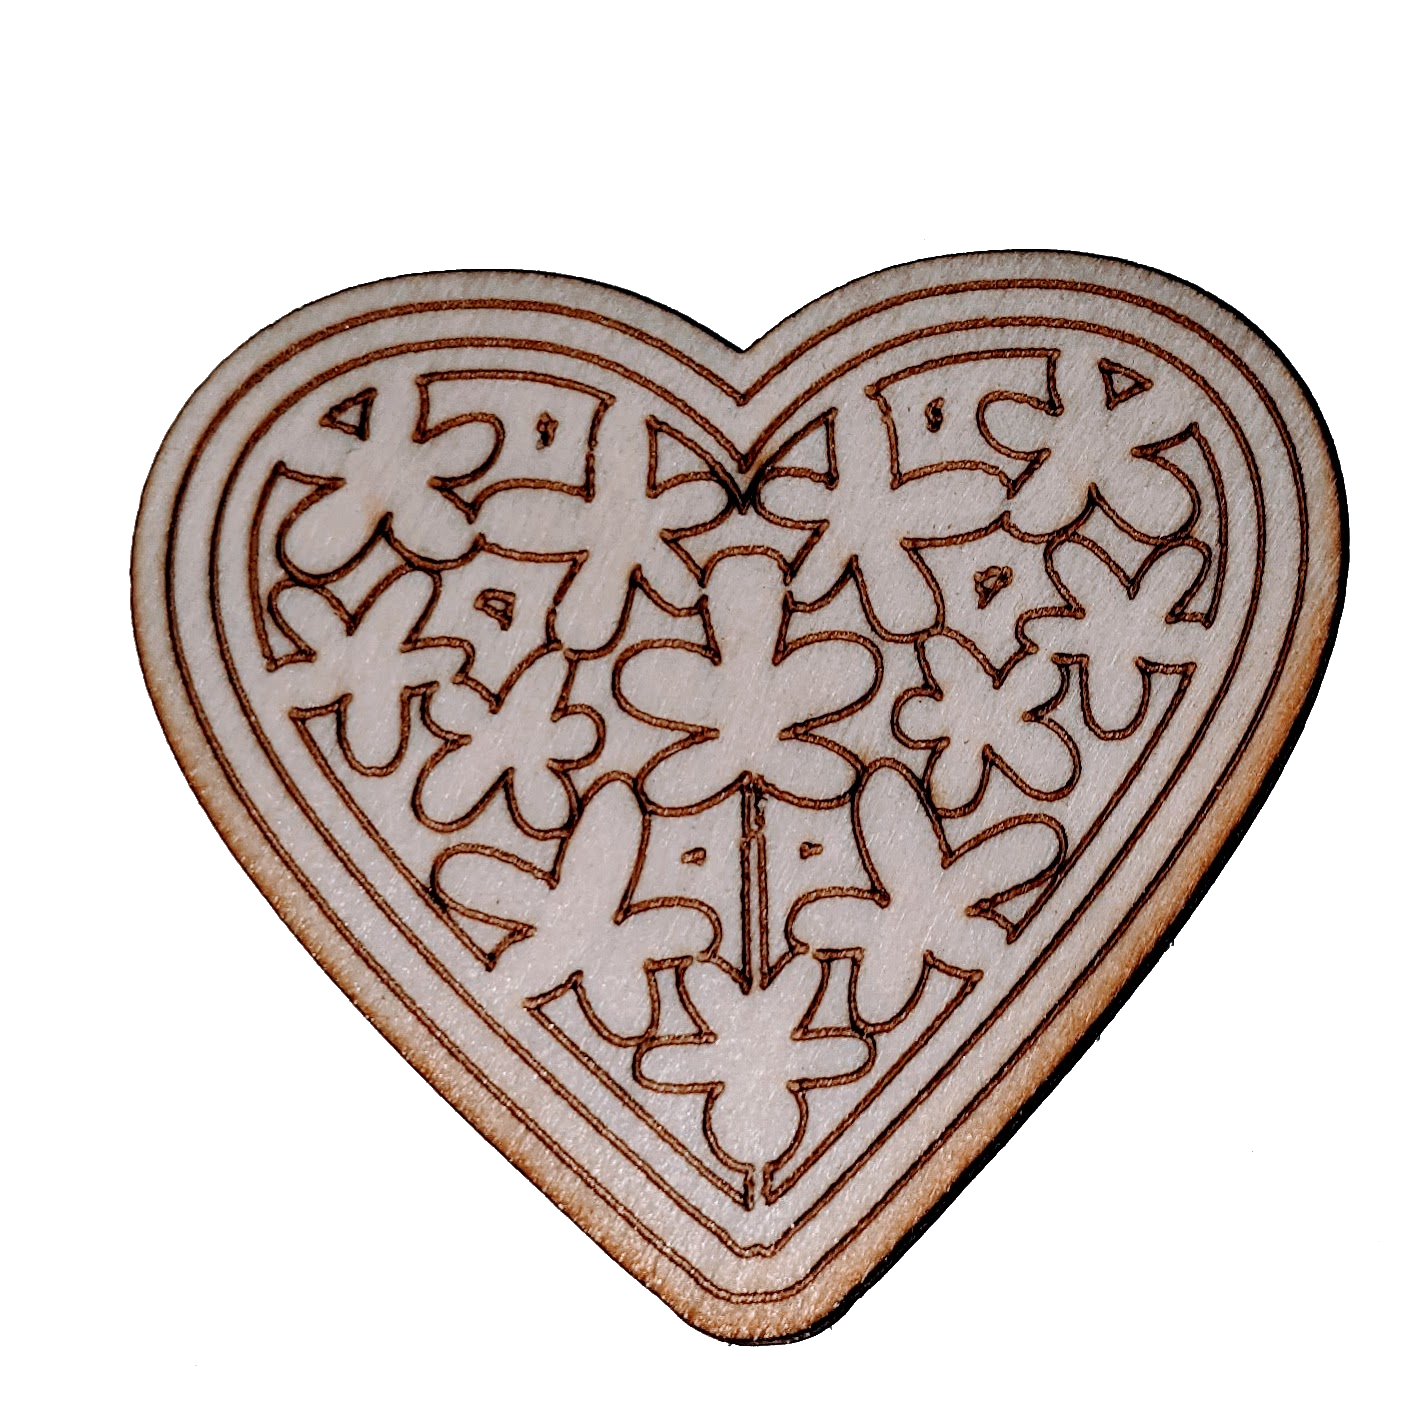
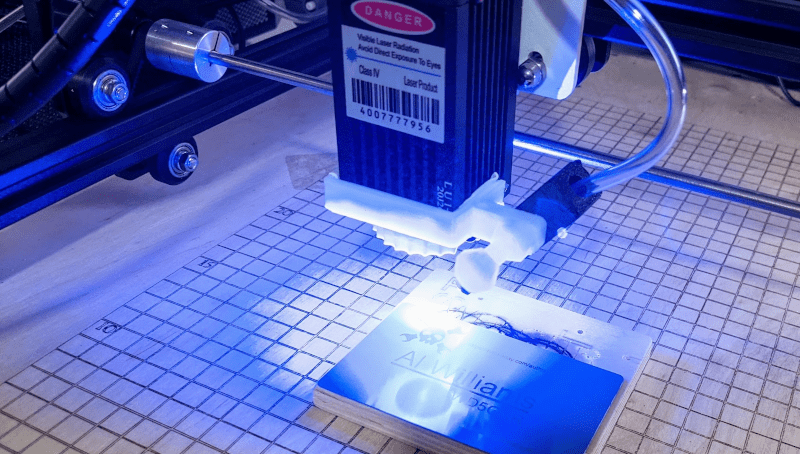
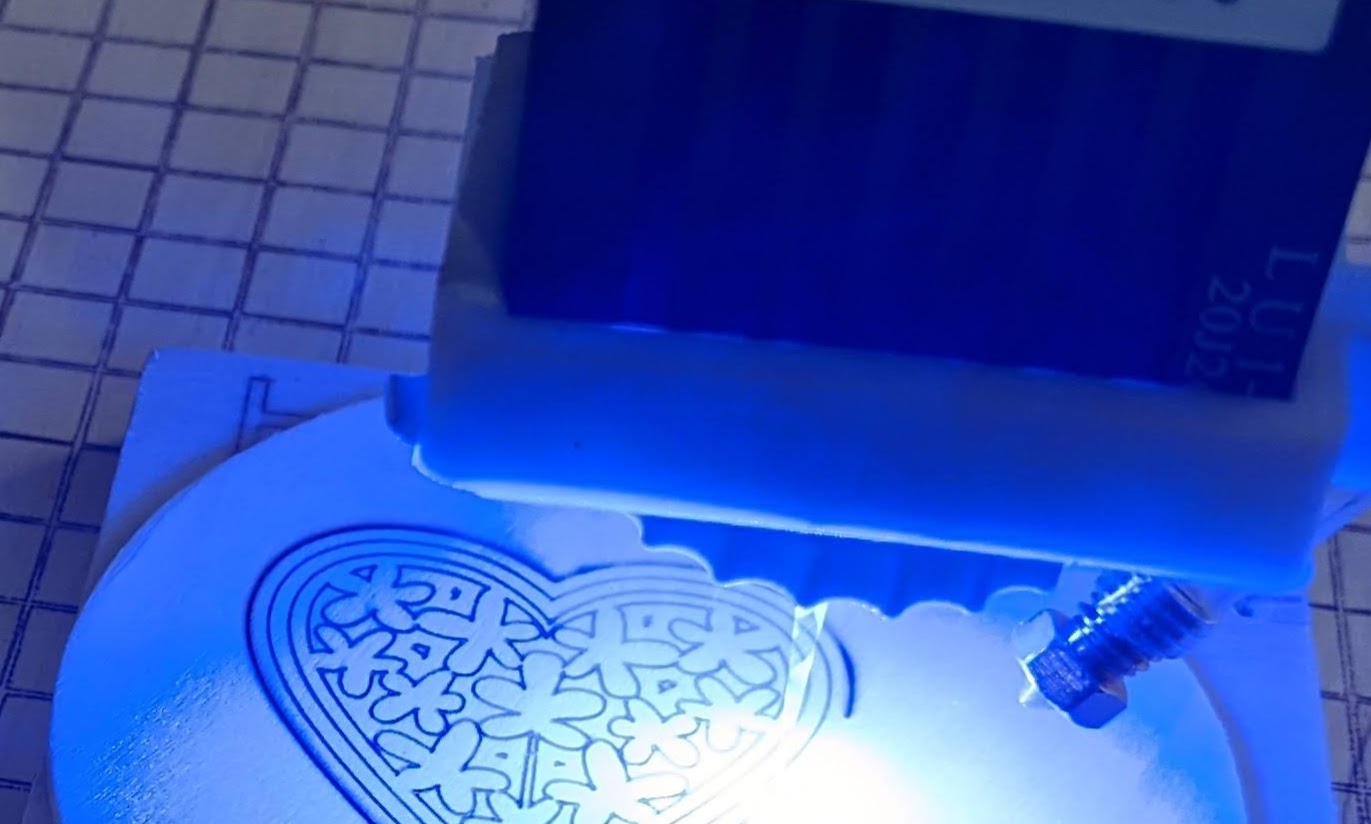
Does it work? It does! Cutting out thin plywood takes only a few passes now and seems to make cleaner cuts. The accompanying picture shows a small test piece on 2mm plywood. Using 2 passes of the laser cut the outline perfectly and — looking close up — it appears I could even cut the engraving power down. Without magnifying it, though, it looks fine.
By the way, these cuts were with what Ortur calls a 15 W laser and using the standard lens. Keep in mind, though, the 15W number is the input power. The actual output power is probably just north of 4W.
Another side effect of the air blowing from the right? You can see all the smoke now hangs to the left side of the machine.
Ventilation
Speaking of smoke, you do need ventilation and that’s one thing I’m not finished working on. I’m still trying to figure out exactly what I want to do. A vent hood or an enclosure with an exhaust seems ideal but a pain to set up. For now, I have an open window with a dual window fan set to blow out.
Wood doesn’t smell too bad, but leather does. I understand, too, that some glue in plywood and some tanning chemicals in leather produce very nasty fumes, so this is one downside to these machines. If you think printing ABS smells, you aren’t going to enjoy an open laser cutter very much.
For now, though, I’m pretty satisfied with the results this modest machine can provide. If you really need a laser cutter for commercial purposes, you are probably going to look elsewhere. But if you want to spend about what a fair 3D printer costs and add a lot of capability to your workshop, you could do worse than one of these inexpensive engravers.


Looks like 5.5W is basically what all these solid-state laser cutters can swing.
Anyone know of something closer to 10W without going CO2?
You won’t like the price, but George at Endurance laser has the 10w+ model that he verifies with a power meter
In my looking around nothing looks sensible in the single diode laser for high sustained output. Seems like CO2 is still the only sane options for the power output, and for most of these sort of tasks works in a better wavelength too.
Much higher, you’re going to have to combine/align beams, which is probably not worth the hassle. The high power blues are fun b/c they’re cheap and easy for what they do.
I can, with proper air and lots of time, just barely burn through 4 mm plywood with a “7 W” laser (really 2.5 W) but it’s sooty, slow, and unpleasant. It also fails if the interior ply layer has a knot in it or something.
If I were serious about laser cutting, I’d get a K40 CO2. For marking and just playing around, though, the blues are cheap and low commitment.
It seems like a (high price) nice solution would be a fiber laser on a 3d printer body. That might be able to cut metal.
I’ve been curious about these guys: https://www.banggood.com/NEJE-40W-Laser-Module-11Pcs-or-Set-NEJE-Laser-Module-2-In-1-Adjustable-Variable-Focus-Lens-and-Fixed-Focal-Modified-Laser-Air-Assist-For-Laser-Engraver-Machine-Laser-Cutter-3D-Printer-CNC-Millling-Banggood-Banggood-World-Exclusive-Premiere-p-1785694.html?cur_warehouse=CN
Looks like, no surprise, the 40W is “marketing” but found another link to what looks like the same thing and they claim 15W optical. That would be nice.
https://neje.shop/products/40w-laser-module-laser-head-for-cnc-laser-cutter-engraver-woodworking-machine
In the video, they show that it is composed of two separate laser diodes and a beam combiner.
Yep, well aware of the marketing tactics, but curious how well it’ll actually do. Even if it gets at least a true 10w+ out of the quoted 15, could be notably better than many of the cheaper options out there. Interested to see how well the beam combining they do pans out.
~7W effective output is the most you will get with out of blue Diodes without them being overdriven, or pulsed (where the average is still ~7W). This will only change when the diode manufacturer makes a higher power version.
There exist more powerful laser diodes, but, they cost more and are generally in the near IR range used to pump fiber lasers.
NEJE makes a module called the “A40640” which uses a lens to combine the output of two diodes into a single ~10W output beam for about $260
Honestly Al; I’d get a cardboard box with a fan+exhaust duct on it and cut a window out and install a piece of acrylic in place. Cheap and easy and buys you time to build your full enclosure from 2x2s and acrylic.
I think that “if you think 3D printing ABS smells bad, you aren’t going to enjoy laser cutting” (paraphrased) is a really succinct summary. (Even a decent exhaust system only does so much)