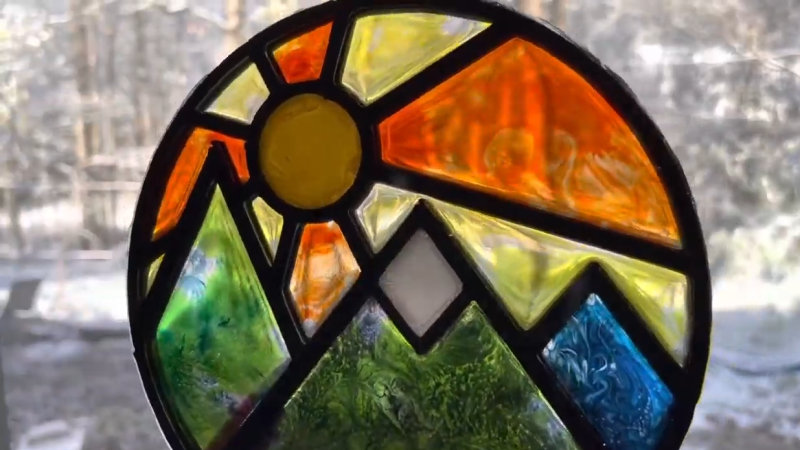
Like the looks of stained glass, but not the amount of work, skill, and materials involved? Well, [Northern Geometry] shows how to sidestep all that nonsense and use a 3D printed frame, epoxy, and some alcohol-based inks to create a pretty good fake stained-glass effect piece of art.
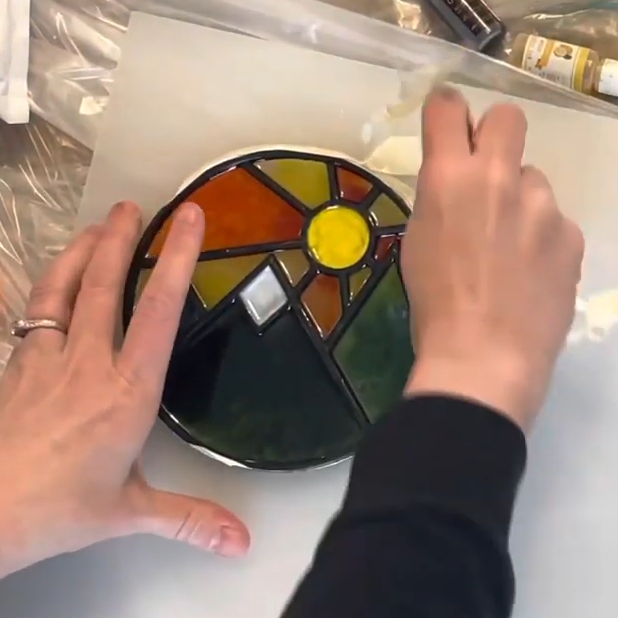
[Northern Geometry] has played with this idea before, but shares some refinements and tips on getting the best results. One suggestion is to begin by securely taping the 3D printed frame to a smooth polypropylene board as a backer. Giving the cured resin a smooth surface is important to get the right look, and since resin will not bond to the polypropylene, it can be used as a backer to get that done.
Once the frame is mounted, pour a small amount of epoxy into each cavity and ensure it gets into every corner, then let it cure. The thin bottom layer of resin will seal things as well as create a glassy-smooth backing that is the perfect foundation for finishing the piece with colored resin as needed.
Once that is done, and everything has had plenty of time to cure fully, just pop the piece off the board. Check it out in the video embedded below, where [Northern Geometry] shows the process from start to finish.
In the video, the piece still does put up a wee bit of a fight during the removal process. Perhaps there’s some way that the release can be made a bit easier, but it all seems to work out in the end.
If faux stained glass is giving you ideas, be sure to check out this alternate method. And if doing the real thing is something you’re already comfortable with? Step it up a notch by adding LEDs to your stained glass.
[via Reddit]


I have the reverse issue, I enjoy the work and process of making stained glass, but don’t really like the end result ;-)
Same except I’ll one up the lazy and say I enjoy watching others making glass but have no desire to give it a go myself. Sure blown glass looks great, but I really didn’t need a vase. Here’s $20 to watch you make another one.
You don’t actually make the glass, you can buy art glass. Mostly it involves cutting and grinding the glass and soldering lead together.
Well that’s why stained glass making is a trade and art. Beautiful results also take time. I applaud anyone though who can make that sort of glass themselves.
Jeez, thats nothing, check out what Jimmy Diresta did, same idea but a bigger scale: https://www.youtube.com/watch?v=2MGtiM_ux0I
I love the dismissal of a trade and skills dating back centuries as nonsense
I did this with an FDM printer. Instead of having another piece I had to glue the frame to, I added 1-3 layers on the bottom, and made sure they were a bit overcompressed. Then after the pours and resin cures, I sanded down the back side until the 1-3 layers of the plastic were gone.
It worked pretty good. I just didn’t put enough color in my resin, so all my colors felt washed out.
Back in the 70’s and maybe early 80’s you could buy a kit that had a metal frame and pouches of plastic beads. The frame was placed on foil on a cookie sheet and you placed the beads in the voids of the metal frame and after a few minutes in the oven and a few minutes of cooling we had little stained glass looking window hangers. My mom still has some of them hanging in her kitchen window.
Apparently they are still in business under the name MAKIT & BAKIT.
Oh yeah, I remember those! They made good Christmas tree ornaments, too!
I like it, all of the looks and none of the lead poisoning.
I fear the colors won’t last long in sunlight. The “alcohol inks” used to color epoxy (the ones I’ve seen, anyway) are all dye based (rather than pigment based), and therefore the color should be considered fugitive. Would love to be corrected, because this looks like fun.
Use clear urethane and transparent and opaque urethane dyes like what Smooth-On has. Those won’t fade and you can get all sorts of transparent and translucent effects. Load up some clear resin with opaque white color then tint with transparent dyes.
Be nice if the design followed the rules of proper stained glass. Some of that is physically impossible to do in glass & lead.