Visual Raspberry Pi With Node-Red And TensorFlow

If you prefer to draw boxes instead of writing code, you may have tried IBM’s Node-RED to create logic with drag-and-drop flows. A recent [TensorFlow] video shows an interview between [Jason Mayes] and [Paul Van Eck] about using TensorFlow.js with Node-RED to create machine learning applications for Raspberry Pi visually. You can see the video, below.

The video doesn’t go into much detail since it is only ten minutes long. But it does show how easy it is to do things like identify images using an existing TensorFlow model. There is a more detailed tutorial available, as well as a corresponding video, which you can see below.

Continue reading “Visual Raspberry Pi With Node-Red And TensorFlow”

Make Your Own Variable Inductor

Inductors are not the most common component these days and variable ones seem even less common. However, with a ferrite rod and some 3D printing, [drjaynes] shows how to make your own variable inductor. You can see him show the device off in the video below.

The coil itself is just some wire, but the trick is moving the ferrite core in and out of the core. The first version used some very thick wire and produced an inductor that varied from 6 to 22 microhenrys. Switching to 22 gauge wire allowed more wire on the form. That pushed the value range to 2 to 12 millihenrys.

Continue reading “Make Your Own Variable Inductor”

Heating A Home With Sunlight… And Water

The sun is a tremendous source of energy, and while photovoltaic panels are an easy way to harvest some of that energy especially now that prices for them are incredibly low, there are plenty of other ways to tap into that free energy as well. [Engelbert] was looking for alternative ways to heat his house since traditional methods were prohibitively expensive, and ended up building a heat exchanger using solar-heated water to cover his home heating needs. (Google Translate from Dutch)

The system uses several large roof-mounted hot water heating panels. The heat captured by them is then pumped into an underground pipe network which is able to warm up a large area of earth in the summer. In the winter, that heat is able to be extracted back out of the earth and used to heat his home. The system includes almost three kilometers of pipe which are buried two meters below grade, so this will probably not be a weekend project, but it still cost much less than the €80,000 to install gas heating in his home.

[Engelbert] is able to use this self-built system to keep his home and another smaller building at a constant 23°C all year. He actually overbuilt the system slightly and has since disconnected almost half of the pipes, but we certainly understand the desire to over-engineer things around here. The only problem he has had is with various government entities that are slow to adopt energy-efficient systems like these. Perhaps the Dutch government can take some notes from the Swiss when it comes to installing geothermal systems like these.

Thanks to [Jero] for the tip!

Turn On Your Lights With A Wave Of A Magic Wand

Smartphones and voice assistants are the typical way most of us interact with our smart devices around the home, but it doesn’t have to be the only way. [Sam March] wanted things to feel a little more magical – so built a wand to do the job instead.

The wand relies on a DA14531 Bluetooth Low Energy (BLE) system-on-chip, and is paired with what appear to be smart plugs running on the same hardware. With an accelerometer in the wand, it’s able to detect waving motions, and then signal the smartplugs over Bluetooth to switch outlets on or off. As far as the magic side of things is concerned, [Sam] took his lead from [Arthur C. Clarke], who famously stated “Any sufficiently advanced technology is indistinguishable from magic.” Thus, efforts were made to miniaturize the electronics down to a single tiny PCB, allowing it to be secreted inside a turned wooden wand that’s wrapped in leather.

The end result is a fun project that’s also probably useful when [Sam] wants to turn the lights off without getting out of bed. We could imagine that, configured properly to work on a room-by-room basis, it could be useful for guests who don’t know where the light switches are.

If the name sounds familiar, it’s because we’ve heard from [Sam] before – with his great DIY smartwatch build. Video after the break.

Continue reading “Turn On Your Lights With A Wave Of A Magic Wand”

LibreVNA Is A Quality Open Hardware Vector Network Analyser

There was a time when a Vector Network Analyser or VNA was the type of instrument that cost as much as a very fancy car or even a small house. The advent of commodity semiconductors that perform at high RF frequencies coupled with microcontrollers powerful enough to handle the data acquisition and processing might not yet have put those high-perfomance instruments within reach, but at our end of the market it’s opened the possibilities for some useful yet affordable devices. A fresh contender comes from [Jankae], whose LibreVNA tops out at 6 GHz and shows some significant attention to design detail that puts it above some of the budget offerings.

At its heart is the versatile Si5351 multi-way clock generator, accompanied by a pair of MAX2871 phase-locked-loop chips for the higher frequency local oscillators. A switched bank of low-pass filters take care of local oscillator harmonics, and in the receive chain there are ADL5081 mixers feeding a dual conversion IF running at 70 MHz and then 300 kHz. Finally the ADCs are Microchip’s MCP3313, and all is kept in sync by an FPGA and an STM32G431 microcontroller. The main data proccessing is offloaded to a host computer, with a software package and GUI able to be compiled on Windows, Linux, and OSX.

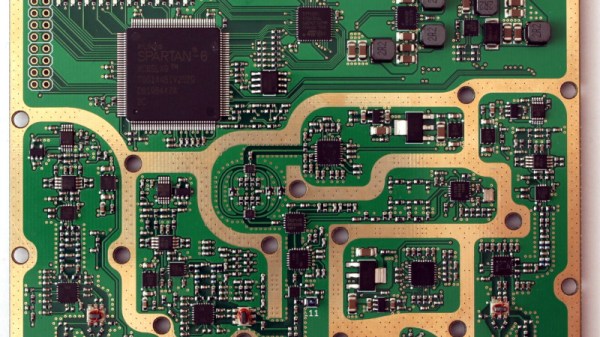
The PCB shows the attention to detail, not least in the power supply arrangements, with every major component receiving its own regulator to ensure no RF makes it down the power rails. It’s clear that a properly made LibreVNA won’t be as cheap as some of its rivals, but we think the corresponding performance hike would make the extra cost worthwhile.

If VNAs are new to you, we covered an introduction from [W2AEW] a while back.

Hands-On With PineCube: An Open IP Camera Begging For Better Kernel Support

When the PineCube was announced by the Pine64 project in 2020, it created a fair bit of interest. Most of this was due to the appeal of a single-board computer (SBC) in a network-based (IP) camera form factor with integrated camera module, for a mere $29.99. Add an enclosure to it, and you would have a neat little package combining a 5 MP camera module with 100 Mbit Ethernet and WiFi. As a bonus, the system could be powered either via an optional battery pack as well as passive PoE, in addition to MicroUSB.

A few weeks ago I bought two of these boards, as part of a client project, and set out to use it for a custom IP camera implementation. With existing Linux-on-SBC and MIPI (CSI) camera experience on my end ranging from the Raspberry Pi to the Odroid, Orange Pi and Banana Pi boards, I felt fairly confident that I could make it work with minimal fuss.

Unfortunately, my experiences were anything but positive. After spending many hours with the PineCube, I’m not able to recommend it for those seeking an IP camera. There are many reasons for this, which I’ll try to explain in this article.

Continue reading “Hands-On With PineCube: An Open IP Camera Begging For Better Kernel Support”

Woofer-Based Parts Cleaner Bounces To The Beat

Is there anything more satisfying than building a useful machine from mostly junk? We think not. [ke4mcl] is a big fan of reusing and repurposing things before settling for the recycle bin, and was in the market for a vibratory parts tumbler to quickly clean off old, rusty bits and bobs in the course of repairing old electronics. For just $10, most of which went into a new tube of RTV silicone, [ke4mcl] built their own tumbler and came away with a reusable amplifier setup in the process.

We’ve all seen speaker cones dance, and they are definitely our favorite way to observe non-Newtonian fluids. This old woofer can still move, so it’s got a second life shaking sand and screws around until they’re somewhat shiny. The ideal woofer for this purpose has a rubber surround — that’s the ring that connects the speaker cone to the frame. [ke4mcl]’s foam-surrounded woofer works just as well, though it may not last as long.

After scrounging a container with a screw-top lid that fits the woofer perfectly, [ke4mcl] joined them together with a bead of RTV silicone. Since there weren’t any amplifiers lying around, [ke4mcl] spent a few bucks on a class D amplifier board and found a spare laptop brick to power it. An old phone with a tone generator app gets the sand churning with a friendly sine wave, which you can see in the videos after the break.

We think it’s particularly nice to keep things like fire extinguishers out of the landfill. If you don’t need a parts tumbler, why not use one to make your own refillable, re-pressurizable solvent container?

Continue reading “Woofer-Based Parts Cleaner Bounces To The Beat”