This wind tunnel is a pile of junk and we love it! When making science and engineering accessible to kids, it really helps to show that it doesn’t require a fancy research lab. [Jelly & Marshmallows] show kids that it takes little more than cardboard, duct tape, and dumpster-diving to up your paper airplane game to NASA levels of engineering.
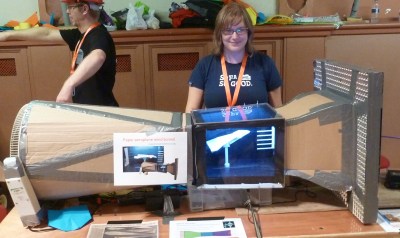
[Jelly & Marshmallows] built their wind tunnel for a Maker Faire using the aforementioned cheap and free materials for the straightener, collector, diffuser, and fan sections. We especially love the efficient hack of using stacked ceiling light diffusers rather than hundreds of straws for the straightener.
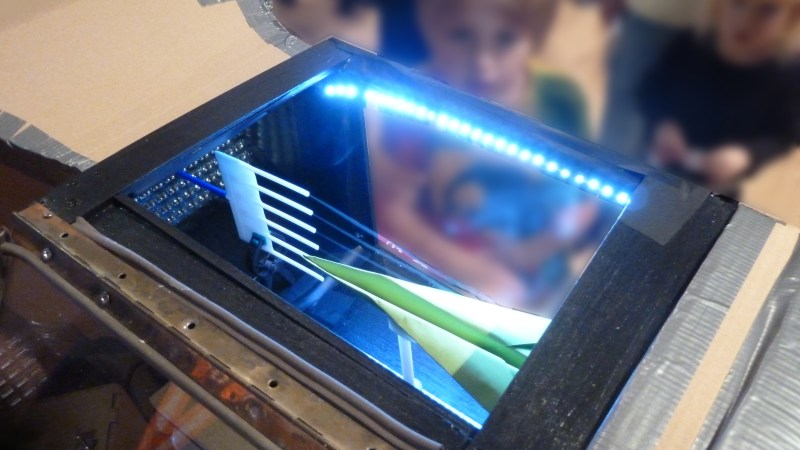
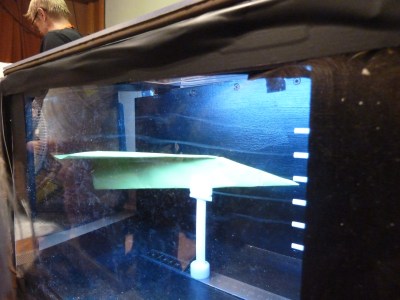
The most time went into the working section, custom-built from plywood frames and acrylic windows. Many 3D printed parts came together to convert a smoke-ring gun to emit smoke trails and LEDs were employed to make those trails a little easier to see. We think the magnetic clips for quick changes of aircraft and their position along a steel ruler were inspired.
The kids attending the Maker Faire (we miss those!) loved the exhibit, having the best time hitting a big green arcade button to spin up the fan. It’s the little things in life. How would you get the kids even more involved with analyzing aerodynamics and make the smoke trails more visible?
Thanks for the tip [Rómulo Antão]


Collect (or or model) everything you’ve ever seen tumble slowly from the sky.
Maple seeds come most immediately to mind. Turn the tunnel upright (yeah, I know, easier said than done) and drive the fan with a potentiometer to control flow speed. Get the forces to balance such that the test object hovers. Bonus: if the test object rotates, illuminate with a strobe light turned to the rotational frequency. It can be a really fun demo.
Don’t want to rebuild the tunnel? Go full NASA and instrument the test mount to measure the aerodynamic forces exerted on the test object.
Good work! Needs force gages for drag and lift only.
> How would you get the kids even more involved with analyzing aerodynamics and make the smoke trails more visible?
Making the smoke more visible sounds doable. A couple laser LEDs with line filters can be had for a few dollars and mounted parallel with the smoke nozzles so the lasers illuminate a single slice of smoke. A denser smoke might be good, something like dry ice fog might work better?
Getting kids more involved might be a challenge. Having a series of basic shapes on hand to show how air goes around a box, a sphere, a cone, and then moving on to a model bus, model car, model rocket, and model plane would make it pretty intuitive to a group of younger kids.
For something more hands on, how about a bin of LEGO parts and having kids build their own model plane or rocket so they can put it in the chamber and see what the airflow does, letting them take a step into the prototype-test procedures. If you add a force sensor or two to measure drag and lift, it would be an engaging challenge for older kids to try and build a model with the least drag and greatest lift.
Macerate and knead a little water to bluetac.
Remove the plastic from a food bag tie.
Make a small coil out of the food bag tie wire.
Encase the coil in the water softened bluetac.
Add some insulated wires to the coil and pass an amp or two through it. The coil will get hot and the bluetac will produce very thick white smoke. It’s denser than air and will remain in a container for along time, to be drawn out from the bottom or via venturi.
Interesting, I never heard of this method. Do you know what the smoke is? Is it ok to use indoors?
we got them involved making paper planes; which was both cheap on materials and Tyler them take away their creation. We also had test objects but a queue of up to 30 kids at any one time with planes to test meant they didn’t get used much. Interestingly we had models of Bloodhound SSC with and without air brakes deployed, that Mark simplified from the real CAD. The bloodhound project even asked for Mark’s CAD so schools could 3D print models of it (their CAD was unmanageably complex). For smoke we tried dry ice, smoke machines, heating glycerol directly and settled on a smoke ring gun as it was safer than home brew heating set up, while giving densest smoke. What isn’t obvious is that very dense smoke becomes very thin injected into a 0.5m/s airstream. Given events don’t allow burning or fumes, this was as good as we could do.
We had optimised for visual engagement for Maker Faire, but the rig also toured some local schools with lift drag sensing. This was done by some pre-university interns we had, so that was great for them to both to design and get experience educating kids
“Making the smoke more visible sounds doable. A couple laser LEDs with line filters can be had for a few dollars and mounted parallel with the smoke nozzles so the lasers illuminate a single slice of smoke. A denser smoke might be good, something like dry ice fog might work better?”
You have to have lines of smoke (or bubbles or whatever you’re working with) separated from general clear air. If you shine a line laser through a solid bank of smoke/fog (moving or static) it won’t show any contrast, and thus no indications of turbulence. A vertical line laser through horizontal lines of smoke/fog (or vice versa) is excellent since you have both contrast and positional specificity.
If you are using junk to make it, why not make it bigger? Then you can straighten out the flow and get better results. This seems way too short to get good straight flow. This would cut short your maximum air speed, but it is better to have accurate results limited to a certain Re than garbage results at higher Re.
The size was limited by by the junk we used and the need to fit it with other exhibits in a car to take across the country to makerfaire. It was built solely for kids to test paper aeroplanes with so we only needed flow good enough to keep the smoke straight (which it did), not research grade airflow. The geometry was actually very good and was based on an educational windtunnel design from NASA. The working section was specked based on fan diameter (fan came from a skip) the straightener dimensions (lighting diffuser from the same skip) and it the size of various paper aeroplane designs (including wide ‘landscape’ planes. It worked fine for the purpose beyond the fog being too thin at higher speeds
I think it is inspired and awesome as-is. Nice work, kids!
Thanks! The kids certainly enjoyed it and many were really interested in how the flow patterns show they were creating lift. Some came back with lots of designs to try, and by the end of the day most kids had a plane in their hands, not to mention a fair few around the venue (sorry clean up crew!