See Aerodynamics In Action With A Desktop Wind Tunnel

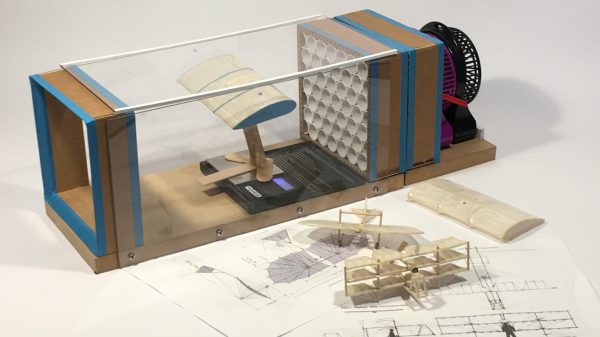
While most of us don’t design aircraft or racing cars, it’s likely that we’re still fascinated by some of the aerodynamic studies behind them. But a full-sized wind tunnel is going to cost a small fortune, so how can we experiment? Never fear, because [luisengineering] is here with a 3D printable desktop wind tunnel.

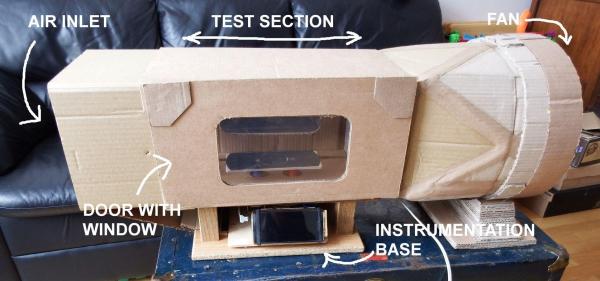
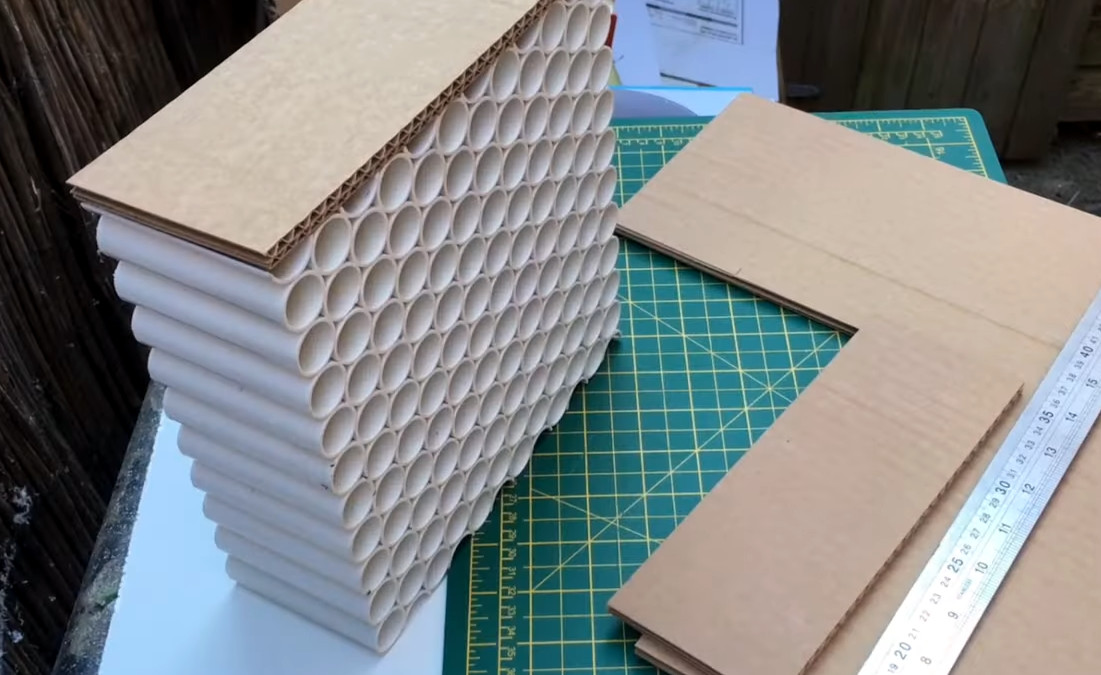
There’s a build video that we’ve embedded below, and if you can sit through the continuous shilling of random tools, it’s an interesting watch. It’s an open design in that air is not recirculate through it, instead it passed through the machine from left to right. On the right is the fan, on the left the intake with a rectifier to ensure laminar flow. Then a constriction compresses and speeds up the air past the stage for the model under test, and an expansion slows it down again for the fan.

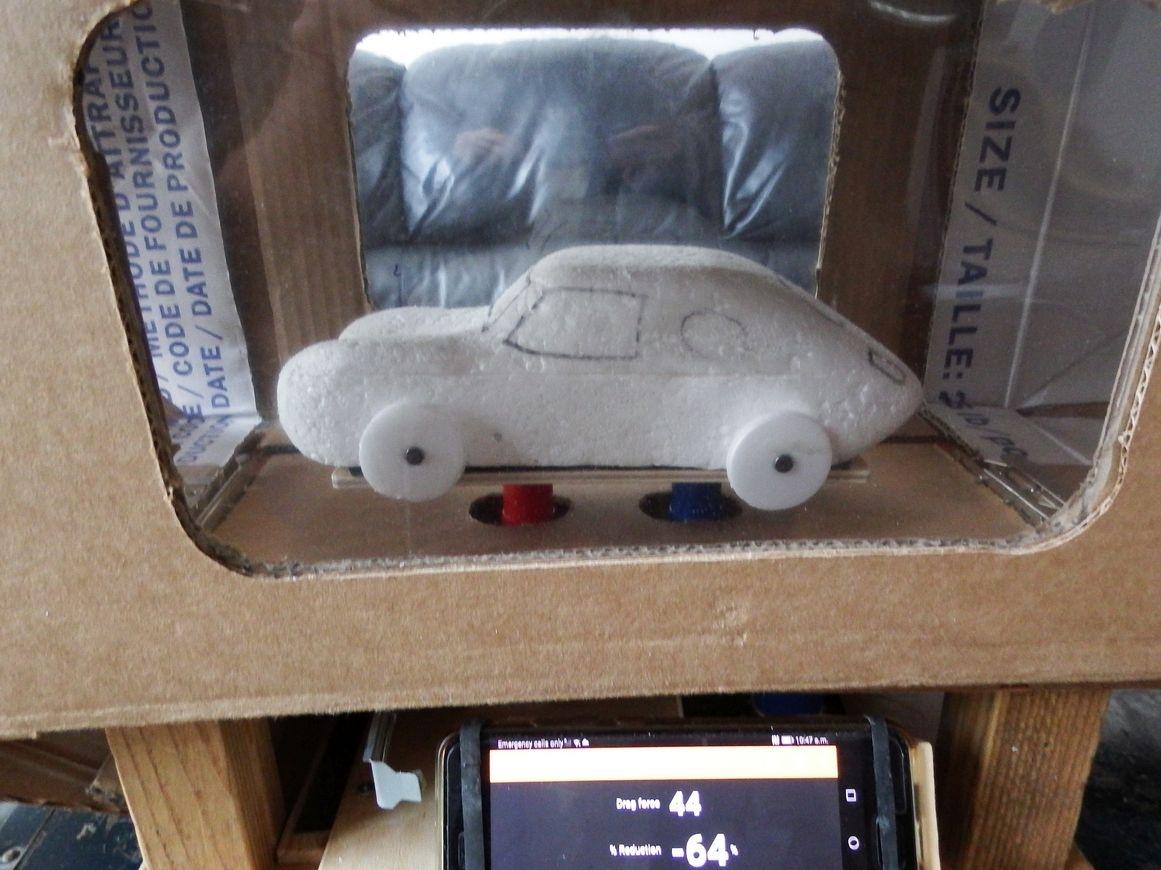
A wind tunnel needs a smoke generator to easily spot turbulence, and in this case a vape is called into action. The result is surprisingly effective, as we see with a demonstration using a small model car. Meanwhile if you’re interested in wind tunnels at this size, it’s not the first one we’ve brought you.

Continue reading “See Aerodynamics In Action With A Desktop Wind Tunnel”

The best-practice wind tunnel (above) vs a compact version (below)

Optimizing A Desktop, 3D Printed Wind Tunnel

You’ve heard of wind tunnels– get some airflow going over a thingy, put some some smoke on, and voila! Flow visualization. How hard could it be? Well, as always, the devil is in the details and [toast] is down in there with him with this Hot-Wheels sized wind tunnel video.

To get good, laminar flow inside of a wind tunnel, there are important ratios to be followed– the inlet and outlet diameters must relate to the interior size to get the correct slope on the contraction and exhaust cones. You need a flow straightener on both ends. All of it can be easily 3D printed, as [toast] shows, but you have to know those design rules and pay attention to, which [toast] does… this time. One of his “don’t do this” examples in this video is previous build of his where he did not follow all the rules, and the difference is clear.

Now, unless you’re hooked on flow visualizations —guilty— or are a Hot-Wheels aficionado, since that’s what this wind tunnel is sized for, you probably won’t rush to gumroad to buy [toast]’s STLs. On the other hand, if you pay attention to the lessons [toast] has learned in this video you can apply them to wind tunnels of whatever size and construction technique you need, be it cardboard or junk box plastic and get a more stable result.

Continue reading “Optimizing A Desktop, 3D Printed Wind Tunnel”

A rectangular box with a purple section sandwiched between two red sections sits on a black tabletop. The end of the box is open. Black and red wires run out of the back of the box to a breadboard.

Improving Wind Turbine Testing With A Better Air Source

When comparing the efficiency of different wind turbine blade designs, [AdamEnt] found using a hair dryer wasn’t the best tool for the job. Enter his new 3D-printed wind tunnel.

After several prototypes, [AdamEnt] decided on a design that exploits slicer infill to create a flow straightener without having to do any tedious modeling of a lattice. Combined with a box on both ends of the straightener to constrain the flow, he has a more controllable air source with laminar instead of turbulent flow for testing his wind turbines.

The BLDC motor driving the air is attached to a toroidal blade of MIT fame. We get a little bit of the math behind calculating wind turbine efficiency and see a quick test of a blade placed next to the outlet of the air source at the end of the video.

If you’re planning on building your own wind tunnel, we’ve covered a few. We’ve even seen one that goes up to Mach 20, although that probably wouldn’t be useful for wind turbine design!

Continue reading “Improving Wind Turbine Testing With A Better Air Source”

Wind Tunnel Uses The Last Straw

If you watch the movies, there isn’t much to a wind tunnel. Just a fan and a tunnel, right? The truth is there’s a lot more to it than that, and [ejs13] shows you how you can make a small tunnel with some basic supplies. One of the requirements for a useful tunnel is to have laminar flow — that is, flow in uniform layers with little, if any, mixing. This tunnel achieves laminar flow using an array of soda straws to direct the flow. In fact, there are 150 straws in total. You can see a short clip of the wind tunnel in action below.

The rest of the parts are easy, too. A computer fan provides wind, and there’s a little bit of wood and acrylic. You’ll notice in the video that you can easily see the airflow. That’s thanks to a light source, some water, and a bit of dry ice.

Continue reading “Wind Tunnel Uses The Last Straw”

Victorian Train Tunnel Turned Test Track

Characterizing the aerodynamic performance of a vehicle usually requires a wind tunnel since it’s difficult to control all variables when actually driving. Unless you had some kind of perfectly straight, environmentally controlled, and precision-graded section of road, anyway. Turns out the Catesby Tunnel in the UK meets those requirements exactly, and [Tom Scott] recently got to take a tour of it.

The 2.7 kilometer (1.7 mile) long tunnel was constructed as a railway tunnel between 1895 and 1897, thanks to the estate owner objecting to the idea of “unsightly trains” crossing his property. The tunnel’s construction was precise even by modern standards, deviating only 3 mm from being perfectly straight along its entire length. It lay abandoned for many years until it was paved and converted into a test facility, opening in 2021.

To measure the speed without the luxury of GPS reception, a high-speed camera mounted inside a vehicle detects reflective tags mounted every 5 m along the tunnel’s wall. This provides accurate speed measurement down to 0.001 km/h. A pair of turntables are installed at the ends of the tunnel to avoid an Austin Powers multi-point turn (apparently that’s the technical term) when turning around inside the confined space.

Due to the overhead soil and sealed ends, the temperature in the tunnel only varies by 1 – 2 °C year round. This controlled environment makes the tunnel perfect for coastdown tests, where a vehicle accelerates to a designated speed and then is put into neutral and allowed to coast. By measuring the loss of speed across multiple runs, it’s possible to calculate the aerodynamic drag and friction on the wheels. Thanks to the repeatable nature of the tests, it was even possible to calculate the aerodynamic losses caused by [Tom]’s cameras mounted to the outside of the vehicle.

The Catesby Tunnel is an excellent example of repurposing old infrastructure for modern use. Some other examples we’ve seen include using coal mines and gold mines for geothermal energy.

Continue reading “Victorian Train Tunnel Turned Test Track”

A cardboard wind tunnel

Optimize Your Paper Planes With This Cardboard Wind Tunnel

We at Hackaday are great fans of hands-on classroom projects promoting science, technology, engineering and math (STEM) subjects – after all, inspiring kids with technology at a young age will help ensure a new generation of hardware hackers in the future. If you’re looking for an interesting project to keep a full classroom busy, have a look at [drdonh]’s latest project: a fully-functional wind tunnel made from simple materials.

A styrofoam car model in a cardboard wind tunnelBuilt from cardboard, it has all the same components you’d find in a full-size aerodynamics lab: a fan to generate a decent stream of air, an inlet with channels to stabilize the flow, and a platform to mount experiments on. There’s even some basic instrumentation included that can be used to measure drag and lift, allowing the students to evaluate the drag coefficients of different car designs or the lift-generating properties of various airfoils. Continue reading “Optimize Your Paper Planes With This Cardboard Wind Tunnel”

DIY Wind Tunnel Aims To Educate The Youth

Typically, when we talk about wind tunnels, we think of the big facilities in use by the aerospace and motorsports industries. However, there’s nothing stopping you building a wind tunnel of your very own, and it may even be easier than you think! [Jude Pullen] has whipped up just such a design with DIY in mind.

Intended for high school Design & Technology (D&T) classes, it uses relatively simple materials construction techniques. The airflow straightener is built out of PVC pipes, and the end boxes built out of cardboard. The transparent walls for observation are created out of acrylic, while a simple fan provides the necessary flow. The desk-sized wind tunnel can then be instrumented with a manometer, tachometer, and anemometer to measure pressure, fan speed, and wind speed. [Jude] also explores experiments that can be run in the wind tunnel, such as working with a small balsa wood glider and measuring the lift it generates with a scale.

[Jude] has a very pragmatic and real-world understanding of such projects, too. He notes the difference between making things to measure, and making them to fit, and highlights the values of both approaches. It’s a much more holistic approach than simply berating students to “do it right” or “do it better” when making things in a D&T class.

Use of a basic wind tunnel is often not taught to engineering students until at least the second or third year of an engineering degree, after all the boring math and static analysis has been dealt with. However, there’s no reason high school physics students can’t understand the physics involved, and they’re more than capable of undertaking such a build. Starting such education early often nets huge benefits for individuals and their eventual careers.

Once you’ve got yourself a wind tunnel, you might want to start thinking about some flow visualization, which gets really exciting.

Continue reading “DIY Wind Tunnel Aims To Educate The Youth”