[AndrewMohawk] had seen all kinds of ambient lighting systems for TVs come and go over the years, and the one thing they all had in common was that they didn’t live up to his high standards. Armed with the tools of the hacker trade, he set about building an Ambilight-type system of his own that truly delivered the goods.
The development process was one full of roadblocks and dead ends, but [Andrew] persevered. After solving annoying problems with HDCP and HDMI splitters, he was finally able to get a Raspberry Pi to capture video going to his TV and use OpenCV to determine the colors of segments around the screen. From there, it was simple enough to send out data to a string of addressable RGB LEDs behind the TV to create the desired effect.
For all the hard work, [Andrew] was rewarded with an ambient lighting system that runs at a healthy 20fps and works with any HDMI video feed plugged into the TV. It even autoscales to work with video content shot in different aspect ratios so the ambient display always picks up the edge of the video content.
With 270 LEDs fitted, the result is an incredibly smooth and fluid ambient display we’d love to have at home. You can build one too, since [Andrew] shared all the code on Github. As an added bonus, he also gave the system an audio visualiser, and tested it out with some Streetlight Manifesto, the greatest third-wave ska band ever to roam the Earth. The Fourth Wave still eludes us, but we hold out hope.
We’ve seen plenty of hacks in this vein before; one of the most impressive hacked a smart TV into doing the video processing itself. Video after the break.


Whats wrong with Hyperion ? Mine runs at 30fps no problem.
Honestly, I just hadn’t seen the project before. I watched some of the videos and went through the docs and arguably this could definitely be done with Hyperion, all they would need to support is something like the adafruit circuitpython neopixel library and you could connect them with Hyperion.
FPS is a little difficult to really judge because likely your FPS you are referring to the capture rate and not the LED updates per second. These I worked on a bit to try get it down but actually its just the time it takes to PWM the signal across the GPIO18 pin, so if you have less than 500 LEDs (what mine is set to now) then you should get way more FPS.
Due to an issue where I cannot re-assign LED length without re-instantiating the LED library it means that to configure it I need to estimate 500-ish LEDs, but if I knew the length I could definitely push way about 40FPS.
Additionally while the openCV stuff is cool, a lot of the setup and pain comes from the HDCP/EDID/HDMI config where you still want to get 4K with HDR, but really this is all handled by the easycoolav splitter.
Hyperion looks awesome, but it also lets you do a ton of different things like control Hue lights/USB/has a full app etc. This one just does one thing, but thanks for the info!
Hey @AndrewMohawk,
TPmodding from the Hyperion-Team here. If you are interested to work with us/help us or only have a chat, feel free to contact us. I would greatly appreciate it.
Regards TP
Excellent! I will!
Hyperion doesn’t capture the HDMI signal but uses a frontend that “playes” the content, extracts the data and sends it to the Hyperion server. Try connecting you Playstation to Hyperion, it doesn’t work, this will.
I have a Hyperion setup with 265 LEDs on the back ov my TV. The HDMI comes from my Denon receiver with dual HDMI outputs. It works on every source. Gaming with the ambient light is awesome.
I have a Denon and am looking at this setup – I am assuming the splitter goes the way of the dodo with this setup? Basically HDMI to capture, capture to pi, pi to LEDs? My only issue is I’m doing this to a projector screen and my perimeter is 28 feet so I need a chonky power supply to drive all the lights.
Heya,
yeah that sounds right, because the denon has dual HDMI out it would be able to send one to the TV and one to the Pi->LEDs
However you might still need a splitter if you need to downscale so that a cheap TV card in the Pi can capture it (ie, for the Pi to capture 4K Dolby Vision the card would be $$$$). Additionally since the resolution is so low you dont need a high res pic anyway, it wont make almost any difference, spend that money on better LEDs!
-AM
“And if and when I die will you bury me alone, cause I’ll never get to heaven if I’m singing this song”
If? Are you delusional mate?
I’m so glad it worked as an example too!
It looks cool but apart from cool does this ambient lighting improve the viewing experience?
Yeah, so anytime there is a light source in a movie or game/whatever that gets ‘stopped’ at the edge of the screen it now gets extended past that. Its pretty fun to watch it and a lot less distracting than what it looks like on camera, but here are some examples:
Static images (but look at the one with the light source): https://twitter.com/AndrewMohawk/status/1402344836183719937
Watching something like avatar (Its not my pick, but it demos it well): https://twitter.com/AndrewMohawk/status/1402346909654683648
Take a look at https://twitter.com/AndrewMohawk/status/1402346909654683648
Pretty but what’s the point?
It makes the watching experience so much bigger. I have a 265 LED setup with a 65″ tv. Big action moments are so intense. It’s sort of like a poor man’s HDR.
Pretty is the point..!
Nice work! Any idea what that latency is? That’s been the main sticking pont for me in the past.
Latency is measured differently I guess, but the LED refresh times are what I count as ‘FPS’, its about 20/s, but there is a trick once its setup to improve that depending on how many LEDs you have. 20 updates a second seemed to be about where I didnt notice it at all, but obviously depends from person to person, here is it live playing avatar with the default setup: https://twitter.com/AndrewMohawk/status/1402346909654683648
Yeah, I should have been clearer. I’m referring to the latency between the images displayed on TV screen and the LED response. For example, if the video cuts to a different color, how long before the LEDs update their color to match?
In the past some of these setups suffered from latency that was slow enough that it distracted from the viewing experience. Just curious about yours.
It shouldn’t be too hard to measure. Presumably you could find a video source that has sudden cuts, or changes of color, then record the LEDs responding to the changes. Depending on the FPS of your video, you can then calculate the latency.
Its updating the LEDs 20 times a second (so about 50ms) — and there are some things to optimise this, but they cant be used generally so it has to be for each setup.
So the maximum time you should expect is about 50ms from image changing to LEDs updating :)
Really would like to do this but with a health bar, like some PC’s can do with their lighting… Just would have to change the script to pull from the health bar location rather than screen edges.
Honestly, this shouldnt be too hard to do since you can simply write your own in Python. The only really difficult part is to get the HP, but there are likely openCV examples to do that for most things already! The example would be something like this:
def getHealth(self):
#fetch hp from wherever
return random.randint(10,100)
def getHealthColour(self, health)
#this is taken from https://stackoverflow.com/questions/340209/generate-colors-between-red-and-green-for-a-power-meter
R = (255 * health) / 100
G = (255 * (100 – health)) / 100
B = 0
return (R,G,B)
# This will ‘visualise’ whatever you want and will be called every ~0.01s
def visualise(self):
hp = self.getHealth()
hpColour = self.getHealthColour(hp)
self.pixels.fill(hpColour)
self.pixels.show()
Dang. I want one of these. But I’m also a danger to life and property when using a soldering iron. I’m almost wondering if there like an “Etsy” where I can pay someone to build this hardware? Software and Raspberry Pi I can do, soldering… :)
Honestly, this soldering is really easy, you can leave out cutting and soldering the strip and just bend it round the corners, its not as good, but it will be fine and then you *only* need to solder the strip onto the Pi pins, its just 2 wires and you solder them onto a header and you can buy a few headers if you make a mistake! You can do it!
Looks like the ezcoo splitter/scaler says not to use the scaler with Dolby Vision. That’s a bummer, I was hoping this would be a cheaper alternative to the HDFury Diva.
That’s 100% true and one of the things that I didn’t like, but because Dolby vision is proprietary it can’t be decoded properly, however I’ve been using it with hdr10 instead, and honestly I struggle to tell the difference between Dolby vision HDR10. Easy cool av however are amazing and I’m hoping their new firmware will one day support it!
Hdfury can do it but for a significant price
Great job! I’ve been a long term Hyperion-er – Originally running Plex on a RPI2, then recently to a webcam to “watch” the screen and output the colours – it’s not very colour accurate and the webcam looks ugly on the TV unit so I’ve been waiting for the time to move to an HDMI splitter and USB capture. Ordered the stuff from Amazon and hopefully arrive tomorrow.
Got the splitter and capture dongle today – pulled out webcam, plugged the capture dongle in and it’s working – a few extra tweaks required to improve the latency and some random “uvcvideo: Failed to resubmit video URB (-19).” now and then but its start! colour is much better than using a webcam.
Well, I’m glad to see how that works in action. It serves to reinforce just how violently I would react to something like that in my media room. I wouldn’t even look for the off switch. I would just rip those godforsaken LEDs off, Hulk-like.
If there was ever a reason to build something
The latency of this is just awful. Looks like its at least 300ms but it could be even more. And the averaging to mask this just makes it worse.
Its running at about 50ms latency (20 updates/s?) what do you mean the averaging to mask it?
Getting a working Ambilight clone using only the HDMI input signal has been a project I’ve had on the back burner for over a decade. The recent availability of affordable HDMI splitters and capture devices make it much more practical and this implementation looks really well done. I’m impressed by the sophisticated image recognition part all my previous attempts have done some clunky video scaling to match LEDs to border pixels 1:1 and sending those border pixel to the LEDs.
It could be just the video but it looks like there may be some possible improvements to the color calculations that would better match the LEDs to what’s on the screen.
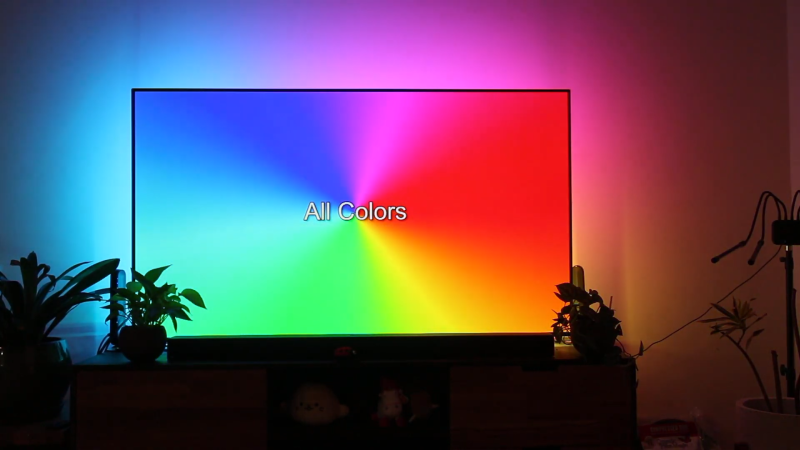
You can see it in the color wheel test, the segments for the primary RGB colors are lost between the secondary CYM segments. It’s the issue with all RGB LEDs where driving multiple channels at 100% exceeds the brightness capabilities of any single channel.
You can improve it by compressing the color space for a uniform brightness so that the sum of all values maxes out at 255 (assuming 24 bit color). It means that your white value becomes 3×85, your secondary colors become 2×127, your primaries remain 1×255 and every other color is compressed somewhere inside the edges of that color space. Thinking in HSV terms is likely to make the math easier.
The screen is probably doing much more complex color processing using the color gamut of the signal, the performance of the panel and the response curve of the human eye. That means you’ll never get a perfect match but it should reduce the differences in the color wheel test between the wall and the screen.
Stiey,
Interesting and thanks for the comment, the issue with the colour wheel where they blend I thought was because the light was being too defused against the back wall and then real world averaging. Your post gives me some better insight into why its doing this rather than what I assumed, when I get a free moment I’ll try it out again with the max value 255 (over 255,255,255).
Using OpenCV I can also work in HSV over RGB as well so maybe something else I will look into it. Also it looks a lot closer when I view it IRL over on the video and its frustrating to see in the video but not when I physically look at it!
The colour is also a bit tricky because if I am watching at HDR10, then the switch is downgrading from HDR10 to SDR and losing a lot of the colour, which I did speak to easycoolav about and they did offer some new firmware, but unfortunately didn’t work right now, but hopefully in the future it will!
Cheers!
Andrew