We know this feeling all too well [YOHON!] spent $340 building, lubing, and filming a custom keyboard and it still wasn’t perfect until they got the keycaps sorted. They bought blank ‘caps because they’re awesome, but also because they wanted to make their own custom ‘caps for all those painstakingly lubed and filmed Gateron yellows. At first [YOHON!] thought about doing it DIY dye-sublimation style with a hair straightener and polyimide tape, but that is too permanent of a method. Instead, [YOHON!] wanted room to experiment, make changes, and make mistakes.
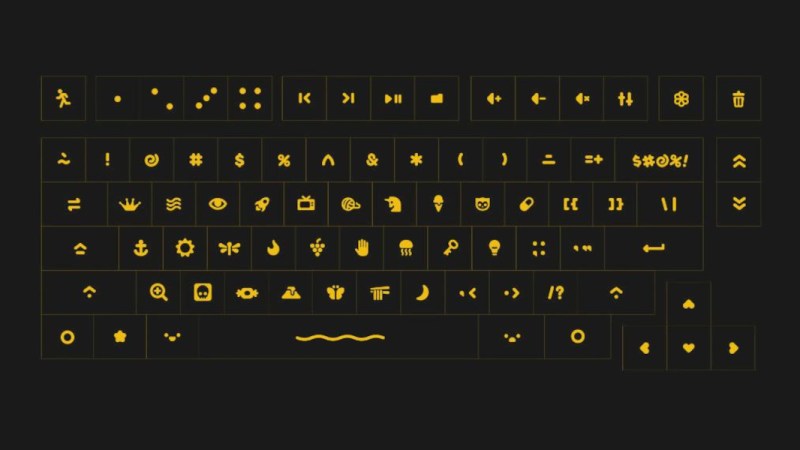
 Eventually, [YOHON!] learned about waterslide decals and settled on doing them that way. Every step sounds arduous, but we think it was way worth it because these look great. Since [YOHON!] wanted the keyboard to be weird, they designed a cute little symbol for each key which gives it a cryptic-but-accessible Wingdings feel.
We think these pictograms are all totally adorable, and we particularly like the owl for O, the volcano for V, and of course, the skeleton for X is a solid choice. Oh, and there’s a tiny fidget spinner knob to round out the cuteness. Designing and applying the keycaps took longer than the entire keyboard build, but you can check out the sped-up version after the break.
Want to just throw money at the keycaps problem? You may not want an entire keyboard full of cheeseburger and hot dog keycaps, but one or two fun keycaps are pretty cool to have. If you want to make your custom keycaps more permanent and don’t like the dye sublimation trick, try 3D printing them.
Via KBD


If you need to coat it in varnish for it to stick, why not just use transparent sticker paper and varnish instead?
From past (far past) experience, water slide decals are thinner so they follow curves better; a big advantage for slightly Fisher key caps. They’re also pretty easy to move around once they’re on (they slide!), so more forgiving to get them exactly where you want them.
Aaahhh!!
Slightly *dished key caps!
LOL! I thought “Fisher” was a new term I would learn today after I looked up its meaning.
I thought Fisher, as in Fisher-Price…
waterslide decals are very thin, so they won’t look like stickers. they can be moved around while they are wet, if alignment is critical. they’re usually really cheap to make in small custom quantities as they’re compatible with many different processes (inkjet, laser, silkscreen, felt tip market, etc). tweezers are essential and there probably isn’t a good way to automate putting them on. They’ve been pretty much the standard practice for plastic model kits and RC planes for as long as I can remember, probably well beyond 100 years.
I remember building plastic model planes and soaking the air force usa decals in water and then putting them on and repositioning them before they dried. Thanks for the memory.
Does anyone know of a good way to get white?
Getting black is easy, but I want to make white artwork/lettering to apply to a grey panel. I have thought of a few things, but nothing that jumps out as super cheap and easy (when compared with using black pigment from a laser printer).
Look up white toner… (apparently it IS a thing!)
So it is – I’d have never thunk it
https://www.ghost-white-toner.com/toner-supplies/
Yes, I have some of that, but I haven’t tried it yet. I can’t get a white toner cartridge for my printer, but I do have a bag of white toner and an empty cartridge. I suppose I really need to bite the bullet, but I anticipate a huge mess.
I’ve also got some t-shirt transfer material. Print black on special paper, apply white transfer and heat (it sticks to black), then peel off special paper (exposing underside of black) apply to surface and heat. Black adheres to surface, but white is on top.
Still nothing simple and obvious however.
Thanks for the suggestion though.
For labeling black custom devices I’ve used laser printing inverse text, so the background is black and the text is ‘white’, e.g. no toner. Then you have to just sharpie the four corners to hide the black paper. Not great, but after covering with clearcoat I’ve managed to get it fairly professional looking.
*to hide the white paper
Get yourself the waterslide paper and a fancy photo printer with the separate ink reservoirs – then just fill an empty black tank with white ink, the printer won’t know any better its just going to print ‘black’ but it comes out white (probably after a little flushing out of the tubes and print head – which is why I suggested doing it to black, once you are done and want to print black again the dark ink should quickly start looking normal enough so you only really have to waste ink purging one way). You can also try refilling the more standard ink cartridge cheap printer cartridge with the wrong colour, but IMO those printer should be avoided at all costs, cheap to buy they may be, but awful to run..
There are also some fancy printers out there using multiple ribbon cartridges that can even print in metal leaf foils as well – though I’ve not seen one in ages and they are bound to be far far more expensive.
Try putting down white dry-transfer decals (e.g. Letraset) onto a waterslide substrate then spray with clear lacquer.
Alps microdry printers were discontinued forever ago…..but they are popular second hand scores for model builders…their ribbons are available in not only cmykw but clear overcoat, and metal foil appearance as well
Totes adorb!
Soooo cute! I would love to have one, but my typing would go down to single digit WPM with one of these
Love the keyboard, hate waterslide decals, have debuilt several models over frustration with decals!
The mention of Wingdings reminded of a computer class I taught long ago. I told the class that if they wanted to send a secret message in email all they had to do was type the message, then select all the words and change the font to Wingdings. Then send the email. The person on the other end would have to know to select all and change the font back to regular text. This was ian old email systems. Haven’t tried it lately but these days most computer savvy folks would recognize Wingdings. Not secure but kind of fun.
An eye for an E…
Or is it I for E?/
Confused me at first…
That one caught me, too.
Side printed decals? What a lovely option to have.
[looks at laptop] Chiclet keys suck. Yet another reason people rave about old Thinkpad keyboards, I suppose.
Thnkpad keys were nice, but don’t retire that IBM Model M keyboard yet.