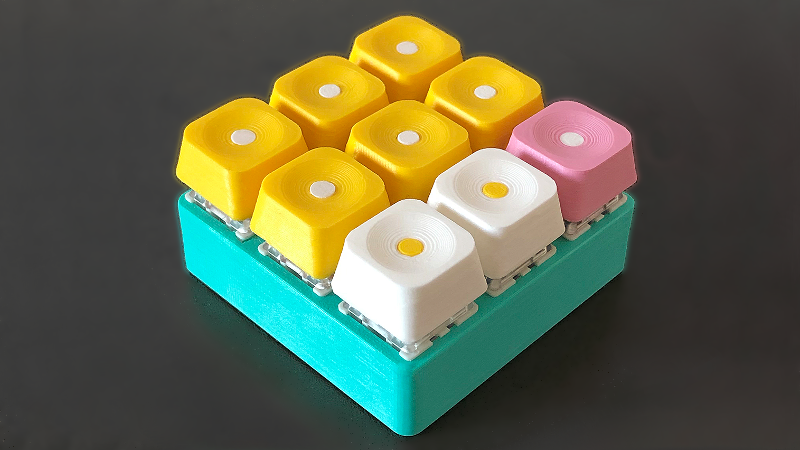
Reddit user [duzitbetter] showed off their design for a 3D-printed programmable macro keyboard that offers a different take on what can be thought of as a sort of 3D-printed PCB. The design is called the Bloko 9 and uses the Raspberry Pi PICO and some Cherry MX-style switches, which are popular in DIY keyboards.
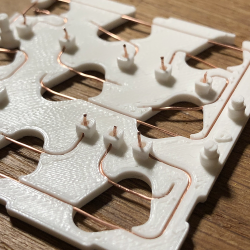
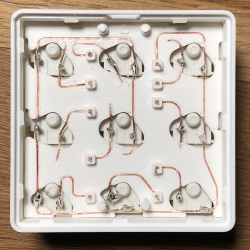
The enclosure and keycaps are all 3D printed, and what’s interesting is the way that the enclosure both holds the components in place as well as providing a kind of wire guide for all the electrical connections. The result is such that bare copper wire can be routed and soldered between leads in a layout that closely resembles the way a PCB would be routed. The pictures say it all, so take a look.

Bloko 9 is available as a paid model, and while going PCB-free thanks to 3D printing is a technique others have played with, it is very well demonstrated here and shows there is still plenty of room to innovate on the concept. DIY keyboard and macro pad design is also fertile ground for hackers; we have even seen that it’s possible to 3D print one right down to the switches themselves.


Looking at the picture, there is a separate object that just olds the “slick wiring” which I would argue is really just a PCB made the hard way.
It’s 3d Printed, holds a Circuit, and is Board shaped so I think calling it a PCB fits in the “technically correct” category. Calling it the hard way is much more subjective though. Someone who has never etched a board before but has done lots of 3d printing could see this as an easy shortcut.
Call it a PWB then. It’s somewhat akin to the old MultiWire boards.
PCB etching is easier as you can skip the assembly step versus the 3D printed way, especially for more complicated or more compact designs.
But the chemicals are a hassle and clean up is messy. Having another trick in our toolbelt for prototypes is always welcome!
Having hand-wired keyboards more than once: for 9 keys, it’s probably easiset to just run wires.
Once you get above 40 keys or so, with diiodes and their polarity, and keeping the rows/columns straight, you’re really wishing you had a PCB. (But it’s still doable for a one-off.)
Thanks to the Raspberry Pi Pico we can republish all of the old PIC/Picaxe/Basic Stamp/Arduino projects! Everything old is new again!
> Everything old is new again!
:-D
Will Pi-Femto be an electromechanical experiments kit/set?
Will Pi day have surprises for us?
Or I can haz “Q 36 Immodium Space Modulator”?
Questions, questions, questions, ….
Or “will the pi 17 have a working usb 2 power supply in 2078?”
Man, I could buy a bucket full of Pi Picos for what I spent on Basic Stamp. But I feel like this problem of an affordable development board was solved multiple times over the decades with the Parallax Propeller, AVR/ATmega, various STM32 boards, ESP8266/ESP32, etc.
Why aren’t we all using an RPi0 with an RTOS for all our projects? The price is right and the power is definitely there. Ultra low power is a problem for RPi0, but I can be a Pi Pico pretty easily too. You should be able to run a fully static microcontroller off some potatoes.
No you couldn’t. you could only buy 1 + 3 times the retail price in shipping.
Granted, you’d have some money left afterwards.
https://xkcd.com/1053/
i’ve tried to do this in a different context and i was disappointed that pla melts if you have a soldering iron within a foot of it
did i mention? my hands shake
Try using some latching or sprung closed tweeser/pliers as heatsinks around the plastic, it will help with the conducted heat through the wire at least.
Though assuming badly shaking hands and the likely hood poking the hot end where it shouldn’t be means this method isn’t for you I’d suggest. As most of the higher temperature 3d printable materials are perhaps going to be enough to not melt on you, but I’d not recommend charring them, as they are usually less human friendly in composition.
I guess you could try the UV cured SLS printer resins, but I don’t have much knowledge of their thermal resistance, or if they are safe(ish) to breath any fumes from stray irons is lacking.
Try annealing the print in an oven?
https://ecoreprap.com/annealing-pla/
That’s not going to increase the softening / melting temperatures.