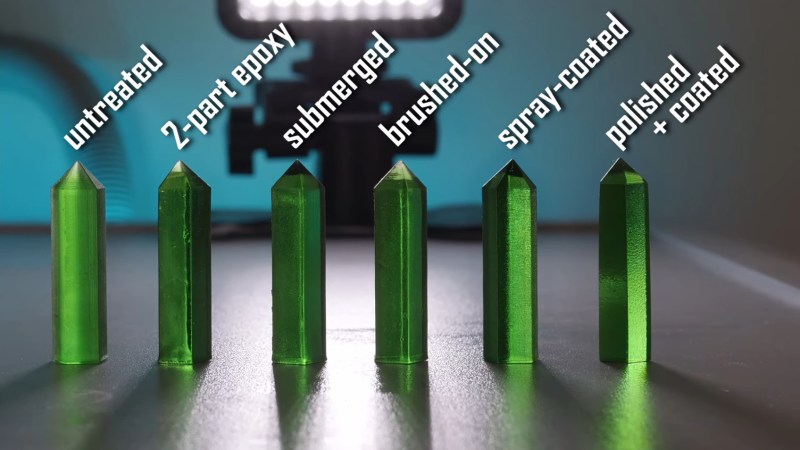
[Matou] has always been entranced by the beauty of natural crystal formations [and has long wished for a glowing crystal pendant]. Once he got a resin-based 3D printer, he was majorly disappointed to find out that although transparent resin prints look like delicious candy when they’re still wet, they turn cloudy and dull after being washed in an isopropyl bath and cured with UV light. There must be a way to either polish pieces back to clear, or keep them clear in the first place, [Matou] thought, and set about experimenting with some test crystals (video, embedded below).
As [Matou] found out, the dullness is caused by surface imperfections. Resin prints have layer lines, too, and although they may be super fine and invisible to the naked eye, they will still scatter light. The choices seem obvious — either polish the proud parts down with many grits of sandpaper, or fill the valleys with something to smooth everything out. As you’ll see in the video after the break, [Matou] tried it all, including a coat of the same resin that made the print. It’s an interesting look at the different ways to smooth out resin prints, though you may not be surprised to find that the one with the most work put into it looks the best.
We were hoping to see [Matou] try a green LED in the pendant, but it didn’t happen. If you’re dying to know what that looks like, you can get one of these pendants for yourself by supporting [Matou] on Patreon.
We think crystals are pretty cool, too — especially crystal radios. Here’s the hack-iest one of those we’ve ever seen, free of charge.


This left me wondering if a polished+uv resin coated part would have given a better finish.
While looking to buy Formlabs’ 3L resin printer, I was questioning the clear samples on the website to the salesperson and was pointed to the secret: Rust-Oleum Clear Enamel.
https://www.rustoleum.com/product-catalog/consumer-brands/stops-rust/clear-enamel/
Never got a chance to try it as the sample they sent had other issues that made me rethink what we were doing but filling in the spaces between the layers looks like the way to go.
That looks very interesting! I wonder if it would be actually different than the clear coat I used. I might give that I try if I can get it here.
Maybe 3D printing is not the best method for manufacturing smooth crystal looking objects. If you created a smooth mold out of acrylic and silicone glue, you could pour your resin in and create the same shapes that are clear without polishing.
I think you’re right :)
But I had a 3d printer and no experience with casting. And it is fun to explore what’s possible with 3d printing. This way, once I want to create forms for which it isn’t easy to create a mold, it might still be possible to get them clear :)
You still need to polish the original part you make the mold from.
^this
I have been using clear resin to print visors for videogame helmets. I got clear resin and mixed in a few drops of resin dye (seems to keep the yellowing of the resin under UV at bay). after a good cure and a long polishing regimen, it has some semblance of optical clarity. I still plan on using what ive made as a master for a mold (that i will then polish the hell out of again im sure) but it is nice knowing that I could potentially make an optically clear visor using just the printer and elbowgrease.
I plan on trying a vibratory rock tumbler with different grits to automate polishing but havnt had the attention span for that at the moment.
diluting the resin prior dipping might do the trick.
Yeah, it works well for me at least. I’m diluting the resin with some IPA and results are pretty goods.
The only drawback is the touch, it feels sticky (even after a long time of curing) and I’m not sure why.
Why not just cure the print without cleaning it first?
and I think a green led would look better..
Future Floor Polish — it’s an acrylic varnish that’s been used by miniature painters for years. I’ve heard good reports on using it to improve the appearance of printed transparent parts.
I’ve used Future on clear PLA with FDM printing, and it does help (and I’ve used it for years for model/figure making). Another option I’d suggest is Krylon Triple-Thick Gloss. Again, used with my FDM printing, it does a great job filling layer lines, but pulls away from edges, retaining sharp details. A poor-man’s XTC-3D resin coating, basically.
I seem to remember using floor polish to fill in light scratches on CDs back in the early 2000s so that makes sense. Polish didn’t work worth a damn if the scratch got remotely heavy though, and actually tended to make it a lot worse.
An OpenSCAD lens STL creation script with user set parameters would be cool.
The isopropanol is what clouds it, so don’t use isopropanol. Simple Green/Mean Green/related products work great for the-precure wash. They don’t cloud clear resins and are significantly cheaper that isopropanol baths. Win/win.
^^This. Personally I also add that I don’t like wasting alcohol that could be used to disinfect a wound to wash my prints. Green mean lasts longer too.
why wash the models in liquid? – Why not Mechanically clean it by rotating! – makes them nice and shiny
Best way is to use clear gloss lacquer diluted with around 10-20% lacquer thinner. Submerge the part in the liquid, air dry in a dust-free environment. The part will end up crystal clear.
I saw a whitepaper a few months ago on using UV-cure resin to 3D-print lenses; it said that the best way to get a print to come out clear was to re-dip it in UV resin before curing it.