Got a couple of old DVD-RW drives lying around, just collecting dust? Of course you do. If not, you likely know where to find a pair so you can build this totally adorable and fully dangerous laser engraver for your desk. Check out the complete build video after the break.
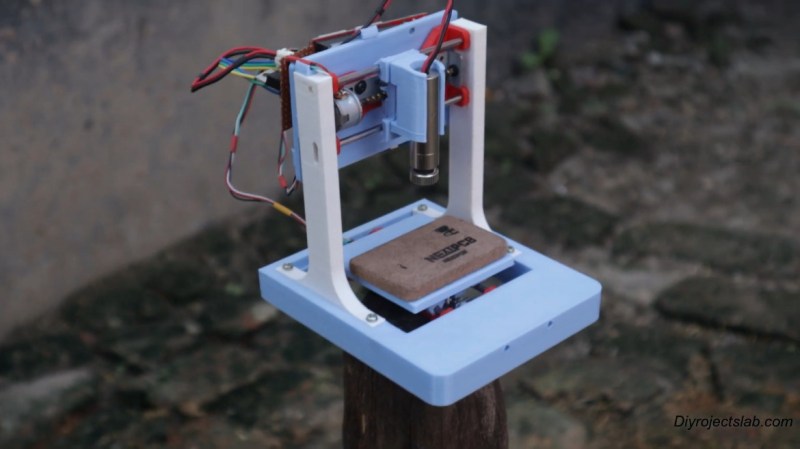
[Smart Tronix] doesn’t just tell you to salvage the stepper motors out of the drives — they show you how it’s done and even take the time to explain in writing what stepper motors are and why you would want to use them in this project, which is a remix of [maggie_shah]’s design over on Thingiverse. As you might expect, the two steppers are wired up to an Arduino Uno through a CNC shield with a pair of A4988 motor drivers. These form the two axes of movement — the 250mW laser is attached to x, and the platform moves back and forth on the y axis. We’d love to have one of these to mess around with. Nothing that fits on that platform would be safe! Just don’t forget the proper laser blocking safety glasses!
Need something much bigger that won’t take up a lot of space? Roll up your sleeves and build a SCARA arm to hold your laser.


Seen it before, but never with this refined of an approach. Nice work!
Coincidentally, I pulled a bunch of these drives apart recently hoping to do exactly that.
The main problem is most newer rewriter drives have a different laser diode arrangement which is a flat block with a heat spreader plate on the back that won’t fit the “standard” AiXiZ modules. Unfortunately I found that this includes nearly all laptop and most desktop drives.
Some of the older ones used a 3.x mm which will fit the other sort at least for the red diode.
Note: if anyone comes up with a module that takes modern flat type diodes specifically more than one, with vernier screws to contact the heat spreader and provide beam alignment.. :-D
Fully working and tested >200mW red modules aren’t that expensive and you can also get more powerful 2W M140s quite cheaply as they will run at lower power with marginally better beam quality, though best to add a parallel 15K resistor in case of ESD and to discharge the somewhat large (hundreds of pF) diode capacitance.
Also a useful tip: to extend the life of the driver modules add a 1-2.2K parallel resistor across each winding on the module end.
Those microstep modules are quite fragile and losing a winding at peak current will ruin them with back EMF as I found out the hard way. ($$$)
Yes but when building one of these little retina engravers one is supposed to use OLD parts, the scrap that nobody really wants anymore. Most of us have it in our closets but failing that check your local thrift shops. Save the new stuff for your computer.
I bought this laser engraver:
https://www.aliexpress.com/snapshot/0.html?spm=a2g0s.9042647.6.2.6a7936faXAfzTe&orderId=506584157136724&productId=32850585668
It has a CH340G USB-serial chip inside, and the windows software seems to upload a BMP file via this serial port.
It is still in its box taking dust, maybe there is some Linux software for it now:
https://github.com/camrein/EzGraver
https://github.com/AxelTB/nejePrint
I wanted to make PCBs with it.
Reminds me of the Neje laser engravers…
/sigh
I have the bulk of one of these done (albeit in a much more rough and ready fashion) in my shed along with the arduino and stepper drivers to run it. Unfortunately a fucked up multimeter caused me to overvolt the diode and turn it into an LED with a strange pattern and I never got around to replacing it. Maybe this’ll be the push I need, it is a beautiful build.
Hmm. Please let me know as I am literally up to my ears in broken drives so sending you a box o’goodies would likely help. I’m on Twitter and other such sites as FB is currently 404 as of this evening.
Laser Tattoos at home?
It definitely looks useable… and cute. But, if you already own a 3D printer (such as required by this project), you pretty much already have a laser engraver, yes? Just add laser.
It’s so cute! I want to put one on my desk at work as a conversation starter.
The worst thing about open-frame laser anythings is:
a) the eye hazard
b) the smoke
This one is small enough that you could put any old cardboard box over it, vent it out the window with a vacuum cleaner, and you’d have both problems solved.