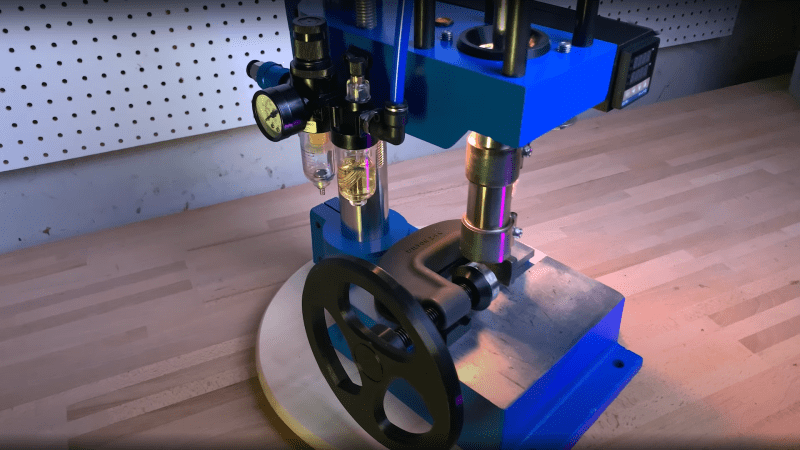
[Kurt Schaefer] was watching YouTube videos of people making molds for injection molding purposes using what he considered to be the toy 3018 CNC machines, and looking at the results, decided he needed a piece of the action. However, once you have molds, the next obvious issue to address is lack of access to an injection molding machine. But these things are expensive. As luck would have it, you can get a nice-looking pneumatic press for less than $350, and with a little more money spent, [Kurt] found he could convert it into a functional injection molding machine (video, embedded below), and get some half-decent results out of it.
After ordering the press on eBay, what eventually arrived was quite a mess, having clearly been inadequately packed for its weight, and had sustained some damage in transit. Despite this, it seemed the functional bits were fine, so [Kurt] decided to press on with the build. The first obvious change is the requirement of a heated chamber to deal with the feedstock material. Using an off-the-shelf injection molding chamber by buster beagle 3D, only a few standoffs and a support bracket needed machining in order to complete the mechanics. A common PID controller available from the usual suppliers, with some heat bands wrapped around the chamber, dealt with the injection temperature requirements, and some 3D printed enclosures wrapped it all up neatly.
After some initial wobbles, and a couple of hacks to the design, [Kurt] got some pretty good results out of this simple setup, and it appears to be pretty tune-able and repeatable, which will help maintain the quality of those results. In short, a neat hack of easy to get parts, and perhaps a welcome addition to a hackerspace near you?
3D printed parts are available on the Thingiverse page, as well as a Fusion360 CAD model. The shopping list for parts can be found in the video description, if you want to have a go at reproducing this.
We’ve seen a few DIY injection molding attempts over the years, like this slick plastic molding setup. Here’s one with 3D-printed molds, and if you just need something the right shape, you could just injection mold with a hot glue.


What a fun project and what a great project video!
Manuel and electric mouldind machines ( 1 oz ) were sold to comprehensive schools in UK 40 years ago. The one shown in the video needs to be plexglass proctected – by law – to protect the user .
You only need that if you’re selling them or inviting the public to operate the device. You’re absolutely allowed to set up your own equipment, in private, as you see fit.
Who knows for sure really, as every region differs… but a secondary blast containment enclosure is certainly recommended. When experienced people offer safety advice, they are often not saying you shouldn’t do a project. Rather, they often are reminding you that there is a community responsibility to keep other people from making life altering mistakes.
One reason we didn’t publish our super-simple inline linear-actuator based 600W design was for safety concerns. Anecdote: The worst recorded injury we had in school shop class was from a steam-blowout scarring some girls neck and face with un-shielded pneumatically pressurized molten plastic. Even a full face-mask would have likely be insufficient based on the injury aftermath.
Pellets need to cook for sometime to bake off the water, and to fit a reasonable amount of material in the melt chamber (factories also use hot-air-pellet-dryers). Also, a rubber flat washer on a preheated mold was usually necessary to achieve reasonable levels of detail on a desktop unit (i.e. the cycle time is low with a single mold).
So, if we want to experiment with injection molding, do you have a good source online? I’d like to be safe and effective.
I was looking for a (relatively) easy DIY injection mold design for small quantities of plastic. Preferably that someone already designed. Looks like this might fit the bill!
Having just milled aluminium on my CNC 3018 yesterday, I object to them being called “toy”. The standard mills which come with them are the toys, but the rest – if you set it up correctly – is fine. Swap in some decent bits and they perform surprisingly well.
By “replace the mill” do you mean the bit or a motor? I ordered one recently and while I am not sure I’ll need to mill aluminum, I’d like to know how.
FYI ‘bits’ are correctly called ‘end mills’ or just ‘mills’.
Milling machines are also called mills’
I’m sure Dan means ‘end mills’.
That said, get some training before you hurt yourself.
The key formula for cutting aluminum will be feed rate. I’d suggest Feedrate = Chip load * # of cutting flutes * RPM. Chip load (the amount cut on each slice) should be about 0.003” for aluminum. Watch your units.
Beware the resonance of the tiny little end mill. If it screams when cutting reduce RPM AND speed by about 20%. Odd numbers to avoid harmonics (changes of 1/5 or 1/3 not 1/4 or 1/2).
Also beware wobbling bits. Use a collet, not a chuck.
While I admire the intent of the Preciousplastic group, and hobby products like A.B. Machinery. Ultimately, they are selling something that is unsafe to operate in the open. I would personally look at the full sized factory hardware prior to trusting hobby designs… as they are entirely enclosed with a latching door.
Part of the reason we built our own version was so one could easily copy it with only hand tools. Although our operating pressure was estimated to be under the 3/4” chamber 495psi limit, we could not guarantee the burst pressure of 2935psi would be predictable after some annealing/wear from use and or a steam pocket. We hoped to mitigate some of the risk as a linear-actuator does not have the potential energy of a pressurized pneumatic system. However, the problem still gets much worse as the diameter of the chamber increases, ram stalls, and the plastic being used is of unknown quality (clogs). Thus, we took the responsible action, and classed the project as nonviable. ;-)