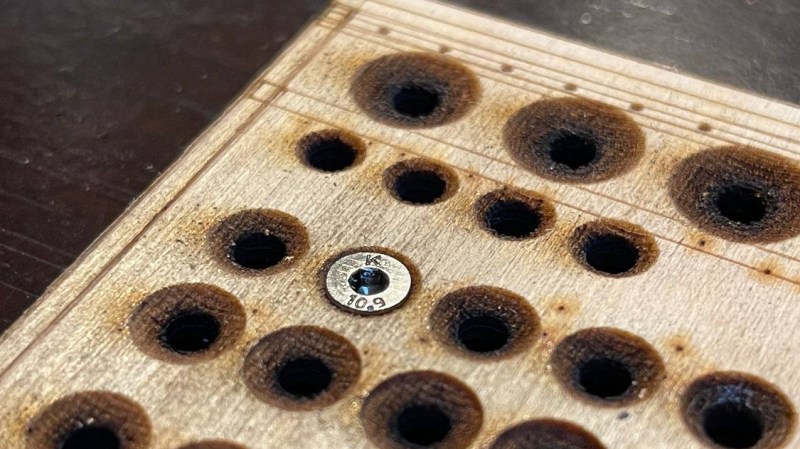
Here’s a fun quick hack from [Timo Birnschein] about using the 3D laser engraving (or ‘stamp’ engraving) mode of certain laser cutter toolchains to create a handy countersink shape in a laser-cut and engraved workpiece. Since [Timo] uses a small laser cutter to cut out and mark project boards for their electronics builds, having an extra messy, manual countersinking operation with subsequent clean-up seemed like a waste of time and effort, if the cutter could be persuaded to do it for them.
Designs are prepared in Inkscape, with an additional ‘3D engraving’ layer holding the extra processing step. [Timo] used the Inkscape feathering tools to create a circular grayscale gradient, leading up to the central cut hole (cuts are in a separate layer) which was then fed into Visicut in order to drive the GRBL-based machine, However, you could do it with practically any toolchain that supports laser power control during a rastering operation. The results look perfectly fine for regions of the workpiece not on show, at least, but if you’re only interested in the idea from a functional point of view, then we reckon this is another great trick for the big bag of laser hacks.
There have been a great number of laser cutting hacks here over the years, since these tools are so darn useful. The snapmaker machine can be a 3D printer, a CNC cutter and a laser cutter all in one, albeit not too perfect at any of those tasks, but the idea is nice. If you own a perfectly fine 3D printer, but fancy a spot of laser engraving (and you have good eye protection!), then you could just strap a 5W blue diode laser to it and get your fix.


That’s interesting but I’ll just keep doing it ole skool
Du you really need to prefabricate countersink holes in wood? I usually just drive them in until flush, which seems to work perfectly fine…
yes you do if you want neat results without the risk of splitting the wood. i just use two drills… one fitted with a regular bit and one fitted with a countersink bit.
It depends on the kind of wood (even with “normal” screw sizes).
I have to do this rarely. And, most annoyingly, the “problem wood” (which requires countersinking holes) may also, occasionally, splinter when it decides to dislike the countersinking bit. Oh well, designing the woodwork in a way that the screwheads aren’t visible anyway helps a lot.
Have you tried a ‘zero flute’ countersink in those woods that like to splinter?
Its something I’ve wondered about, as the cutting force, edge angle and tool pressure is very different from a normal countersink and seems to me likely to reduce or remove tearout entirely as there is down pressure all around the hole pushing the fibre together with pretty even pressure even at the cutting edge – not something I have had any need to try, don’t do much wood and do usually keep screws invisible, or non-existent – when a simple enough to make joint with a power tool a little glue and perhaps a pin or dowel will do the job most of the time why use screws at all, they cost more…
Here one might ask if a regular counter sink bit on a drill isn’t more cost effective long term.
CO2 laser tubes have a finite life after all, since they slowly diminish in intensity throughout their life. And buying and installing a new tube is usually a bit of hassle, especially realigning it and getting to know the new tube.
Well I wouldn’t just rate it against the cost of counter sink bits, but also in the time spent for a human to countersink the holes. I’d gladly spend the laser tube’s lifespan over my own to countersink holes. Especially if there are a great many of them.
Very true, and you don’t want to transfer it to a CNC mill for the countersinks, as that is effort, alignment challenges and another costly machine (though one you could perhaps have just done the whole job on, but with downsides like far greater kerf).
Its not like the CO2 tubes are stupendously expensive, or that short lived either (at least from my reading on the subject), so the cost to use them like this is probably very minimal.
I were more thinking that the 3d aspect of countersinking and the large surface area = a large amount of laser time.
A lot of laser tubes are only rated for a couple of thousand hours. So spending a minute per hole can add up to a fair bit of expense when a new tube usually costs well over 100 $ a piece + shipping. Not to mention installing it and aligning + getting to know the new tube’s behavior. All of this can take days to get back to where one were.
I personally would just use a countersink bit, since it takes seconds at most per hole and the bit lasts for usually thousands of holes. And a new countersink bit costs a few bucks and takes only a hole or two to get to know the new bit.
I have also yet stumbled onto a wood that is hard to countersink where I would also accept the usually rough finish of 3d lasering, or laser cutting in general. Though, if one wants the lasered finish, then that is a different story.
I don’t have a laser cutter, but my 3D printer has extremely low utilization ratios. I’d imagine I’d use a laser cutter similarly, cut a box or something out on it for good few hours, assemble, maybe iterate, and then not use it for a couple weeks while I poke away at the next project. In that context the machine time for countersinking would be negligible.
If one’s machine is already running >50% of the time, though, I can see that extra laser time being a real issue.
From a manufacturing perspective countersinking is best not done on the laser. (I work in manufacturing, so I do have a bias.)
In the hobby shop, everything is effectively an arts project. But 3d engraving on lasers is usually a slow process, so if one does even a few holes and wants the piece quickly, then the countersink bit will come out regardless. Lasers are good at cutting lines, or simple engraving. 3d stuff is like a 3d printer in reverse, and wood/plastics sometimes decides to catch fire during this process, so one can’t leave it over night, or even walk away from it.
Safety advice is to never leave a laser unattended, the work piece do catch fire quite often, especially when one just quickly fiddles together some settings that “should” work. Wood is though the most fire prone material, other than paper/cardboard. But even acrylic can burn, especially if the protective film delaminates a bit and acts as kindling on the next engraving pass. (it is though still a very rare event.)
And the really cheap laser tubes (like a 40 W one for 120-150 $) has a tendency to sometimes leak. Ie, in a few months or a year regardless of usage they have a risk of being dead. (I would recommend the hobby people who lasers infrequently to not go for these cheap tubes. For manufacturing one will burn out the tube first regardless…)
This is a great discussion! I see it the same way: Imm using my laser every once in a while and really don’t mind “wasting” a few minutes on engraving a countersunk hole. It’s negligible from my personal point of view.
On the other hand, engravings always take a long time and oftentimes people raster engrave large parts of a part for text or images. Those are likely the real killers of the tube. But then, raster engraving is probably not always done at full power but rather at a more medium power setting, depending on the speed of the head and the capabilities of the machine. With that, effective hours are even lower.
For me, this is a convenience feature. Cut the part and assemble. I really like the automation aspect. One job to do the entire thing. Engrave, 3D engrave, inner cut, outer cut, done. I just enjoy the elegance of it :)
Call it 20 cents/hour, won’t be that high unless you’re doing something seriously wrong.
If each countersink takes 1 minute, that’s 1/3 cent per hole.
If you have a whole lot, then the time might be an issue. But cost? Really?
That said: Bet it doesn’t work very consistently, even with the same wood, but different water content. Also ‘fire is cool’, just not in my shop.
A five angle laser cutter could do this much better and quicker.
Cool calculation on the cost! Thank you for that!
Not sure about the fire comment, though. Every laser cutter is generally a fire hazard (if left alone unwatched or used improperly) and should always be accompanied by a fire extinguisher! But engraving is no more a fire hazard than the cutting action.
With respect to the repeatability, yeah, that needs more testing for sure. But as long as it’s roughly a conical shape and reasonably deep, it’s good enough to get the screw positioned and tightened without cracking the wood.
There isn’t just the cost of the tube to consider.
A typical 40 W laser tube is anywhere from 120 to 400 $ + shipping. (and shipping a meter long fragile tube of glass isn’t free.)
If it lasts 2K hours of engraving at 20% power, then yes the tube life itself is 6 to 20 cents per hour. (at 20% power it is quite good to get 2K hours out of the tube to be fair, realistically it won’t last even close to that long if kept at the same power output. As the tube wears the input power needs to increase to keep the same output, and this means it wears faster and faster the more worn it gets. But if all one looks at is input power, then it more or less runs indefinitely, at steadily diminishing output power.)
But installing a new tube takes a good few hours and requires a bit of finess to align it, so if one values one’s own time at typical minimum wage of 14 $ an hour, then this alone adds 100 bucks with ease.
Then there is adjusting settings to get a decent counter sink in a given material, this both requires material and time. (this though matters less for larger batches.)
And as I have said before, a laser shouldn’t be left unattended. So unless one has something else to do in parallel (like countersinking holes with a drill) then one will just stand there doing more or less nothing. So we can add another 14 $ an hour here.
In the end, 3d engraving on a laser more realistically costs per hour:
15 cents for the tube. (I don’t recommend buying cheap tubes if one don’t intend on burning through it in a couple of months, since some cheap tubes leak…)
5+ cents for the installation of said tube.
1-6 cents for shipping.
1400 cents for the person overseeing it. (doing other work in parallel works, as long as a watchful eye can be kept on the laser.)
And then there is the initial setup costs to trim in the settings for the desired depth of the 3d feature.
(For laser cutting, one can more or less double the costs except the cost of the overseer since that cost isn’t based on tube life, and most CO2 lasers gets about 1K hours of “usable” life, even if they more or less only can engrave the last portion of their “usable” life.)
However, one might not value one’s own or an employees’ time at minimum wage. (and in regards to employees, then we also have to add other costs like insurance, taxes, etc… So 14 bucks an hour is likely unrealistically low.)
In short, countersinking by hand speeds up the process time, reduces tube wear and also effectively halves the most expensive cost. (though adding the costs of a drill and countersink bit to the equation.)
Hm, I must say all these cost discussions are surprising. Any hobby costs money and is – apart from the most important thing: “the learnings that come out of them” almost completely useless. Hobbies are generally not sold. However, if I calculate this the other way around and pay myself for the education I receive by doing this, I don’t think I’m at a loss here. Pay for the time or get paid for education. I think education wins. It’s worth every penny I invest as I learn more value along the way. Even if I fail! The learnings and experience I gain from this are worth far more than any laser tube could possibly cost to replace!
Maybe the thing to learn here is that an old fashioned countersink and drill are the ‘right tool for the job’.
You see a lot of 3d printing enthusiast vs. building things enthusiast discussions here. This is similar.
Don’t 3d print 2x4s! Even if you can con suckers into paying your filament bills, you’re still wasting your time.
Hmmm, I am confused. This isn’t a new thing right? I have been using this method for countersinks on 1/4″ MDF with a 75 watt Epilog for over 8 years. I could swear that I got the idea from a Hackaday article about 10 years ago (definitely not my own idea).
Nevertheless, well done for someone who hasn’t seen it before.
I like that you said that the laser function of the engraving process provides a functional point to obtain the ideal outcome of the project. My friend informed me yesterday that he and his friend are hoping to find a laser engraving service to do engraved informational signs for a clothing store. He asked if I had thoughts on the best option for choosing designs. I appreciate this helpful engraving article, I’ll tell him it will be much better if they consult a trusted laser engraving company as they can provide information about their services.