At Hackaday, we love those times when we get a chance to follow up on a project that we’ve already featured. Generally, it’s because the project has advanced in some significant way, which is always great to see. Sometimes, though, new details on the original project are available, and that’s where we find ourselves with [Scott Bez] and his haptic smart knob project.
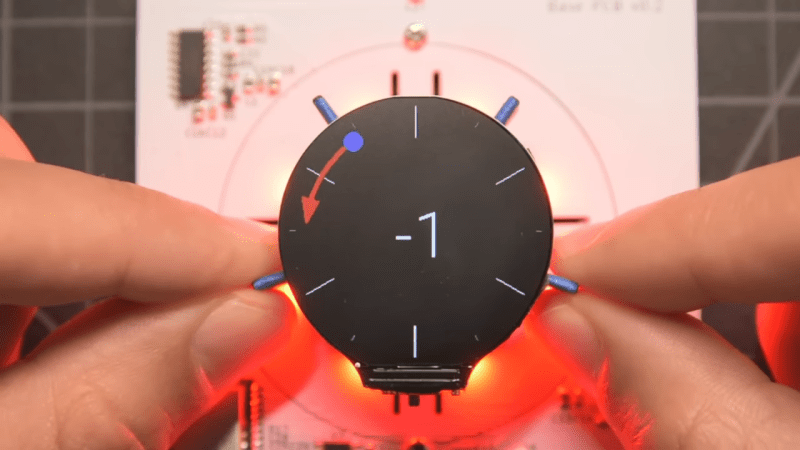
Alert readers may recall [Scott]’s announcement of this project back in March. It made quite a splash, with favorable comments and a general “Why didn’t I think of that?” vibe. And with good reason; the build quality is excellent, and the idea is simple yet powerful. By attaching a knob to the shaft of a brushless DC motor and mounting a small circular LCD screen in the middle, [Scott] came up with an input device that could be reprogrammed on the fly. The BLDC can provide virtual detents at any interval while generating haptic feedback for button pushes, and the LCD screen can provide user feedback.
But how is such a thing built? That’s the subject of the current video, which has a ton of neat design details and build insights. The big challenge for [Scott] was supporting the LCD screen in the middle of the knob while still allowing the knob — and the motor — to rotate. Part of the solution was, sadly, a hollow-shaft motor that was out of stock soon after he released this project; hopefully a suitable replacement will be available soon. Another neat feature is the way [Scott] built tiny strain gauges into the PCB itself, which pick up the knob presses that act as an input button. We also found the way button press haptics are provided by a quick jerk of the motor shaft very clever.
This is one of those projects that seems like a solution waiting for a problem, and something that you’d build just for the coolness factor. Hats off to [Scott] for following up a sweet build with equally juicy details.


I love overengineering !
Not just that but well documented as well!
Beautiful
I think I’d like that for a smart but not creepy (Liike Nest etc) thermostat knob.
Though I’m wondering if the design lends itself to adaption to retrofit a smart knob over the top of a dimmer or fan speed controller type shaft… wherein you can set it manually and use the motor to turn the knob to pre determined positions remotely or programmed. IDK if one could make it concentric on a regular D pot type shaft, or make a gear that holds the shaft driven off the base of the knob… you could make it to fit a standard switch plate format.
And for oneupmanship purposes, I am pondering a 5 axis knob with touch screen :-D … though that would really be a different class of knob for other kinds of functions, it would kinda be like a rotatable hat switch on top of a joystick in the axes involved.
I could swear I saw the same article with the same photo just a few days ago. I’ve gone back through the list, and I’ve used the search, but nothing. Spooky.
It was….en this is the link front the old article (deleted) https://hackaday.com/2022/06/23/an-in-depth-look-at-the-haptic-smart-knob/
Maybe just a glitch in the Matrix…
Me too. Relief that I am not going mad!
I’m also relieved. For a moment I thought the red pill wasn’t working.
Yeah, we dunno either. It got deleted, so we re-ran it. Sorry about that.
Wow, very nice design work. I would add a provision for the USB wire to go into the wall.
“haptic smart knob” sounds more like a marital aid than it probably should. 🤣
Haptic smart knob, pulses motor for sensory feedback, compliant mechanism for pushing your buttons, variable from single to multiple digits, full instructions supplied for do-it-yourself satisfaction.
nice, is possible adding ring for ‘setup’ setting some parameter? for example put key and move not put dont move ring
Very well done project.
Wire wrap wires are single strand, as opposed to multi strand thicker wires. I’m wondering if these will have a tendency to break over time.
Earbud wires are multi stranded, interleaved with thread to avoid this. Lots and lots of hobby makers wire up their project with single strand wires, then find that the wires break over time with use.
Not a criticism, as the project (and video) is very well done, but consider lifespan testing to see if this will be a future problem. (Probably not an issue for thermostat use, and as the author notes the motors are no longer available so it’s not an immediate issue.)
The wires don’t move, except with the very slight flexing when the knob is pushed. I don’t think it will be a problem.
Could the rare and exotic hollow shafted motor be avoided by building an internal gear into the knob and driving it with a smaller, standard motor mounted at a corner of the PC board? Idlers at the other corners could help hold the knob in position leaving the center of the PC board free for a conventionally mounted display. Seems like that might be an easier way to do this.
Certainly there are other approaches, but perhaps at the cost of extra parts and complexity.
It probably wouldn’t be too hard to convert a random outrunner motor into one with a hole through the middle. You’d just need to (1) remove the shaft, (2) drill out the outrunner part to handle a decently large bearing, (3) glue the bearing into the outrunner, (4) using a piece of pipe (or a 3D-printed part), make a bearing mount that attaches to the stator. Since this motor won’t be spinning at high speed, high precision milling isn’t needed.
1) I hope they make a ton of money off this.
2) I hope that Chinese companies make an ultra cheap clone of this so that it’s super easy and cost effective to use it in other projects.
Imagine having a mechanical switch with programmable haptic feedback, for keyboards. So you can easily switch from linear to a tactile switch with a push of a button!
That sounds like this project I am currently persuing: https://hackaday.io/project/184181
I almost didn’t follow up on this because there was only a Youtube link. But [Scott Bez] has hosted a very detailed writeup at https://github.com/scottbez1/smartknob/
The other good news is that those hollow-shaft motors are available again, thanks to SparkFun. Details on the github link.
If only all the other DIY projects were as well documented as this one! Mine sure aren’t. Great work [Scott Bez] and thanks for sharing!