Industrial machines have all kinds of moving parts that require regular lubrication in order to prevent wear and damage. Historically, these would require regular visits from maintenance personnel to keep them greased up and slippery. Automatic lubricators eliminate that job by regularly dosing machines with fresh grease, and [Big Clive] decided to see what makes them tick.

The simplest models merely use a spring to slowly force grease out over time. Changing the spring changes the rate at which grease is dispensed. Chemical versions exist too. A chemical pill is selected and inserted into a chamber with liquid, which releases gas over time. As gas is released, it creates pressure which forces a plunger down, dispensing grease over time.
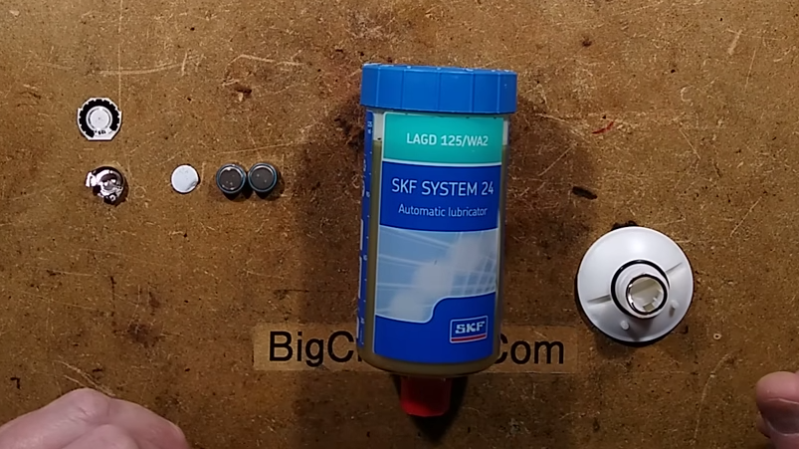
Perhaps the fanciest versions are the electronic models, however, which have a dial on the back for selecting the rate of grease delivery. Turning the dial changes a resistance that is connected across two zinc-air cells which are sealed. Apparently, when current is forced through these cells and they’re excluded from oxygen, the cells liberate hydrogen gas, according to a patent [Big Clive] found. This then forces down the plunger, dispensing the grease. Turning the dial changes the resistance, changing the rate at which grease is dispensed.
The quest for labor saving in industry has produced multiple designs of automated lubricator, all of which are fantastically simple and optimised for purpose. It shows just how much can be achieved with a few components and some creative thinking, where one’s first impulse might be to reach for a timer or microcontroller to do the job.
Lubrication is incredibly important – don’t forget it when building your CNC machines! Video after the break.
[Thanks to hackbyte for the tip!]


If you love it, lube it.
Greasing things is a very under-rated activity but it’ amazing the difference it makes to performance & reliability.
sooo true! I was really astonished when I learned that greasig high-end watches (especially grande complication) requires this-many types of oil of different visosity, tempeartue properties and so on. Seven, I guess?
“Sealed” bearings that are stiff, gritty feeling, loud, can be saved by flushing with WD-40 (wait for it, used as cleaner not lube) and then getting a ball inflator needle or turkey baster syringe and forcing moly high pressure grease into them. If the application warrants sealing against moisture, then the plastic shield that has probably cracked up necessitating this maintenance, can be bandaided with high temperature RTV smeared over it to seal.
This trick has got me a working circular saw I got for free 20 years ago seized up, and that I haven’t had to touch since, another 3 years out of an alternator (The transmission failed before it did) and one car I lubed the front bearings like this and the rear normally and it would coast “for days” after, and I swear I picked up 1mpg. Another one was the timing belt tensioner bearing on a vehicle, it went loud, took it out, replaced it with part store part, failed in 2 weeks, replaced it again, failed again in short time, replaced it with a hardware store off the shelf bearing of right type, lasted 3 months, got pissed off, cleaned/relubed bearing I took out the first time, reinstalled that, got 2 years 30,000 out of it before it got loud again, then found an industrial supply place with timken bearings that didn’t have $100 minimum order, and bought one there, and finally it seemed “fixed” as it went past the 2 year mark. Not too long after the car was retired for other reasons, so IDK if I’d have got the 120k or so service interval out of it, probably would.
If the timing belt tensioner was failing repeatedly within months that’s sign that you’re probably damaging it or otherwise not completing the repair procedure correctly.
every bit of this comment was taken out of context in my head… 🤣
What?!? No mention of the “Real McCoy” in the history of lubricators. Let me fix that: https://en.wikipedia.org/wiki/Elijah_McCoy
Home workshop? one of us, one of us, one of us.
Uh wouw! Thx for that link ;)
An interesting little device. Pretty fascinating. Thanks for posting this. I’d never have guessed this is how these worked. It makes me wonder how much pressure it’s capable of producing. Pretty amazing how the company managed to work out this method, let alone calibrate it.
I have a vague recollection of a similar method being used in some fifties or sixties military hardware, so maybe it could have come from that legwork.
This would be quite easy to DIY, just connect resistor to hearing aid batteries and put it in the other end of a syringe. Hardest part is putting gas tight endcap that can handle the pressure.
Gee, that’s so obvious that I’m surprised Big Clive didn’t do it already… oh wait.
https://www.youtube.com/watch?v=TNjPHkfk1-Q
This seems decidedly sketchy to me: it’s relying on the (self?) discharge characteristic of the batteries without the tab being removed which is something that the battery manufacturer is going to be working continually to improve. I’ve seen designers rely on comparable things working with semiconductors, and it invariably caused problems.
It would not surprise me if SKF had to test each batch of batteries and match it with a particular variable resistance wafer… which might explain why the wafer in the video is numbered.
No, the cells used are *specifically designed* for this use case. They’re not just grabbing random batteries off the shelf, they’re working with the manufacturers to produce devices to a well defined specification. Sure, the original prototype would have used commercially available zinc-air cells, but that’s not what you do in a high volume product that’s protecting extremely expensive equipment.
Besides, it’s not using self discharge, it’s explicitly shorting the cells when they’re blocked from an oxygen source. Battery voltage is characteristic to the chemistry, and the current is set by that and the resistance used. That drives a chemical reaction that will produce a fixed amount of hydrogen gas for a fixed amount of electrons passing through. About the only part of that which might vary between units is the exact resistance selected… but the generation is so slow and the lifetime is so long that an error of a month or two is irrelevant.